Saturday, February 28, 2009

Daring Bakers' Challenge: Chocolate Valentino and Ice Cream


What a truly delicious challenge we had for the Daring Bakers in February! The February 2009 challenge is hosted by Wendy of WMPE's blog and Dharm of Dad ~ Baker & Chef.
We have chosen a Chocolate Valentino cake by Chef Wan; a Vanilla Ice Cream recipe from Dharm and a Vanilla Ice Cream recipe from Wendy as the challenge.


I make a version of this delicious flourless chocolate cake that we call Chocolate Mousse Torte here at home. However, I rarely make ice cream for several reasons. For a family our size it's expensive, I don't have an ice cream maker and I really don't like to play the 'check and stir' game all day long. I did it for this challenge, though and decided on an apple dumpling ice cream made with vanilla ice cream studded with apples, cinnamon, sugar and pie dough squares. Yum!

Here are the recipes:

Chocolate Valentino
Preparation Time: 20 minutes
16 ounces (1 pound) (454 grams) of semisweet chocolate, roughly chopped
½ cup (1 stick) plus 2 tablespoons (146 grams total) of unsalted butter
5 large eggs separated

1. Put chocolate and butter in a heatproof bowl and set over a pan of simmering water (the bottom of the bowl should not touch the water) and melt, stirring often.
2. While your chocolate butter mixture is cooling. Butter your pan and line with a parchment circle then butter the parchment.
3. Separate the egg yolks from the egg whites and put into two medium/large bowls.
4. Whip the egg whites in a medium/large grease free bowl until stiff peaks are formed (do not over-whip or the cake will be dry).
5. With the same beater beat the egg yolks together.
6. Add the egg yolks to the cooled chocolate.
7. Fold in 1/3 of the egg whites into the chocolate mixture and follow with remaining 2/3rds. Fold until no white remains without deflating the batter. {link of folding demonstration}
8. Pour batter into prepared pan, the batter should fill the pan 3/4 of the way full, and bake at 375F/190C
9. Bake for 25 minutes until an instant read thermometer reads 140F/60C.
Note – If you do not have an instant read thermometer, the top of the cake will look similar to a brownie and a cake tester will appear wet.
10. Cool cake on a rack for 10 minutes then unmold.

Dharm's Ice Cream Recipe
Classic Vanilla Ice Cream
Preparation Time: 30 minutes

Recipe comes from the Ice Cream Book by Joanna Farrow and Sara Lewis (tested modifications and notes in parentheses by Dharm)

Ingredients
1 Vanilla Pod (or substitute with vanilla extract)
300ml / ½ pint / 1 ¼ cups Semi Skimmed Milk – in the U.S. this is 2% fat (or use fresh full fat milk that is pasteurised and homogenised {as opposed to canned or powdered}). Dharm used whole milk.
4 large egg yolks
75g / 3oz / 6 tbsp caster sugar {superfine sugar can be achieved in a food processor or use regular granulated sugar}
5ml / 1 tsp corn flour {cornstarch}
300ml / ½ pint / 1 ¼ cups Double Cream (48% butter fat) {in the U.S. heavy cream is 37% fat)
{you can easily increase your cream's fat content by heating 1/4 cup of heavy cream with 3 Tbs of butter until melted - cool to room temperature and add to the heavy cream as soon as whisk marks appear in the cream, in a slow steady stream, with the mixer on low speed. Raise speed and continue whipping the cream) or use heavy cream the difference will be in the creaminess of the ice cream.

1. Using a small knife slit the vanilla pod lengthways. Pour the milk into a heavy based saucepan, add the vanilla pod and bring to the boil. Remove from heat and leave for 15 minutes to allow the flavours to infuse
Lift the vanilla pod up. Holding it over the pan, scrape the black seeds out of the pod with a small knife so that they fall back into the milk. SET the vanilla pod aside and bring the milk back to the boil.
2. Whisk the egg yolks, sugar and corn-flour in a bowl until the mixture is thick and foamy. 3. Gradually pour in the hot milk, whisking constantly. Return the mixture to the pan and cook over a gentle hear, stirring all the time
4. When the custard thickens and is smooth, pour it back into the bowl. Cool it then chill.
5. By Hand: Whip the cream until it has thickened but still falls from a spoon. Fold it into the custard and pour into a plastic tub or similar freeze-proof container. Freeze for 6 hours or until firm enough to scoop, beating it twice (during the freezing process – to get smoother ice cream or else the ice cream will be icy and coarse)
By Using and Ice Cream Maker: Stir the cream into the custard and churn the mixture until thick (follow instructions on your ice cream maker)

Wendy's Ice Cream Recipe

Vanilla Philadelphia Style Recipe
Preparation Time: 5 minutes
2 cups (473 ml) of half and half (1 cup of heavy cream and 1 cup of whole, full fat milk)
1 cup (237 ml) heavy cream
2/3 (128 grams) cup sugar
Dash of salt
1 (12 grams) tablespoon of vanilla

Mix all ingredients together (we do this in a plastic pitcher and mix with an emulsifier hand blender-whisking works too).
Refrigerate for 30 minutes or longer
Mix in your ice cream maker as directed.


The cake turned out perfectly - I used a fluted tart pan and underbaked it slightly so that the center is closer to dense chocolate mousse than cake. Great challenge Dharm and Wendy - thanks!

Wednesday, February 25, 2009

Veggie Wednesday: Mandarin Orange and Cucumber Rice Salad with Orange Blossom Vinaigrette


Rice Salad
This is a dual-purpose recipe; it works perfectly for Veggie Wednesday and is my submission to the Royal Foodie Joust for this month. The ingredients this month were Satsuma (or any other orange citrus) - zest, fruit or juice, shallots and Edible Flowers. I couldn't find anything fresh (don't ever eat edible varieties if they are bought at the florist - check HERE for more tips) and there weren't any dried varieties I wanted to use, so I broke out one of my flower waters - orange blossom this time - and invented this rice salad.

It's very bright and fresh tasting - just like Spring!

Mandarin Orange and Cucumber Rice Salad with Orange Blossom Vinaigrette
Serves 6
Printable Recipe

Vinaigrette:

1 Tablespoon olive oil
2 Tablespoons orange blossom water
1 Tablespoon pomegranate vinegar (or other fruited vinegar)
1/2 cup liquid from canned mandarin oranges
1 shallot - minced
1/2 teaspoon salt


Salad:

2 cups water
1 cup rice
1 shallot - diced finely
1 Tablespoon vegetable oil
1 small cucumber, peeled, seeded and diced - about 1 cup
1 small can (11 ounces) mandarin orange segments

Combine vinaigrette ingredients, stir well and let stand in the refrigerator for one hour to blend flavors.

Heat a small saucepan over medium-high heat and add oil. Stir in shallot and rice. Stir well so that rice is well coated with oil. Add water, bring to a boil and reduce heat to low. Cover tightly and simmer for 15-20 minutes or until rice is tender. Remove from heat and cool completely. It's important to have the rice cool before adding the vinaigrette so that the rice will not absorb it all.

Toss orange segments and cucumber with vinaigrette and let stand - refrigerated - until rice is cool. When rice is fully cooled, combine with vinaigrette mixture and serve immediately.

Monday, February 23, 2009

More on Food Budgeting

I'm sure for anyone reading here often you've surmised that nearly every recipe posted is of the frugal variety. Other than the occasional recipe that contains an expensive ingredient or two, I stick to what I know: Feeding many for little.

It's no secret that much of what I cook is from scratch with as little processed junk as possible. A few of my favorite budget-minded recipes from the archives:

Homemade Toaster Tarts

Whole Wheat Bread with Honey

Corn Fritters with Black Bean Salsa

Hummus and Tomato Melt (using Hummus and Wheat Pita)

Tortilla EspaƱola

Veggie Fajitas with Homemade Whole Wheat Tortillas and Refried Beans

Linguine with Baby Spinach and Almonds

Creamed Peas and Carrots on Toast

Orange-Ginger Chicken Tabbouleh

Lebanese Zucchini

Sausage Sandwich Tart

Fried Green Tomatoes

Stacked Salad


Three Bean Salad

Apple Cake

Wacky Cake

Chicken Recipes

Similarly, nearly everything I've posted to Family.com has been in the frugal family, so take a look there, as well. I'm working in getting recipes tagged properly here so they are easier to search for, but with 3 1/2 years of recipes to sift through, it may take a little time.

Regardless what others may believe, feeding my large family for $150 a week doesn't make me an anomaly. On the contrary, it puts me in good company. I have several friends with larger families (and smaller families) who feed them well for a relatively small amount each week. Lucky for the rest of us, they also blog about it.

Here are several links to frugal family blogs to get you started:

Real Life Living : Not only does Annie share great frugal recipes and menu plans, she also lets you in on how her own family's debt reduction is going (and it's going well!).

Making Do with the Not-So-New : MJ shares leftover food ideas, but beyond that are all sorts of ways to make your money stretch and make-do with what you already have.

Caffey Family Adventures : I think Jaqueline may just trump us all by doing things like feeding 16 for breakfast, lunch and snacks and 6 for dinner on less than $97 a week!

Growlies for the Gang : Kim has a large family (14 in all!) and feeds everyone on budget without making them eat nothing but ramen noodles. Real food, real good, real cheap. Check out her sidebar titled, 'The Freezer' for some awesome menu plans.

Cornbread & Cookies : Ranae, another mom of seven shares her own great tips and recipes for the frugal kitchen.


More on Meal Planning and Budgeting
:

Budget Meal Planning
What's For Dinner?

Sunday, February 22, 2009

Sunday Dinner: BBQ-Fried Chicken

This photo is one of the little one's plates - I always cut the tenders from the chicken breasts as they are easier for tiny hands to grasp.

This week's Sunday Dinner is a combination of things my family loves. Declan (our 9 year-old son) could probably live on barbecue sauce; he puts it on almost everything. The rest of the family is crazy about fried chicken so I put the two together and it was a hit.

I was able to find boneless, skinless chicken breasts at Valley Farm this week for $1.99 a pound - hard to beat these days - and along with homemade breadcrumbs (I never, ever buy them) from a leftover French batard I had, this was quite the frugal dinner.

BBQ-Fried Chicken
Smashed Potatoes

Steamed Broccoli

Carrot Cupcakes


BBQ-Fried Chicken
Serves 4
Printable Recipe

The larger crumb on these makes them crunchier but can be harder to work with. Be sure to press the breadcrumbs onto the chicken well before frying.

4 boneless skinless chicken breast halves - pounded or cut to even thickness
1/2 cup barbecue sauce
2 cups large-crumb breadcrumbs
salt and pepper to taste
oil for frying

Coat each chicken breast in barbecue sauce and then in breadcrumbs - pressing onto spots that are not covered. Fry in hot oil until golden brown on both sides - about 5 minutes each side. Drain well on paper toweling.


Smashed Potatoes
Serves 4
Printable Recipe

8 white or gold new potatoes - washed well
salt and pepper
olive oil

Cook potatoes in boiling water until just tender - about 15 - 20 minutes. Grease a baking sheet with olive oil and place potatoes on sheet - several inches apart. Gently press down on each potato until they flatten slightly but do not fall apart. Salt and pepper well. Bake in a 350 degree F oven for 10 minutes - turn over with tongs being careful to hold each potato together. Bake for another 10 minutes until browned well.

Saturday, February 21, 2009

Baked Grits and Eggs with Cheese


I've been eating grits since I was very young - perhaps shortly after birth - I'd have to ask mom. My family is not from The South - Midwest actually - but there's such a strong Southern influence in and around where my mom grew up that I have a fairly good grasp of Southern food. That's a good thing because some of the finest food in the world was born in the rural south here in the U.S. and it's something I think every good cook needs to have in their repertoire.

Not only is Southern food hearty and full of flavor, it's also economical - which is also a good thing. When we were young my mom would often make grits, eggs and bacon for breakfast on weekends and there is nothing quite like those flavors blended together.

I like to change things up a little and add cheese or green onion to my grits, but the kids don't always like that, so I usually cook up grits with cheese or even just lots of butter for them. This dish is a couple of my favorites all in one.

Please don't use instant grits for this. If it's all you can get then I suppose it's OK, but the taste and texture of instant is so very different from the real deal that you'll be doing yourself a favor by buying long-cooking grits. Add crumbled bacon and green onion to the grits before baking if you like.

Baked Eggs and Grits with Cheese
Serves 4
Printable Recipe

4 servings grits
4 Tablespoons butter
1 teaspoon salt
4 whole eggs - room temperature
1/2 cup shredded or julienne cheese
oil or cooking spray

Heat oven to 350 degrees F.

Make 4 servings of grits according to package directions leaving out any cooking salt or butter. Once grits are done, add butter and salt and stir. Let stand for 5 minutes to thicken.
Coat an 8 inch diameter cast iron skillet or other heavy pan with oil or cooking spray and put pan into heated oven for 5 minutes.
Remove pan from oven and pour grits into pan. Make 4 indentations in grits and drop one egg into each indentation.
Sprinkle with cheese and bake for 20 minutes or until egg whites are set and yolks are still loose.
Serve hot.

Finished grits in a cast iron pan


Eggs set on the grits


Cheese topped grits and eggs


Tuesday, February 17, 2009

Homemade Hummus and Wheat Pita

Hummus and whole wheat pita is one of my very favorite things. In fact, I joke with my son Ian that he's 'half hummus and pita' because I ate it so often when I was pregnant with him. I used to pay big money to get good hummus and pita and then I started making my own. Not only did it taste better, but it's so much cheaper that I don't buy the pre-made stuff any longer. I paid less than $5 for both the pita and hummus - a far sight less than when I bought it at the grocery.

It's also a lot easier than you may think. Here are the recipes I use most often.

Hummus
Makes 2 cups
Printable Recipe

2 cups cooked and drained garbanzo beans (chickpeas)
1/2 cup tahini - sesame paste
1 teaspoon minced garlic
1 teaspoon salt
juice of 1 lemon

Toss everything into a blender and pulse until smooth. For this one I added in a cup of diced red pepper. You can add in other veggies, etc. just make sure to balance out the liquid so the hummus isn't too thin.

Cooked chickpeas


Lemon, garlic, tahini and salt


Red pepper


Red Pepper Hummus


Homemade wheat pita

Wheat Pita
Makes 12
Printable Recipe

2 1/2 cups warm water
1 packet active dry yeast
1 tablespoon honey
2 cups whole wheat flour
3 cups white flour
1 teaspoon salt
1 teaspoon olive oil

Stir flours together with salt and set aside. Add yeast to 1 cup of warm water and stir until dissolved. Mix in 1/2 cup of flours and let stand until bubbly.

Make a well in the center of the flours and pour in the yeast mixture. Start mixing together and add the remaining warm water. Stir well until combined and knead for 5-10 minutes or until dough is smooth and elastic.

Coat a bowl with the oil and add the dough - turning over once to coat both sides with oil. Cover with a towel and let rise in a warm spot until doubled in bulk.

Preheat oven to 500 degrees F and place a cookie sheet into the oven to heat as well.

Punch down dough and divide into 12 equal pieces. On a well-floured surface, roll each piece of dough into a 6 inch circle. Let stand for 10 minutes. Taking turns, place each pita onto the preheated cookie sheet and bake for 4-5 minutes. Turn over once and continue baking until the pita puffs up. Remove from oven and push down gently with a wooden spoon to flatten out. Continue until each pita is baked. Let cool and store in plastic bags.

Saturday, February 14, 2009

The Lehigh Valley Food Co-Op Update!

From the most recent Lehigh Valley Food Co-Op e-mail:

We are very pleased to be opening our Virtual Farmers' Market with Coop Store very shortly. We will commence our first ordering cycle starting Feb 17th. It will run until March 16th with delivery on March 19th if everything goes as planned. We need your help with ideas on what types of Bulk, Personal Care, Household care, and Produce items that your family usually buys to run your household. Keep in mind the brands you prefer. We will compile the list for easy ordering via our website. Please respond promptly.

Come to the Macungie Fire Company on Feb 17th from 7-9pm for the Launching of the website, check out the facilities and meet some producers! Address is 31 S. Walnut St. in Macungie, PA 18062 - RSVP to the e-mail or 610-965-6198.

Membership work hour shifts are in need of being filled for weekly Thursday Delivery. Now is your time to help!

Wednesday will be a 2 hr shift for bulk break down - We need 4 people for this. Times will be approx. 12-2pm?? TBA

Thursday Distribution Day 2-3 hour shifts available starting at 11pm and ending at 9:00pm depending at which site you choose to work.

Here are the drop-off sites:

  • Macungie site- 3hr shifts 11-2pm - at least 5 people needed

  • Macungie site - 2-8pm - 8 people needed

  • Unity Church in Emmaus (3rd st)- 3:30-5:30- 2people needed

  • Swain School, 31st St Allentown - 3:30-6:00 - 2 people needed

  • St Lukes UCC Church 417 7th St Allentown - 4:00-6:00 2 people needed

  • South Bethlehem site (TBA)- 4:30-6:30 - 2 people needed

  • Nurture Nature Org, 518 Northampton St Easton .5:00-7:00 - Truck driver and helper will work at this site

Other sites - (TBA) eventually we will have other sites (Coopersburg, Fogelsville, etc ) as membership increases, in the meantime, we are looking for members to take turns picking up multiple family orders in their areas they live and bringing it back to their homes for pick-up. The times can be scheduled by individual members for these neighborhood sites - food credits will be allotted.

Restaurant and Home/Business Delivery Service - TBA call 610-965-6198 for information

We look forward to being able to compensate all member worker volunteers with Co-op food dollar credits for volunteering for the Co-op.
Jobs in need:

Distribution Day Sorters - Workers need to receive the orders from the producers at the Macungie Site and place them in the customer boxes and coolers according to customer name and drop-off site.

Truck Driver - This shift starts at approx 2pm and ends approx 9pm. CDL preferred. Will be required to drive to the sights above and help unload the truck to the drop-off sites. Please contact 610-965-6198 if you are interested in this position. Will be required to work at the last drop-off site until approx 7:30pm to then go back through the sites for a empty cooler pickup. Shift ends at the Macungie Fire Company where coolers will be stored.

Drop-off site workers- We need members to volunteer time slots at the above sites.
As we evolve there will be volunteer hours need for office work, newsletter, membership, anyway you can think of helping, etc. stay tuned. Members have the ability to bank hours eventually as our membership increases.

Let us know what times look good for you.

Thanks,

Board of Directors
LVFoodcoop
610-965-6198

Thursday, February 12, 2009

Balasia's Valentine's Day Dinner and News

If you're a vegan, vegetarian or anyone who enjoys great vegetarian food, the place to be this Valentine's Day is Balasia in Emmaus.

Here is the fixed-price dinner-for-two menu available for Valentine's Day:

Valentines Day Dinner - Saturday, February 14th

Prixe Fixe $125

Dinner for Two Will Include:

Soup
Salad
Entree
Balasian Cocktail
hot tea, teeccino, or organic coffee
Vegan Treats dessert and surprise gift

Contact 484-330-6405 or balasia-world@hotmail.com for reservations and further information.

Get there NOW before time runs out! The news of the day for Balasia is as follows:

*Balasia will be on a brief hiatus beginning shortly after Valentine's Day. Our secret new location will be disclosed within the next year. Make your reservations now to experience the unique culinary adventure that IS Balasia! Call for details 484-330-6405*

Tuesday, February 10, 2009

Wacky Cake: Frugal, Vegan ... Delicious


Wacky Cake


Long ago and far away when I was young my brothers and I had the good fortune of being nourished by wonderfully talented cooks: our mother, our step-mother and our grandmothers. All four went above and beyond the call of duty by making sure that we were not only getting decent nutrition, but that we enjoyed all that we ate.

When they weren't feeding us food that kept us healthy, they were doing very bad things, like feeding us too much Wacky Cake. Now, remember, in the 70's vegetarianism was just taking hold here in the U.S. and moms and grandmoms were still of the 'June Cleaver' variety; that meant dessert every night. Having been products of the Depression and World War II eras or, in the case of our mom and step-mom, having been fed by someone who was the product of the Depression and World War II eras, one of the more popular cakes to make was Wacky Cake.

Prepared in one pan without eggs, milk or butter, it was not only fast, but thrifty and filled the dessert slot as well as any time consuming 3-layer chocolate cake could. The origins of this are very unclear. There are thoughts that it sprung from rationing days when eggs and butter were scarce, but in all of the literature I've come across from that time, there is no mention of using vinegar and baking soda to leaven a cake. I'm sure it came about around that time, though, as other evidence points to it, but the earliest writings I've found in my own cookbook cache is in a cookbook dated 1956.

Whenever it was born, it's something I turn to again and again for several reasons. It's cheap (about $2 without icing not over $3 with), it's easy, it's fast and everyone loves it. No child ever had a clue that their cake was made from what seemed like a basic salad dressing. No, we saw moist and dark chocolate cake covered in white frosting and didn't care what it was made from. My own kids are the same. I think they each took turns looking a bit perplexed the first time they caught me making it, but they soon forgot what went on behind the scenes once the cake was in front of them.

This is the version I use, so often that I don't refer to a written recipe in fact, and the icing that follows is also the one I use most and a variation for anyone who would like a little something different.

This cake was originally meant to be baked in a 9x9 square pan, but we've since outgrown that. In other words, you can cut this in half just fine and still have a delicious cake. The sugar seems a bit hefty, but the price you pay for cutting back - a dry cake - isn't worth it to me. This is one of the moistest cakes ever and the sugar is the reason for that.

Wacky Cake
Serves 12
Printable Recipe

3 cups flour
2 cups sugar
1/2 cup cocoa
2 teaspoons baking soda
1 teaspoon salt
2 teaspoons vanilla
2 Tablespoons vinegar
3/4 cup oil
2 cups water

Mix flour, sugar, cocoa, baking soda and salt in a 9x13 pan.
Make three holes in the flour mixture.
In one put vanilla; in another the vinegar, and in the third the oil.
Pour water over all and stir well.
Bake at 350 degrees F until it springs back to the touch or a toothpick inserted near the center comes out clean - about 25 minutes.

Icing

1 stick margarine
1 teaspoon vanilla
1/4 cup milk
powdered sugar

Melt margarine and add vanilla and milk. Add powdered sugar until desired consistency - loose but spreadable. This thickens as it cools.

**As a variation, I add a teaspoon of ground cinnamon to the flour mixture and add a cinnamon chocolate buttercream icing to the top.

Cinnamon Chocolate Buttercream

1 cup butter - softened
1/2 cup cocoa powder
1 teaspoon vanilla extract
1 teaspoon ground cinnamon
Powdered sugar - about 4 to 4 1/2 cups
Milk as needed

Cream butter until fluffy and add vanilla and cinnamon. Add cocoa and mix well. Add powdered sugar and milk until icing forms and is thick and spreadable.

Monday, February 09, 2009

Bonefish Grill for Valentine's Day

Looking for a little extra this Valentine's Day? Head on over to Bonefish Grill for your celebratory sweetheart meal and you'll receive "a complimentary 1.2 oz Lindt Excellence 70% Cocoa bar at the end of (the) meal. Additionally, a tasting card outlining the Lindt Master Chocolatier’s “Five Senses of Chocolate Tasting” process will be provided to highlight the optimal way to identify and enjoy premium chocolate."

Valentine's Day hails as the day when more chocolate is purchased and given than on any other day of the year. Why not get a fabulous meal to go with that chocolate? Bonefish Grill and Lindt & Sprungli, master Swiss chocolatiers, are teaming up for this one-time event, so don't miss it! Check out the store locator at the Bonefish Grill website and find the menu for your location so you can plan your night.

Thursday, February 05, 2009

The Other Fish


In the realm of 'Things Anne Has Not Yet Tried' not only was there authentic chow mein, there was also sushi. I, like many others, couldn't get past the idea of eating raw fish. It didn't matter that I had eaten raw ground beef as a child, there was something about raw fish that just didn't seem right. There were also the many warnings about parasites and bacteria and food borne illnesses to think about. My own daughters had sushi far before I had and told me how they would never eat sushi again (never mind that it was a stomach virus that made them sick, not the sushi). So, I had set myself against it. Maybe I would eat a California roll, but even then, how often did I frequent establishments that served sushi of any form, even the cooked variety?

Along comes my brother Bobby. He has been eating sushi for 20 years at least 2 times a week. To say he is addicted would be putting it mildly; he may also be pushing the boundaries of 'guilty pleasure' at this point. Nevertheless, he wrote a blog post about his love of sushi and I mentioned that we would have to go out and have some soon. That soon turned out to be the moment I mentioned it.

So, in a very non-typical for me fashion, I told dear hubby that I was going out -alone- to meet my brother and have sushi at a highly recommended local spot, The Other Fish. I figured that going with Bobby for my first sushi venture would be the smartest thing I could do; sort of like taking a food critic along to an opening of a new restaurant. He is so well informed about sushi that he often captures the attention of the sushi chef who finds himself unable to resist wanting to make something special for Bobby. I can understand that completely - when someone who really loves food comes along, I want to feed them until they're sated and happy.

I don't have a huge history of The Other Fish, but I do know they were first located on the South Side of Bethlehem where they were known as The Dancing Fish and both the staff and clientele have remained largely unchanged. Jay is still the Master Sushi Chef (billed as the only Japanese Master Sushi Chef in the Valley) and he's still cranking out some of the best sushi in the Valley. How do I know this? My brother said so. But Bobby isn't the only barometer for how great the food is at The Other Fish, just check out their Facebook page and you'll come across some very devoted fans. The love for this small hole-in-the-wall spot is near cult-like and understandably so.

The restaurant is small - cramped even - but that's part of the ambiance. I'm not one for austere and pristine settings where everything matches and it all looks as though it were steam-cleaned before being lacquered over and shrink-wrapped. I like the funky eclectic look they have going on, but once you start eating everything else takes a backseat to the food.

We had quite a plateful of sushi - Bobby ordered for us both, at my insistence, and explained each different type of sushi in detail. We started with the traditional miso soup which I've had many times and it was perfect - especially on such a cold evening. Then came the sushi; nigiri and maki which were tuna, salmon, fluke and one of Bobby's favorites and something he almost always has to order special, Tobiko with quail egg. He told me that many times he requests the quail egg and as many times is told that it's not available, so he was very pleased that they were able to grant his wish.

I have to admit that I stared at that quail egg and balked at the thought of eating it, feeling a little like Andrew Zimmern at that moment, but I gave in and was immediately hit with an understanding as to why Bobby liked it so much. We had red snapper with ponzu, the shrimp tempura roll and a specialty roll, the Tracy Roll: crunchy spicy scallops and tobiko. Bobby liked that so much that he ordered another and asked Jay to add avocado to the top which was fabulous. Bobby was really pleased with that, and so was I.

Bobby knows several Japanese words and is able to let the chef know that he has enjoyed his sushi. The chefs generally appreciate this and let Bobby know with extras like special pieces of sushi. Jay made one such piece of sushi for Bobby that had what he called 'a sort of squid salad' topped with a quail egg. Another thing that Jay whipped up for us and a trio next to us at the bar was fried salmon skin with a hot sauce that was so good we hated to leave any behind. It was superb.

Needless to say, I enjoyed myself very much and Bobby did as well. For a first-time sushi eater, it was the perfect spot to go; there was no chance of getting anything that wasn't perfection.

Check out The Other Fish at their page on Dine Indie or their Facebook page, where you can become a fan ... just like I did.

The Other Fish
59 E Broad Street
Bethlehem, PA 18018
484-821-1370

Hours:
Mon - Thurs: 11:30 am - 2:00 pm
5:00 pm - 10:00 pm
Fri: 11:30 am - 2:00 pm
5:00 pm - 11:00 pm
Sat: 5:00 pm - 11:00 pm

Wednesday, February 04, 2009

Cooking with Anne in the News

Cooking with Anne, and more specifically, Short Order Mom, are in the local newspaper today! Read up about it at The Morning Call (permalink HERE).

While this is exciting news, please remember to check out my other post (below) today about the Wildflower Cafe. Thanks!

*Note: The above links are no longer functional and will only take you to the Morning Call website - where the article doesn't seem to be archived. Here is a copy still up at The Seattle Times: http://seattletimes.nwsource.com/html/foodwine/2008741608_zfoo12shortordermom.html

and one at The Philadelphia Inquirer: http://www.philly.com/philly/restaurants/39446282.html

Veggie Wednesday: Wildflower Cafe

If you are a vegetarian or vegan (or anybody who enjoys good food, for that matter) living in the Lehigh Valley and surrounding areas, here's a weekly event you won't want to miss:

Wildflower Cafe, at 316 South New Street between 3rd and 4th Streets in Bethlehem, is having a $5, all-you-can-eat vegan pancake breakfast every Sunday from 10 AM to 2 PM. We make each batch unique with different ingredients, and genuinely enjoy serving the community in this way. We hope you will come and join us ; we'd love to see you!

Good for the environment and the economy! Sadly, I haven't been in yet at all, but I hope to be able to check it out soon and bring you lots more info on this great little spot on the South Side of Bethlehem. They are also a part of the listing of vegan and vegetarian restaurants in and around the Lehigh Valley.

Tuesday, February 03, 2009

Cinnamon Chocolate Chip Muffins


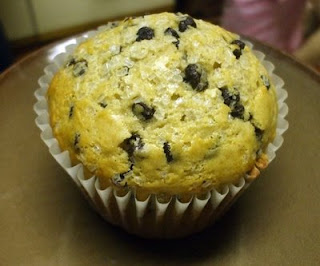
Walking through the grocery today with my daughter, Megan she picked up a mammoth muffin and pointed to the top, "Look, see that sparkly sugar on top? Why don't you make muffins like this, woman?" Yes, she calls me 'woman' and points to the fact that Jesus also called his mother 'woman' as her reasoning for doing this and not being disrespectful. Right.

Anyway, I can make muffins like that, I just don't because I like to limit sugar consumption here to what is in food without making it worse by putting sugar on the food as well. I caved and made them for her. This combines two of my favorites - chocolate and cinnamon.

Cinnamon Chocolate Chip Muffins
Makes 12 large muffins
Printable Recipe

3 cups flour
1/2 cup white sugar
1/2 cup packed brown sugar
1 tablespoon baking powder
1/2 teaspoon salt
1 teaspoon ground cinnamon
1 1/2 cups milk
1 teaspoon vanilla extract
2 eggs - beaten
1/2 cup oil or melted butter (I like olive oil for baking)
1 12 ounce package mini chocolate chips
large grained sugar - I use Wilton's White Sparkling Sugar

Preheat oven to 350 degrees F and line 12 large (a.k.a. mammoth) muffin tins with muffin liners. Stir together dry ingredients and make a well in the center. Blend milk, eggs, butter or oil and vanilla together and pour into well. Mix batter thoroughly and fold in chocolate chips until evenly distributed throughout batter.

Divide batter evenly between muffin tins and top each with sugar. Bake until tops spring back when touched lightly - about 20-25 minutes.