Saturday, June 30, 2012

A Very Veggie Garden


Every year for a very long time now, I've grown a garden behind my house. No matter where I lived there was something there that I was tending. Flowers, vegetables, fruit or herbs, I was out in the sun each morning checking on seedlings or pruning and weeding larger plants. I didn't always have a bumper crop, but I always had something to tend to. 


Tiny little zucchini.

Now that I've moved (and last year was close to the end of the growing season and I had to leave my garden behind) the yard is not so big and quite weedy. I also haven't had the time to devote to a full garden. I did have a large seed tray filled with plants, but when the time came to plant (and I was in the middle of that) my mother needed me to help during a brief illness and the planting window opened and closed quickly.

Tomato flowers ... soon-to-be-tomatoes!

No matter, there's no way I wouldn't have something growing, and I did get zucchini, green beans and tomatoes in the ground. The green bean leaves were eaten by the cutest bunny ever, so they were doomed from the start. Sad to me, because it's the one thing I've always been able to grow without issue.

A whole lotta mint!

The zucchini are starting and the tomatoes just now blooming. I'm happy with that. I lost some herbs to the recent heat, as well, but learning the new sun location has taken me a little time and if I'm here next year, I'll know better. I also have a bumper crop of wild mint and purslane is creeping everywhere! If you don't know about purslane, please do have a look here for more information - it's not just a weed!

Purslane creeping across the concrete walk.

Over the years, though, I've grown many things and I always had a little companion with me to check growth, pull weeds and harvest when the time was right. My kids love to get into the dirt (sometimes in a not-so-helpful way) and pick vegetables from the garden. And, because of their love for gardening, they also love to eat veggies.

Purslane closeup.

It's not really so hard to get kids to eat their veggies when you involve them from the ground up. They're proud of their accomplishment and really want to see if what they grew tastes like what they've only seen on shelves at the store.

This is in line with Country Crock's message that vegetables are delicious and shouldn't be hidden. I believe the same. Hiding veggies in recipes by pureeing or overcooking not only takes much of the nutritional value away, but doesn't really teach children to enjoy vegetables, setting them up for a lifetime of issues. They won't always have someone who will be willing to hide their veggies for them.

Make veggies the star - have a veggie tasting party with your kids - let kids take turns picking out vegetables at the store for meal time, or do what we do - Grow Your Own! Even if you don't have a yard, many vegetables can be grown in containers and kids love to watch things grow. Give it a try and see if you don't have not only budding gardeners on your hands, but veggie lovers, as well.

Before you go, check out The Country Crock Chronicle for more veggie tips and recipes!

*Disclosure: My posts for Country Crock are sponsored, compensated and/or reimbursed by Country Crock and Unilever. As such, all content and opinions are required to be honest and belonging wholly to myself.

Tuesday, June 12, 2012

Hello!

I sometimes wonder if being on camera comes natural to everyone in the world but me. I get nervous and tongue-tied and my eyes wander everywhere but the camera. I sat down today and after 8 tries have a short intro video (with a guest!). If we've never met in person you get a tiny glimpse of what I'm like in real life. 

I'm hoping to get rid of my fears and actually make a cooking video some day soon. No, I'll never be on The Next Food Network Star, but I do hope to at least connect a little better with my readers.

Alright Mr. Demille, I'm ready for my close-up...


Monday, June 11, 2012

No-Bake Vanilla Snowballs


No-Bake Vanilla Snowballs


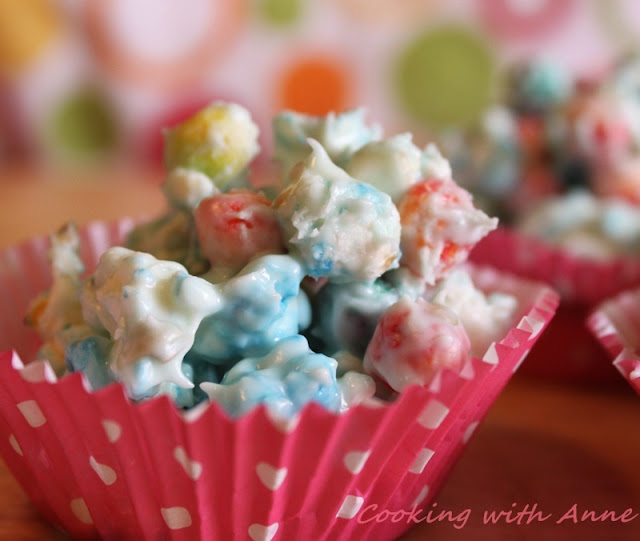
Taken directly from my post at Family.com for No-Bake Vanilla Snowballs, these are easier and cuter than ever thanks to Pop-Secret's Magic Colors microwave popcorn. A pretty blue hue adds just the right touch. These are perfect for parties, bake sales or after-school snacks. 


Beauty and the Snowball

Regular popcorn is just as good and any colored cereal can be used. This time I went with Trix because it's such a vibrant contrast to the blue popcorn. Experiment and see what you can come up with!


No-Bake Vanilla Snowballs
Printable Recipe

Ingredients:

One 12 ounce package white chocolate chips or white coating
4 cups popped popcorn
2 cups fruit flavored O's cereal

Directions:

Melt chips or coating until smooth.
Pop popcorn according to directions and place in a large bowl. Shake well to get all the unpopped kernels to the bottom. Measure out 4 cups.
Measure cereal and mix with popcorn.
Blend together with melted chocolate until coated well.
Measure into cupcake liners with a 1/3 cup measure. Grease hands and pat cereal together where needed. 
Let cool for 30 to 45 minutes or until hardened.


Monday, June 04, 2012

Pull-Apart Oven Sandwich

Who doesn't love ham and cheese? It's even better when it's heated. This has much of the same flavors as the Baked Ham and Cheese Sandwiches I've made before, but with a different presentation for a little more "wow" factor at the table.

Here's the deal with these; any meat or cheese works and you can use just mustard or honey mustard on the insides and you don't really need any on the outside of the loaf. Any way you slice it, it's delicious.


 Start with a loaf of Italian bread.


 Cut 13 times to make 6 sandwiches (12 slices of bread) and two ends. Don't cut all the way through to the bottom of the bread. It's a must to let the bread stand for 30 minutes once cut if you'll be spreading the insides with the margarine mixture.


 Put bread onto tin foil. Spread margarine mixture on the inside edges of each sandwich. Don't spread on what will be the outsides of each sandwich or you'll have a mess!


 This is the spread in the center of 6 sandwiches - each labeled so you can see easier how to cut. Use 2/3 of the spread for this part.


 Put ham and cheese in between slices of bread spread with margarine mixture. This makes 6 sandwiches with two ends left to the bread.


 Cover the outside of the sandwich with the remaining 1/3 of spread.


 Wrapped and ready for the oven. Bake for 25 minutes in a 350 degree oven.


 The finished sandwich.


 Individual sandwiches.


Pull-Apart Oven Sandwich
Printable Recipe

1 loaf Italian bread - unsliced
1/2 cup margarine spread (like Country Crock) or softened butter
2 Tablespoons brown mustard
1 Tablespoon honey
1/2 pound sliced ham
6 slices Provolone cheese

1. Make 13 even slices into bread, but do not cut all the way through to the bottom. This should make 14 slices of bread - 12 even and 2 larger ends. (See photo) Let bread stand for half an hour to dry out the slices slightly.
2. Mix margarine, honey and mustard together until well blended. Spread into the center of bread slices, leaving spaces between sandwiches. Spread on the insides only, where you will place the ham and cheese.
3. Put ham and cheese in between slices that were spread with margarine mixture.
4. Wrap entire loaf in tin foil and put into 350 degree oven for 25 minutes. Let stand for 10 minutes before unwrapping and serving.


Sunday, June 03, 2012

Sunshine Bread

Sunshine Bread. Instructions below.

A long, long time ago (somewhere around 1990) I started getting recipe cards in the mail. You know, the free box to hold them in with 10 or so cards coming at a time. The set was called "My Great Recipes" and though I paid on time all the time, one day they just stopped coming. This was well before the internet and I never did find a phone number in any of the paperwork that came, so I resigned myself to having the cards I did have and let it be.

I did love those cards. In fact, I still have them. One recipe that caught my eye was "Maple Sunburst Coffee Cake". I believe I made it once and, not being a huge maple fan, I didn't make it again. My kids are big cinnamon roll fans, though so I took my standard cinnamon roll recipe and rolled it out differently.

Two circles of dough with butter and cinnamon/sugar in the center, cut into "rays" which are then twisted and there you have it. A pretty and tasty new way to serve up the usual cinnamon roll!

If you want it to be really sun-shiny, add some grated orange zest to the dough and top with an orange and powdered sugar glaze. Either way is just as yummy.

I won't give you a recipe for cinnamon rolls - there are so many out there already, but I will show you how to roll it and what to do with the filling.

 Half of the cinnamon roll dough. You need two balls of dough.


 Dough rolled to 12-inches in diameter. (Mine was 18-inches because I'd made a huge batch of dough.) Roll two.


The two dough circles with cinnamon/sugar/butter in between. This is a special pan I usually use for pizza. I'd tell you what it really is, but then I'd have to ... well, you know. Use parchment paper to make it easier to move the bread once it's baked.


 Place a small bowl, 3-inches in diameter, in the center of the dough to help guide you in cutting the "rays". (Again, my dough was 18-inches so the bowl was 4-inches in diameter.)


 The cuts shown from the center. When making a 12-inch diameter "sun" should be 1-inch apart on the outside edge. The center will be far closer together than shown. Use a very sharp knife to make the cuts or the dough will stick when you try to lift it to twist.


 Twisted. Take each "ray" and twist three times. Once all "rays" are twisted, let rise again until doubled in bulk. Brush an egg wash onto the bread to make it look nicer when finished baking.


 Bake according to recipe directions, checking after 20 minutes, and remove once the bread is golden brown. Wait for 10 minutes before moving the bread to another surface for serving. You can also keep it on the pan it baked on. In my house it rarely makes it off the baking pan.


 The center of the sun. 


 The finished bread.