Wednesday, December 22, 2010

Lucky Leaf Pot-A-Cakes


I admit to being a baker who uses canned pie filling. It's not anything I'm ashamed of, on the contrary, I think it makes me a smarter baker. While fresh cherry pie is lovely, pitting cherries is not, and while fresh blueberries are the bomb, some days I just need them ready to go. I will admit that using apple pie filling from a can is something you'll almost never see me do, but I've slipped there on occasion, too.

Lucky Leaf recently sent along a few recipes for me to try along with cans of their pie fillings to make them with. The first was a clear winner in our house. Lucky Leaf Pot-A-Cakes was the Grand-Prize Winner of the Lucky Leaf Blue Ribbon Recipe challenge, submitted by Gloria Herdman of Pomeroy, Ohio. A combination of streusel bread, blueberry pie filling and cheesecake, they were absolutely yummy.

Pot-A-Cakes

Ingredients

1 21-ounce can LUCKY LEAF ® Premium Blueberry Pie Filling
1 8-ounce package cream cheese, softened
1 4-serving size package (3.4 ounces) French vanilla instant pudding mix
1 1/3 cups whipping cream
1 17.4- to 18.3-ounce package cinnamon streusel quick bread mix
2/3 cup water
2 eggs
2 tablespoons vegetable oil

Preparation

1. Preheat oven to 350°F. Divide pie filling among eight 10-ounce custard cups or ramekins (for one dish recipe see below). Set cups on a large baking sheet; set aside.
2. In a large bowl beat cream cheese with an electric mixer on medium speed until smooth. Beat in pudding mix. Gradually beat in whipping cream until well combined (mixture will be thick). Spoon evenly over pie filling in cups.
3. In another large bowl combine quick bread mix, water, eggs, and oil. Stir until combined but slightly lumpy. Spoon 1/4 cup of the batter over the cream cheese mixture in each cup. Sprinkle evenly with all but 1/4 cup of the packaged streusel mixture. Spoon remaining batter over the streusel (batter won't cover the streusel layer). Sprinkle with reserved streusel. (Note: Cups will be full.)
4. Bake for 25 to 30 minutes or until tops are golden brown and a toothpick inserted into top portion comes out clean. Cool slightly. If desired, drizzle tops of cakes with icing* before serving. Serve warm.

*Icing: If your quick bread does not contain an icing packet, in a small bowl combine 3/4 cup powdered sugar, 2 teaspoons milk, and 1/4 teaspoon vanilla. If necessary, stir in additional milk, 1 teaspoon at a time, to make drizzling consistency.

One Dish Method: Prepare batters as above. Spread pie filling in a 3-quart rectangular baking dish. Dollop pudding mixture atop. Spoon on about 1/2 of the batter and sprinkle with all but 1/4 cup of the streusel. Spoon on remaining batter and sprinkle with reserved streusel. Bake in a 350°F for 40 minutes. Cool slightly and drizzle with icing.

Servings: 8

Cooking Time: 25 minutes


Lucky Leaf products provided free of charge. This post and resulting opinions are my own and have not be influenced by free product.

Monday, December 20, 2010

Sweet Potato Pound Cake with Dulce de Leche

Sweet Potato Pound Cake with Dulce de Leche
Leftovers are a fact of life, especially during the holidays. I'm a straight-up kind of girl when it comes to them so it's rare that I make anything different from a leftover holiday food. This cake, though, is something I'd make extra sweet potatoes for any day.

When this was done, still warm from the oven and topped with thick dulce de leche, the result was something that can really only be described as foodgasmic. There were no words for just how good that cake was. I made it again with the same delicious results and expect it to stand the test of time here.


Sweet Potato Pound Cake with Dulce de Leche
Serves: 12
Printable Recipe

Ingredients:

2 cups leftover mashed sweet potatoes
1 cup unsalted butter - softened
4 large eggs
1 teaspoon vanilla extract
1 cup granulated sugar
1 cup unpacked light brown sugar
3 1/4 cups all-purpose flour
1/4 cup milk
2 teaspoons baking powder
1/2 teaspoon baking soda
1/2 teaspoon salt
2 teaspoons pumpkin pie spice
2 cups prepared dulce de leche

1. Preheat oven to 350 degrees F. Grease a 12-cup bundt pan and set aside.
2. Mix together butter and sugars until light and fluffy. Add sweet potatoes, vanilla, eggs and milk and stir until smooth.
3. Combine flour, baking soda, baking powder, salt and pumpkin pie spice and add to wet ingredients slowly. Batter will be thick.
4. Spoon batter into prepared pan and bake for 55 to 60 minutes or until a toothpick inserted near the center comes out clean.
5. Cool for 10 minutes and invert onto a clean serving platter.
6. Heat dulce de leche until smooth and warm and serve over slices of cake.

*Notes: If you don't have pumpkin pie spice on-hand you can use 1 teaspoon ground cinnamon, 1/2 teaspoon ground ginger and 1/4 teaspoon each ground nutmeg and cloves.


Saturday, December 18, 2010

Timpano

Have you ever seen Stanley Tucci and Tony Shalhoub in Big Night? If not, and you are anywhere near a serious foodie, or even just a fan of either actor, you must watch it. The story is that of 3 brothers who own a flailing restaurant and are in need of financial assistance. Their search for funding leads them to believe they will be serving a famous musician at their restaurant and they plan a 'big night' with an even bigger meal for the musician and the friends they've invited.

The pièce de résistance of the huge meal is Timpano. Watch here:


I scoured the web and found Stanley Tucci's mama's recipe for Timpano and tackled it over three day's time. It was just as good as the guests in the clip make it out to be. I had children making noises that rivaled the dinner scene from What About Bob? It really is that good.

I won't share the recipe here, but it can be found in Cucina & Famiglia: Two Italian Families Share Their Stories, Recipes, And Traditions by Joan T. Tucci, Gianni Scappin and Mimi S. Taf

Here, however, is the building of a Timpano:


Timpano
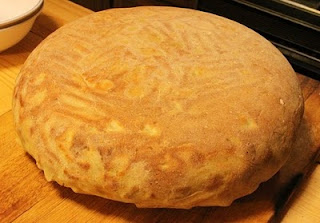
You need a very large pan. The usual is a 14-inch enamel coated basin, but I have a 6.9 quart caldero on hand from IMUSA which I used. The end result doesn't look the same on the outside, but I promise it tastes just as good.


Timpano
Adding pasta tossed with Ragu Tucci to the first layer.


TimpanoLayering salami, provolone, hard-boiled eggs, Romano cheese and tiny meatballs to the layer.


Timpano
More Ragu to top the first layer. Repeat.


Timpano
Top the second layer with a last layer of just pasta and Ragu before closing up and baking.


Timpano
The baked Timpano. Mine looks more disc-like than drum-like, so if you can get the right pan, do so.


TimpanoOne HUGE slice of Timpano. This serves up to 16 very easily. Be prepared for leftovers if you don't have a crowd to feed.


Tuesday, November 16, 2010

Salt-Crusted Turkey

Salt Crusted Turkey
Each year that I host Thanksgiving I brine my turkey. Usually it's a simple salt and water solution that the turkey soaks in overnight. The salt pulls the moisture to the surface of the turkey and keeps it that way, resulting in a very delicious bird.

This year, I'm switching things up a bit. Rather than soak the bird in brine, which calls for a large enough vessel to completely cover the turkey, I'm salt-crusting. There are many recipes out there for a salt-crusted turkey, but they are for a crust which bakes around the bird and is then broken away once baked. My own thoughts were to crust the turkey with salt and herbs, marinate for several hours in the refrigerator, and then roast as usual.The ending was pure bliss. The turkey was moist and delicious and the salt and herbs weren't overpowering. The gravy was even wonderful after augmenting the drippings with salt-free stock and water.

I suggest trying it beforehand with smaller poultry like a roasting chicken, but do try it, my whole family loved this and there's no way I'll be able to have Thanksgiving this year without it.

First thing's first, though - you need to start with a quality turkey. I prefer Butterball, I've never had one yet that wasn't perfect and I know each time I purchase one I'm getting the best there is. So, I started with the right turkey and the recipe goes a little something like this:

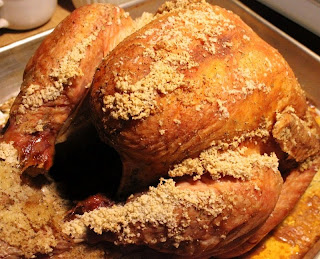
For a 10-12 pound turkey, combine 1 cup Kosher salt, 2 teaspoons ground sage, 2 teaspoons crushed thyme and 1 teaspoon crushed tarragon. Mix well and coat the washed and dried turkey with the mixture, inside and out, leaving a crust surrounding the bird. Refrigerate, covered lightly, for 4 hours or up to 8.

Salt Crusted Turkey
Properly crusted bird

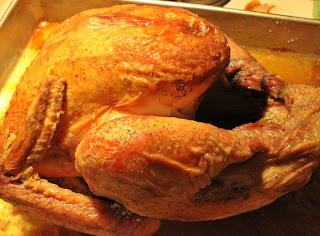
Roast the turkey according to directions and when it's done, break away any excess salt crust, being careful not to let it fall into the drippings in the pan, and discard. Baste the finished turkey with pan drippings or extra salt-free stock.

Salt Crusted Turkey
Perfectly roasted

Carve as usual and make sure to add enough water or salt-free stock to the drippings, tasting frequently, to lower the heavy salt content. You can also play it safe and use purchased turkey gravy.

Now, here's the fun part of this post - I have 2 FREE BUTTERBALL TURKEY CERTIFICATES to give away and all you need to do is post here in the comments about your favorite turkey preparation or holiday memory and I will choose 2 winners on Friday the 20th of November.

**Turkey for this post and turkey certificates were given to me free of charge. this post contains my unbiased opinions of Butterball and I was not sent compensation in any other way.

Friday, October 22, 2010

Cookies!

Once again, we all know I don't like to bake cookies. It's tedium to me and I'd much rather make (and eat!) a large-ish chocolate cake smothered in even more chocolate ganache, but I make cookies for my dear children.

One thing that makes the whole task easier is to have pre-made dough on-hand. I will often whip up a batch of whatever strikes my fancy and stow it away in the freezer for later. However, I don't always have the time and will once in a great while resort to dough from the grocer's freezer. The only problem with that is the iffy ingredients often involved.

Enter the perfect solution for moms who are not only in short on time, but looking for products that aren't chock-full of preservatives and the like, Ice Box Bakery. Created by mom and pastry chef, Jen Bush, the Ice Box Bakery line covers it all; fresh ingredients and ease of use.

Not only are the cookies preservative-free and simple to bake and slice, they're absolutely delicious. Our test batches went from parchment-lined baking sheet to tummies in no time flat. And with 8 fabulous flavors to choose from, there's sure to be a cookie for everyone! Check them out: Gluten Free Chocolate Chip, Deluxe Chocolate Chip, Classic Sugar Cookies, Oatmeal Chocolate Chip, Double Dutch Chocolate, Chewy Ginger Spice, Tart Cherry Pie, and Old Time Peanut Butter.

Ice Box Bakery Deluxe All-Natural Cookie Doughs can be found at retailers nation-wide by searching here: http://www.iceboxbakery.com/store-locator .

Ice Box Bakery Samples Provided free of charge through Ice Box Bakery.

Saturday, October 16, 2010

ShopRite and the New York City Wine & Food Festival 2010


I haven't been M.I.A. on purpose, oh no - I realize my last post was cut short, but there really is a wonderful reason and I'm going to share it with you: ShopRite and the New York City Wine & Food Festival are responsible, in part, for my absence. No sooner had I decided to blog our food for a week then I realized I had so much to do before heading off to NYC for 2 days. I do have photos and I promise to share, but until then you need to hear about the fun time I had!

I have been chosen as one of a select group of bloggers to be a ShopRite Blogger Panelist. What does that mean for me? Well, I get to sample ShopRite products, develop recipes and share with my readers here and on the ShopRite blog. Having been a ShopRite shopper since my own mother bought our groceries there, I am more than equal to the task and really look forward to this.


The most important part about the NYCW&FF are the hosts and beneficiaries of this. While it may seem pricey to some, the festival benefits Share our Strength and the Food Bank for New York City, two organizations I am behind 110%!

ShopRite kicked off the Blogger Panel by sending us all off to the NYCW&FF 2010 where we saw the ShopRite brand in action, sampled until we glutted ourselves and were fortunate enough to meet food executives, fellow bloggers and even a celebrity or two (Fabio Viviani and Tyler Florence)!


Chef Fabio Viviani - Yes, I was taking covert photos of him, but not because I'm a stalker! I honestly wasn't sure it was him. I approached him after Chef Faith's presentation and told him how much our family loves him. He sent kisses to the kids and when I told him we stopped watching Top Chef after his season (our hearts were broken!) he reminded me to watch Season 8 as he will be back! Don't miss it!


We started at Pier 54 Hudson River Park, where we were able to sample wines from just about everywhere (which I passed on as a teetotaler) and food from the ShopRite stores. We also watched ShopRite's Executive Chef Faith Alahverdian cook up a feast of beef and share her infectious passion about food.


Chef Faith Alahverdian


The ShopRite Culinary Workshop Chefs doing their thing.


The food! This is just part of what all those wonderful chefs were cooking up at the tasting.

After that Val of From Val's Kitchen and I traipsed off to Chelsea Market as Val had never had the chance to see it and it's one of my favorite stomping grounds in NYC. Once we shuffled out of there (feet a little sore at this point) we sat with Bob Clare, one of the owners of the Oakland, NJ ShopRite and his friend Janice. We chatted for a bit before heading to Abe & Arthur's for Tyler Florence's signing of his newest book, Family Meal. How cool is that? Full review up & coming for this book, by the way.

We stayed at A & A for dinner (impeccable service and wonderful food - highly recommended) and had the best time laughing and eating together. After that I trucked back to my room at the Tribeca Grand Hotel and Skyped with the kids for a little as they were all so excited about mommy going to NYC.

The ShopRite team, the gals from Coyne PR and the other bloggers were the highlight of the weekend, though and I look forward to getting to know them all better throughout the year. I came away with so many great products, food ideas and memories and I can't wait to blog about them all!

There are more photos of the Festival here: New York City Wine & Food Festival

Sunday, October 03, 2010

What Do We Really Eat?


I am questioned fairly often about what a larger family eats for dinner each day. Mostly what we're eating is what I've posted either here, at A Thousand Soups, at Disney's Family.com or even at Half Hour Meals.

This week, however, I'm going to share what we're eating each day. This will be the good, the bad and the ugly - I'm sure. There is no way to have a family this size without having a snag here and there and I'm planning on sharing what our schedule is and what other extenuating circumstances, if any, there are each day.

So, are you ready? This evening for dinner I've done the very bad: Pancake Breakfast Sandwiches. I went uber easy with prepared and frozen pancakes and sausage, deli American cheese and fresh eggs.

My preference would be to make the pancakes myself from homemade and sausage myself as well, but feeling as I have been, and having wiped myself out yesterday going to the kids' first parade of the year, I'm doing simple and not-so-good-for-you.

Line up!

I don't have a real recipe for these - but it's very simple, cook one egg and one sausage patty (or a strip of bacon if you prefer) for each sandwich and layer together with a slice of cheese between two small pancakes. Serve up with hashbrowns or potato pancakes and orange juice. Easy even for 9 people, just get an assembly line going and you'll be done in no time.

Friday, October 01, 2010

Project Food Blog - Keep Watching!

No, not for me, but for everyone else still involved, because the competition will surely be heating up very soon! Continue to check out Foodbuzz's Project Food Blog to see who the next Food Blog Star will be - there are some fabulous bloggers still in the running and you won't want to miss it.

I want to thank all of my awesome friends for voting for me, but anyone who knows me well knows I'd rather make it on merit over popular vote any day. I also want to thank Kathy Lauer-Williams of the Morning Call for her post urging everyone to vote. I love her and she's done a great job of getting the word out about me since her first article in the paper a year and a half ago. Thanks, Kathy!

Also, my family helped quite a bit last week with the second challenge and I wouldn't have gotten it posted without them. Love you guys!

As for me, last week was quite possibly the worst week ever for me to have been in a competition. I spent Monday morning in the emergency room rather ill and the doctors there discovered some things I need to address. No worries - you know I can't be kept down! So, onward and upward! Hope you'll all keep stopping by.

Monday, September 27, 2010

Project Food Blog Challenge #2 : Time to Vote!

Voting for the Foodbuzz Project Food Blog Challenge #2 is now open from 6AM Pacific Time September 27th through 6PM Pacific Time September 30th.
Click the link to my profile below and vote ~ thank you!


Sunday, September 26, 2010

Project Food Blog: Adventures in Moussaka


Moussaka

Moussaka is one of those dishes that I always felt was rather common, but once I made mention of it to friends and family I realized it may not be as common as I thought. I was met with reactions like, "Moose what?" and "Moose caca?" (you can't have 7 kids and not hear that one at least once), but most often it was simply, "What's that?"

What's that, indeed. I myself wasn't 100% sure, having never eaten it and only having read about it or heard of it the same way most Americans have, by watching "My Big Fat Greek Wedding". I knew it was eggplant and bechamel, but hadn't the foggiest notion how it was put together or what it tasted like.

At one time during my adolesence I was surrounded by Greek-Americans that were all friends of my mother's. She owned a small re-sale boutique and right next door to her shop was Nick's. Oh yes, funny as it sounds because of the commonplace moniker, there really was a Greek restaurant named such right there. My mother and the proprietors, the Bozakis family, became fast friends and mom, who also loved to cook, was taught much about Greek cuisine from the real deal, but never moussaka.

I'd thought about making it from time to time, but it seemed out of reach and difficult and far too time-consuming for a person as busy as myself. Triple layers meant triple preparations and the question as to authenticity always plagued me. I don't like making dishes from other cultures that aren't true to tradition and I wanted to be certain.

I set out to research as in-depth as possible, first with the cookbooks I own and secondly on the internet. What I found only confused me further. Greece isn't the only country responsible for moussaka, in fact, the true origins are Arabic in nature and many countries across the Middle East seem to have a version all their own. What I was looking for, though, was the Greek version.

After I found several recipes I liked among a veritable plethora of them, I was still not satisfied that I'd never had it so I scoured the phone book and started making calls to local Greek restaurants. Each call left me wondering if I would ever find it locally. Finally I hit on Yianni's Taverna, and I struck gold. They whipped up some and it was picked up via take-out.


Yianni's Taverna, Bethlehem, Pa

My first taste of real moussaka was a lightbulb moment ... an "Ohhh, so that's what it is!" Pure bliss. The way it was made was exactly as I'd decided I would make mine, a layer of potato on the bottom, topped with rich meat sauce and covered in thick and creamy bechamel. I nearly wanted to photograph it and pass it off, but it was so good there was no stopping myself. My 6 year-old son ate with me and he loved it every bit as much as I did. This part means if you're in the Lehigh Valley, you need to stop by Yianni's Taverna for beautiful atmosphere and fabulous, authentic Greek food.

Having finally had moussaka and and understanding then for what I was really making, I set off to duplicate it. The recipes, though, were a challenge. There were differences of opinion on which cheese to use, whether or not to include potato, how to layer the ingredients and so on. I compared and read and compared some more and then finally decided on how best to prepare it.

My first batch used ground lamb and canned tomatoes. I don't cook with lamb and haven't since culinary school so the odor was something to get used to, but the flavor was divine. I paired it with spices and wine and fresh herbs and cooked it until the tomatoes were tender and falling apart. I salted and drained the eggplant slices and whipped up a bechamel worthy of its origins. Layered together and baked for an hour, the result was absolute perfection; I know because my 6 year-old told me so. He said it was just as good as the one we'd brought home.

Not convinced that I knew exactly what I was doing, I made it again; this time with ground beef and tomatoes from the garden and a blend of Kefalotyri and Kasseri cheeses. I repeated the potato on the bottom because I enjoyed it so much. The thin layer of potatoes soaked up the rich juices from the meat sauce and were so tender and delicious they would almost be enough by themselves. The second batch, with nutmeg laced bechamel and lighter flavored ground beef was every bit as wonderful as the others had been.

Now that I've eaten it thrice and cooked it twice I can say with complete certainty that I will be making it again and again. Even if it's time-intensive, it really is so worth it. Here is the recipe I settled on:


Perfect Moussaka

Moussaka
Makes 1 9x13 pan
6 tablespoons olive oil - divided
1 medium onion - chopped
3 cloves garlic - minced
2 pounds ground lamb or ground beef
1 large eggplant (aubergine if you live outside the U.S.A.) - evenly and thinly sliced lengthwise - do not peel
3 medium potatoes - peeled and thinly sliced
1 teaspoons salt plus more for sprinkling on eggplant
1/2 teaspoon freshly ground pepper
15 ounces tomato puree
1/2 teaspoon ground cinnamon
1/2 teaspoon ground allspice
1 Tablespoon freshly snipped oregano
1/4 cup freshly snipped parsley
1/2 cup red wine
1/2 cup unsalted butter
1/2 cup all-purpose flour
4 cups milk
3 large eggs
1 teaspoon freshly ground nutmeg
1 teaspoon salt
8 ounces Kefalotyri cheese - shredded (or Romano or Parmesan)
2 Tablespoons bread crumbs

Preheat oven to 325 degrees F. Lightly oil a 9 x 13-inch baking pan and set aside.

  • Salt eggplant slices well and set aside in a colander to drain. The salt will help the eggplant lose any bitterness and will also keep it from absorbing too much oil during frying.
  • Heat a large frying pan over medium-high heat and add oil. Stir in onion and garlic and cook until onion begins to turn translucent. Add ground beef or lamb and break up as you cook so it is very finely minced. Drain grease well.
  • Add tomatoes, wine, spices, herbs, salt and pepper and stir well. Cook over low heat for half an hour or until sauce begins to thicken. Set aside and clean pan.
  • Squeeze out eggplant and pat dry with paper towels. Heat oil in the same frying pan and add 3 Tablespoons oil - fry potato slices until very lightly browned and drain well. Fry eggplant slices until very lightly browned and drain well. *You can alternately bake or grill the eggplant for a healthier version.
  • Layer the potato slices in the bottom of the prepared baking pan and top with another layer of eggplant. Spread the meat sauce evenly over the eggplant and top with a last layer of eggplant. Sprinkle with 1/2 cup of shredded cheese and set aside.
  • Make the bechamel: Heat milk until just hot and set aside.
  • Melt butter in a medium saucepan over low heat and add flour. Stir until smooth and cook several minutes.
  • Pour milk into roux in a thin stream and whisk constantly until milk starts to thicken.
  • Whisk eggs until light and add a cup of hot milk sauce to them and stir briskly so the eggs do not cook.
  • Pour into milk and roux and continue cooking until sauce is thickened.
  • Add nutmeg, salt and 1 cup shredded cheese and stir until cheese is melted.
  • Pour bechamel over top eggplant layer and spread evenly over all to cover completely.
  • Sprinkle with bread crumbs and remaining cheese and bake for one hour.
  • Let stand for 20 to 30 minutes before cutting.

Monday, September 20, 2010

Project Food Blog Challenge #1 : Get the Vote Out!

Yesterday was my post for the first Project Food Blog challenge and today, we vote! The popular vote helps contestants move forward in the event they are not pushed ahead by the judges, so every vote counts!

Visit my profile at Foodbuzz'z Project Food Blog and click to vote!

Thank you!

Saturday, September 18, 2010

Project Food Blog: Cooking with Anne in 7 Easy Steps

In the 5 years I’ve been officially blogging about food, I’ve been asked time and again why I blog and exactly what I blog about. I’ve answered a time or two, but I don’t believe I’ve ever really gotten into that here.

The ‘why’ is very much the same as many food bloggers; I love food and, even more so, I love to share food. Cooking is cathartic to me and when I need a pick-me-up, the pantry is the first place I turn. I also love to create, but it’s sharing those creations and having others enjoy them that brings me true happiness.

Beyond that, and the original reason I began food blogging, was the desire to have my own family food history written down for my kids. I loved our family recipes, the ones handed down from generation to generation, and always wanted to know where each recipe originated or when it was eaten and why it was made so often, but was left instead with a stack of yellowed index cards held together with a rubber band and no history at all attached to the food my ancestors shared. It was a void I didn’t want my own children to have, so I started writing it all down - in a pen & paper journal first, then on the internet.

Once I started meeting other bloggers, I was totally hooked, and adding regular readers to the mix only made it that much more fun and challenging.

So, as an official contestant of the Foodbuzz Project Food Blog I will answer the first challenge, which is to share how my blog is unique and why I should win the grand prize of $10,000 and the coveted title of the next ‘Food Blog Star’ in 7 short points:


1. I’m informative: I am a person plagued with a ‘must-know-why’ attitude that pervades nearly every aspect of my life, and food is no exception. From where things are grown to who was the first to decide to eat them to how to best cook and serve them, I aim to know it all and I try to impart that to my readers.

Posts about growing black beans, cooking fiddleheads, which zucchini blossoms are which and step-by-steps to making stocks and sauces or crafting homemade pasta riddle this blog and always will with one exception over some others - I don’t know it all and I love to learn more!

2. Personal family stories: One of my favorite foodie things is reading stories about food and recipes and the history behind them, so I tend to share my own food connections with others. After all, that’s what blogs were intended to be, yes? A personal web log of whatever one had a mind to log. I try and keep it real here, and the family stories are not only fun for others to read, but also wonderful for me to re-live while writing. Grandma’s Confetti Cookies, Great Grandma’s Rabbit and Mom’s Fried Chicken are just a few of the tales I’ve had the pleasure to re-tell.

3. Original recipes or twists on classics: I try very hard not to re-post recipes from elsewhere. I have done it, and always give credit where credit is due, but I like to offer up something that you can’t find just anywhere, so I develop my own recipes or spin classics on their heads to keep things fresh and different. Banana Pear Bread, St. Andrè Dessert Tart and Simon and Garfunkel Roast Chicken are 3 of my favorite originals.


4. I am tenacious: When life gives me lemons, I don’t just make lemonade, I make 5-layer lemon chiffon cake topped with chocolate ganache and crumb-coated with hazelnuts - and why not?

In 2007, just after my second year of blogging and 6 months into blogging for Disney at Family.com, absolute disaster struck our family when my husband fell 3 stories from the roof of the building he was working on. It was a very dark and difficult time for us that continues to this day and my blogging outlet, though it was about food, proved to be an invaluable source of solace and the perfect outlet for all the many feelings I was going through. I kept blogging here making the most of things and came out stronger as a result.

5. Attention to detail: I am a bit of a perfectionist, so if there is a misspelling or grammatical error, an incorrect ingredient amount, or a link that’s not working, I try my best to fix it and make things as accessible and easy to read as possible. While I love to write and love to talk, I know the best way to keep a reader is to keep it short and sweet, so my posts often reflect that with a simple header, photo and recipe.

6. Humor: Life is funny, and even when it isn’t I can somehow draw the humor out of any given situation. I try to fit that into my blog as often as possible without being offensive, and I’m pretty sure most times I hit the mark fairly well. If not, oh well, at least I got a laugh out of it.

7. The last thing I have in my corner is also the best thing: I do all of this blogging here, on A Thousand Soups and recipe development at Family.com, with 7 children still at home. They were the impetus for this whole blogging career I’ve begun and they continue to be the thing that motivates me. Whether it’s because I spend a lot of time simply cooking for and feeding them or because they are my finest critics and biggest fans, they will forever be the reason I do what I do and the driving force behind my always wanting to be better.

So, there you have it, Cooking with Anne in 7 Easy Steps. I look forward to the remainder of this competition and wish all my fellow contestants the very best!


Tuesday, August 24, 2010

Mini Hiatus

I'm back! Did you even know that I was gone ... ? That's OK, it was unintended, but I have posts ready and waiting for you. Summertime here is always so busy that I've barely time to breathe let alone write or cook.

No worries, the kids are back to school next week and I've got goodies to share with you then!

See you soon.

Wednesday, July 21, 2010

Growing Black Beans

Boy, oh boy - the photo of my homegrown black beans in my last post has caused quite the stir so I thought I would share the very little I know about growing black beans with you.

Dried beans seem to be one of those things that nobody really thinks about growing. You head to the store or the co-op and buy them bagged or in bulk, take them home, clean through them, soak, and cook. It's pretty simple that way, really, but when I saw the packet of black beans for sale at my local gardening spot, I had to grab them.

GROW my own black beans? The hell you say. Really. I didn't know what to expect. The back of the package gave the usual spacing and depth instructions along with watering and light recommendations, but as any gardener knows, the packet tells so little.

I set them to seed in trays with the rest of my plants and then set them in the ground when it was time. The first surprise I had was the plant itself. It looks exactly like a blue lake bush bean and I had to be very careful about labeling so I would know which were which. Bush beans are one of the first successful vegetables I had ever grown and I look forward to them each year. No matter what else I'm growing, I must have green beans in the garden. The difference is, and I found this out quickly, black beans are like pole beans because they climb. I jabbed stakes into the ground and let them wind their way up.

I watered as I did my green beans, not too much, not too little. I set them in a sunny, but not too sunny, spot (vague enough for you?) and watched them grow.


The second surprise was the flower. Again, they look exactly like bush beans, but PURPLE! The first sight of one of those flowers was a truly breathtaking moment. As soon as I caught my breath I said, "Of course! Black beans have purple flowers!" Because, in reality, black beans aren't really black, they are a very deep purple. This can be seen any time they are soaked.


Then came the pods, which - again - looked like bush beans. Ever so slowly, though, they changed color and nearly looked like they were rotting. I was concerned. What if they were too done? WHEN were they done? Did I need to dry them once they were picked? Of course, I knew where the answer was: Google.

Sure enough I found that black beans are not ever really "fresh" because they are left on the plant to fully dry and darken. I popped open a pod and to my horror the beans within were snow white except at the very edge, where they were beginning to turn purple. Aha! They TURN black as they dry!

Those pods aren't rotten, they're purple!


Black beans in the pod.

So, I mustered up all the patience I could and let them alone. Sure enough, before I knew it each pod was full of hard black beans. Wow. Just wow. Now I have bushes full of drying black bean pods and once I harvest them and cook up something splendid I'll be sure and post it!


Tuesday, July 20, 2010

Garden Interlude

I'm taking a moment today to share photos from my garden. These range in date from first planting in May to today. This isn't everything we have growing, just some of the photos I wanted to show you. Enjoy!

Catnip flowers - very pretty and something you'd miss if you didn't look closely enough.


Black beans have purple flowers! How very pretty.


Once the beans are fully grown, they are left on the plant to dry. Check occasionally to see if the beans have turned black. Once they have, they are done.


Black beans in the pod.

Wild mint - my favorite type. I also have spearmint but don't like it nearly as much.


Johnny Jump-Up that belongs to my oldest daughter.


Basil ready to flower.


Forget-Me-Nots This is my second year with them. The seed was from last year's crop.


Cilantro Flowers.


Whenever I see these mimosa blossoms I think of Horton Hears a Who!


Nemesis - Japanese Beetle. He was far flung right after the shot was snapped.


Strawberries.


Soon-to-be tomatoes.


Grape tomatoes ripe for the picking.


Better Boys coming along nicely.


Zucchini blossom.


Cosmos - one I grow each year.


Can't recall what these are, but we had them planted with small purple flowers and the effect was very pretty.


French Lavender.


Pumpkin vine curl.