Monday, March 29, 2010

Healthy Snack Options

I have to admit, when I think about snacking (or any food, for that matter) I don't usually consider fat content. If it's obvious, like lots of mayo or drowned in butter, I'll think twice, but the average day has me eating for flavor more than anything.

Most snacks that are low fat aren't very flavorful or interesting, especially the fat-free varieties. I adore vegetables, but apart from that, I tend to seek out snacks with too much fat - but not on purpose.

I had been seeing kale chips all over the place lately and decided to give them a try. They aren't anything new - in fact I found mentions of them several years old, but they seem to be a big deal right now. Along with kale chips I also made two snacks from my favorite legume - chickpeas. I made roasted chickpeas and a fat free 'hummus'. I can say for sure that each of these had so much flavor that I'll be making them again and again. See what you think.


Kale Chips
Kale Chips

1) Kale chips are nothing but clean, dry kale leaves roasted in an oven until crisp. You can salt them or spray with olive oil before toasting, but I found that I really liked them just plain - and even better, my kids loved them! The two youngest got their hands on them and demolished an entire sheet tray! That's one awesome snack. These are totally fat-free if you toast them without olive oil and have a small amount of fat if you mist them first with oil.

Kale Chips
This is for one pound of kale, which makes several baking sheets of chips.
1. Preheat oven to 450 degrees F.
2. Wash kale and remove large stems and veins. Dry completely with a salad spinner or paper toweling.
3. Tear into bite-sized pieces and lay on parchment lined baking sheets. Mist with olive oil and sprinkle with sea salt - or leave plain.
4. Roast for 7 to 10 minutes and remove before they brown. Cool and enjoy!

You MUST tear these into bite-sized pieces unless you want a big mess each time you bite one. I made the mistake of leaving them larger and they fall apart when you bite into them.


Roasted Chickpeas
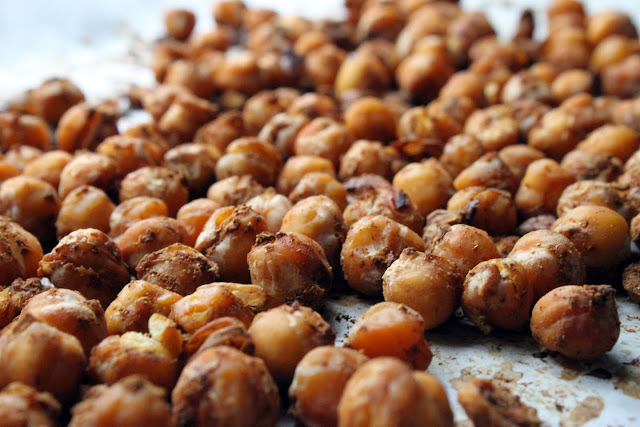
Roasted Chickpeas

2) Roasted Chickpeas are so good. Garbanzos have a small amount of natural fat to them and there's no way around that, but you don't need to add any at all for this recipe. I used Moroccan spice from my Moroccan Spiced Beef Roast and Sweet Potatoes recipe and it was awesome. This was another one the kids couldn't get enough of ... me, either.

Moroccan Spiced Roasted Chickpea Snack
Makes 2 cups
1 can chickpeas, drained
1 teaspoon garlic powder
1 teaspoon Kosher or sea salt
1 teaspoon ground cumin
1 teaspoon sweet paprika
1/2 teaspoon ground cinnamon
1/4 teaspoon cayenne pepper

Preheat oven to 450 degrees F.
Toss beans with seasonings and lay out on a parchment-lined baking sheet.
Roast for 45 minutes stirring every 15 minutes so they don't burn and cook evenly.
Check for doneness (they should be crunchy and not soft at all) and put back into the oven for 5 minute intervals if they are not ready).


Fat-Free 'Hummus'
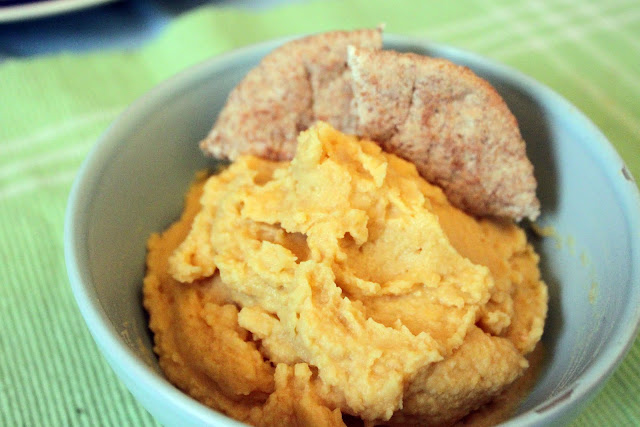
Fat-Free 'Hummus'

3) I have a hard time calling this one hummus as it is missing a vital ingredient to hummus - sesame paste (tahini). It is very good as-is and, just like the chickpea snack, there is a small amount of natural fat. No matter, add whatever you like to this basic recipe to up the flavor if you like.

Fat-Free 'Hummus'
1 can (2 cups) chickpeas - drained
1/4 cup lemon juice
2 cloves garlic - minced
1 teaspoon Kosher or sea salt

Whir everything together in the blender or food processor until smooth. Serve with chips or crackers - or kale chips! I like this with some red pepper or green onion added in.


Tuesday, March 23, 2010

Caramelized Onion, Artichoke Heart and Goat Cheese Turnovers


Before I get to the recipe today, I have to let you know about a small article about me at The Meal Planning Mom. I was asked to send in a recipe for possible inclusion in one of the weekly menus at MenuForTheWeek.com, so I did. They liked it and are using it in this week's menu!

On to these delicious little turnovers. I had several spring vegetables on-hand that I was unsure what to make with. I finally decided on these handheld pies and they are far more delicious than I thought they would be.

Caramelized Onion, Artichoke Heart and Goat Cheese Turnovers
Makes 8 turnovers
Printable Recipe

10 cipollini onions - peeled and sliced
1 bunch green or spring onions - sliced
1 large shallot - sliced
2 cloves garlic - minced
2 Tablespoons olive oil
1 cup artichoke hearts in brine - drained and chopped
4 ounces goat cheese
1 recipe double-crust pie dough (I like pate brisee)
1 egg and 1 Tablespoon water beaten to make egg wash

1. Preheat oven to 400 degrees F. Line 2 baking sheets with parchment paper.
2. Roll dough to 1/8-inch thickness and cut into 8 circles 3-inches in diameter. Cover with plastic wrap and set aside.
3. Combine olive oil and all onions in a small pan - cook over a low flame until caramelized. This can take up to 15 minutes.
4. When onions are done, place a spoonful in the center of each pastry circle. Top with artichoke hearts and goat cheese. Brush the edges of pastry with egg wash.
5. Fold over and press to close. Brush each with egg wash and bake on parchment lined baking sheets until golden brown, 15 to 20 minutes.

Sunday, March 14, 2010

Chocolate Gravy

Chocolate Gravy and Biscuits
I just finished off a plateful of Saveur 100's #48 - Chocolate Gravy with biscuits. It was hard for me to imagine a breakfast that combined a rich, velvety, buttery chocolate sauce as a component (unless I were a 5 year-old), so when I first saw the recipe I was intrigued.

In our home savory has ruled as the Queen of Breakfast and every one of my 7 children knows that I don't embrace the idea of chocolate or sugar as the first meal of the day. But, the recommendation did come from Saveur, and the woman who submitted it is from the South, so I figured it had to be good. And I was right. And I apologize to my children for denying them chocolate for breakfast for so long.

I think I'm in love - the dark chocolate sauce on top of flaky biscuits is nearly sinful. I'm not sure I should have been making it for Sunday breakfast. I did, though - and I don't apologize for it. If you've never had chocolate gravy for breakfast, please do go and make up a batch - you can find the recipe at Saveur.

Tuesday, March 09, 2010

It's Not Even Spring Yet!


I couldn't help it. I tried to restrain myself, really, but this stretch of warmer weather had me champing at the bit to grill something. Anything. So, after spending the morning zesting citrus for various things (Dorie Greenspan's Perfect Party Cake was one) I felt the need for fresh flavors on my dinner plate.

I had already thawed chicken breasts and was planning on fried chicken with a tomato based sauce, but I caught sight of the grill outside and made a last minute executive decision: the chicken must be grilled.

I had also been cooking beans to have on-hand. The beans were cooking with dried arbol chiles, bay leaves and garlic, and after tossing the lime shells (limes sans zest and juice) into the beans I felt like they needed to come to play in our dinner somehow. I scratched the tomato sauce idea and instead made a quick salsa with beans, avocado and tomato. It was the perfect complement to the grilled chicken. It was so good, in fact, that I had to keep from finishing it off myself. There are no herbs added and it doesn't need any at all - the combination of crunchy onion, tender avocado and tangy lime juice is terrific as-is.

Our dinner was a thrown-together delight. The chicken was topped with the salsa and I made a simple side of linguine tossed with olive oil, dried lemon zest and basil. It was divinely delicious and even the kids liked it. Not quite summer, but so close I could almost taste it.

Simple Tomato, Bean and Avocado Salsa
Makes 3 cups
Printable Link

1 1/2 cups seeded and diced tomato
1 1/2 cups cooked and drained beans (I used kidney and pinto)
1 small Hass avocado, peeled, seeded and diced
1/2 cup white onion, diced
2 cloves garlic, minced
2 limes, juiced
1 teaspoon Kosher salt

Combine all in a small bowl and toss well. Let stand for several minutes to blend flavors before serving.


Tuesday, March 02, 2010

Adopt a Blogger: Round 4

I've adopted a food blogger! Kristin of Dine & Dish has successfully paired veteran bloggers with newer bloggers for the past 4 years and this year I jumped on board and offered to be an adoptive blogger. I figured with 4 years under my belt and being halfway through my 5th year that it was high time to give back.

I've been paired with a wonderfully precocious young blogger named Lauren. She has written Celiac Teen for nearly 2 years (and she's only 17!) about her disease and how she manages to eat well despite it.

She's got quite the following for someone so young, and she is SO good at what she does that I'm afraid I won't have much to offer her. In fact, I can easily see Lauren being the adopter for Round 5 of Adopt a Blogger.

Even if you're not gluten-free, you must see this blog ... for the recipes, the photos, the writing and the general yumminess of it all. Brazilian Cheese Bread or Gluten-Free Tiramisu, anyone?

But, wait - there's more! More? Yes, yes, there's more! She created an ebook specifically to provide help to Haiti titled, Help for Haiti. A compilation of 87 recipes from 71 bloggers, the book was made to raise funds for Haitians in the aftermath of the recent earthquake there. The Red Cross matched donations, as have Lauren's parents (up to $1,000) and the book costs whatever you'd like to donate. Please go check that link, and every link leading to Lauren's blog, she is one fantastically talented young woman and I am so proud to be her adoptive blogger.