Monday, November 13, 2017

White Pumpkin Pie with Cinnamon Pretzel Crust

White Pumpkin Pie with Cinnamon Pretzel Crust


It's been pumpkin time for quite a while now. It seems it begins each year just a little earlier than the year before. I love pumpkin. I really, really do. That being said, you can most definitely have too much of a good thing. Enter the white pumpkin.

With Thanksgiving coming up, I'm in the throes of menu planning and shopping, and this year as I looked at the uncarved white pumpkin on my porch, I thought, "Why not?" It turns out you can make a pumpkin pie from just about any pumpkin you can purchase, including the white variety.

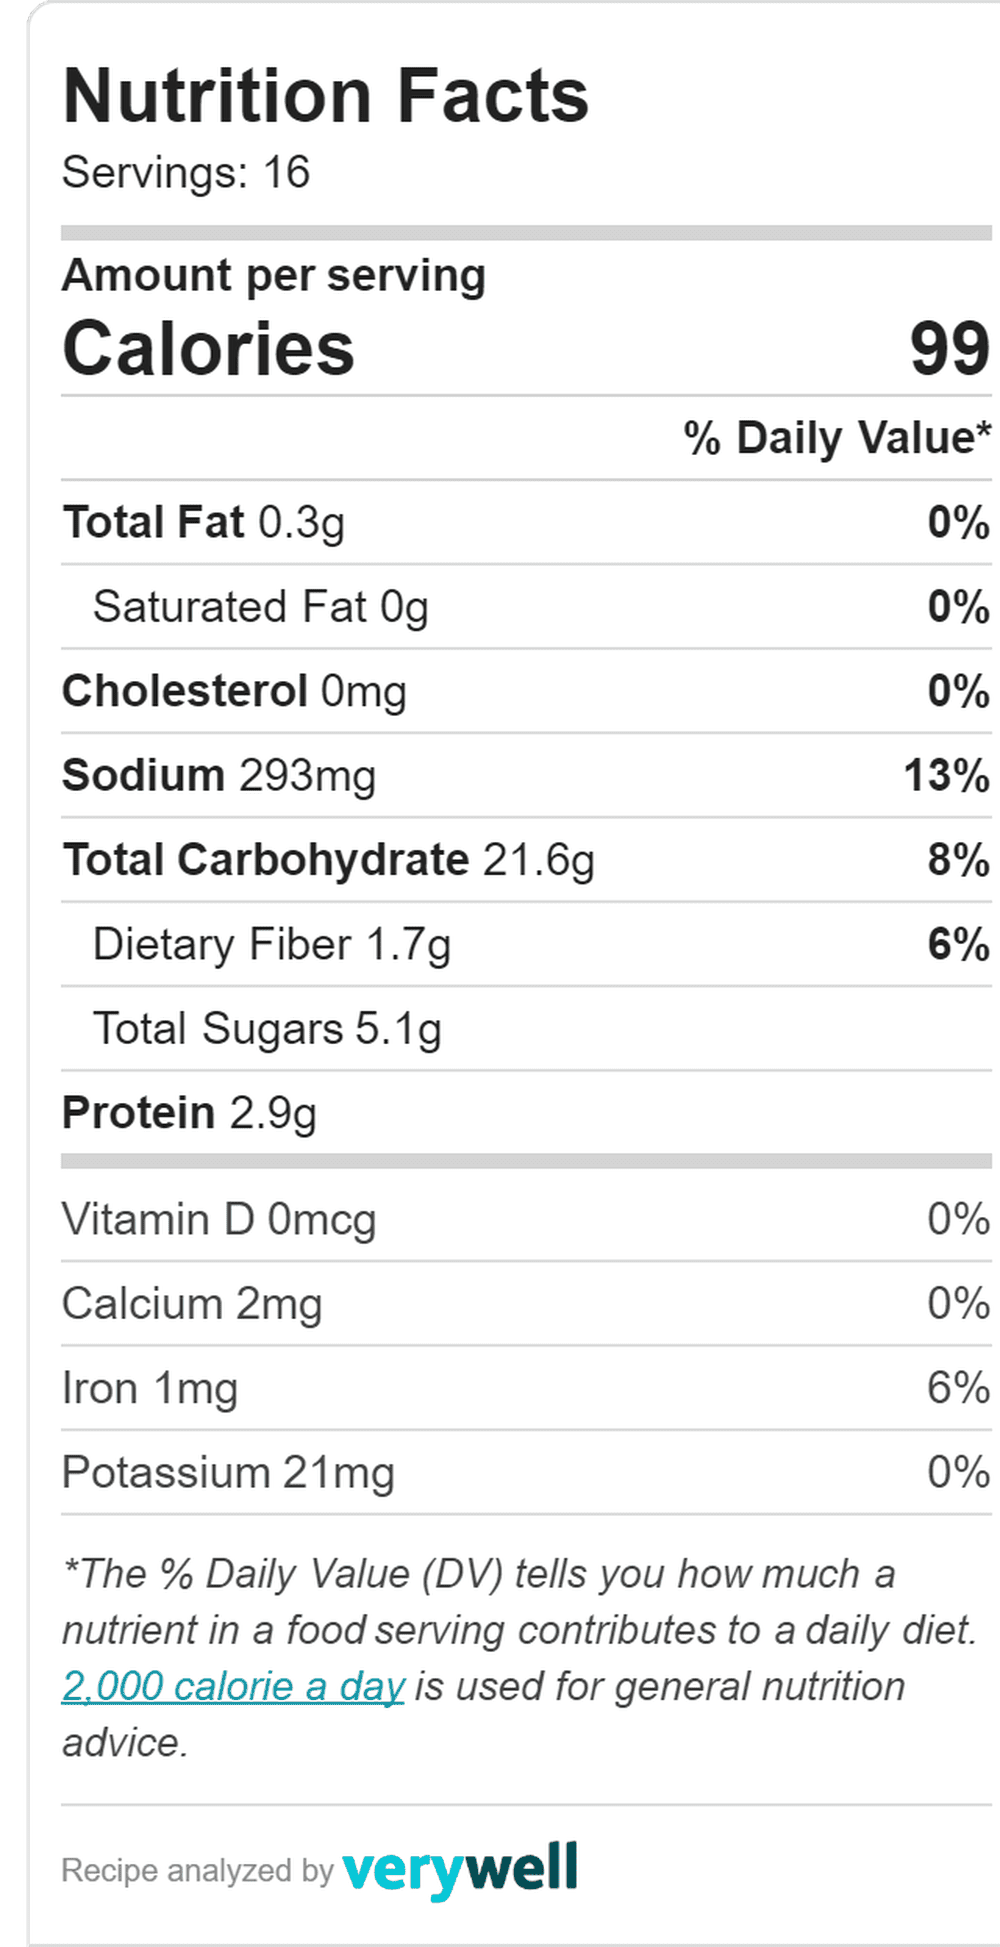
The flavor is milder and sweeter than that of a traditional orange pumpkin, and so surprisingly different that I've had requests to make this one for Thanksgiving Day. I am more than happy to oblige! This pumpkin variety is so sweet in fact, I am using sweetened condensed milk and no sugar. This changes the usual baking time, so read carefully! Please taste your pumpkin puree to decide whether or not you want to add sugar. Add sugar to the puree first and check before making the filling.

Now, you don't run to the store and simply pull white pumpkin puree from the shelf, you make it in the usual way. You can find instructions for that here: Which Pumpkin?  All pumpkins are edible, but some are more tasy than othersFollow the general rules for which pumpkin to cook, and you'll be fine.

UTZ Holiday Cinnamon Pretzel Sticks

On to that crust! I was greeted one day in my local Giant food store's vestibule by a bag of UTZ Holiday Cinnamon Pretzel Sticks. I love these things. They are very mild in flavor and lightly sweet, but with all the delicious crunch of the usual UTZ pretzel. On their own, they are lovely, but as a pie crust? A whole new dimension of texture an flavor. I though this would pair well with the white pumpkin, and I was right. If you are not able to find these, you can use any pretzel for the crust.


White Pumpkin Pie with Cinnamon Pretzel Crust
Makes one 9-inch pie

Crust:
1 1/2 cups finely crushed UTZ Holiday Cinnamon Pretzel Sticks
1 stick (1/2 cup) unsalted butter - melted
1/2 cup brown sugar

Pie Filling:

2 cups white pumpkin puree
1 can (14 ounces) sweetened condensed milk (NOT evaporated milk!)
2 large eggs
1/2 to 1 teaspoon pumpkin pie spice (this is to your liking)

Directions:

For the crust:

1. Combine all ingredients and mix well. Press into the bottom and sides of a well-greased 9-inch pie plate. Set aside.

For the Filling:

1. Heat oven to 425 degrees F.
2. Blend all ingredients until smooth.
3, Pour into prepared crust.
4. Bake for 15 minutes then reduce heat to 350 and bake for an additional 30 minutes or until pie does not jiggle when touched.
5. Cool for 1 hour then refrigerate before serving.

Monday, November 06, 2017

Aunt Dorothy's Refrigerator Yeast Rolls


Aunt Dorothy's Refrigerator Yeast Rolls

Everyone has a food that takes them instantly back to their childhood with a single bite. For me it's these rolls. Served at every large family gathering, they were gone before they cooled and it's still the same way today in our home. These are perfect for Thanksgiving, which is just around the corner here in the United States.

Aunt Dorothy's Refrigerator Yeast Rolls


The original recipe directions were so simplified, almost too much for more novice cooks, that I've expanded the preparation details here. Many refrigerator roll recipes call for using the dough as far out as 3 days, but I find that it rises too much in that period of time. Perfect timing is within 24 hours but can be pushed to 48.

Aunt Dorothy's Refrigerator Yeast Rolls*
Hand-On Time:
Ready In:
Serves: Makes 3 dozen rolls

Ingredients:

1 packet dry yeast
2 1/2 cups warm water
3 tablespoons unsalted butter - room temperature
1/2 cup granulated sugar
1 Tablespoon salt
1 large egg
8 cups all-purpose flour

Directions:

1. Combine 1/2 cup of the warm water with yeast in a large bowl and stir until dissolved. Let rest for 5 minutes until bubbly.
2. Add remaining 2 cups of water to yeast mixture along with butter, sugar and salt. Stir until sugar is dissolved and butter has melted.
3. Beat egg lightly and add to water along with 1 cup of flour. Stir until well blended.
4. Add in remaining flour, a cup at a time, stirring with a heavy wooden spoon until no more flour can be added. Knead in remaining flour with hands, a 1/4 cup at a time until dough is smooth and elastic - about 8 to 10 minutes.
5. Put dough back into bowl and cover tightly with plastic wrap. Store in refrigerator for at least 4 hours but not more than 48 hours.
6. When you are ready to bake rolls, pre-heat oven to 400 degrees F, punch down dough and portion into 36 equal pieces. Shape dough into rolls and put into greased muffin tins. Cover with a towel and let rise in a warm spot for 1 hour or until doubled in bulk.
7. Once rolls are doubled, brush with olive oil or egg wash (1 egg and 2 tablespoons water blended well) and bake for 15 minutes or until golden brown on top.

*Aunt Dorothy was my grandfather's sister-in-law. I absolutely adored her and my uncle, Hershel. She was sweet and quiet, which was necessary as my uncle took the spotlight every time we visited. He was a real hoot, definitely a story for another time.

Monday, October 23, 2017

Nutty Pumpkin Drinks


When it comes to autumn and winter holidays one of my favorite parts is what we’re drinking. I don’t necessarily mean alcoholic beverages, but everything we drink. As a rule my family drinks water, coffee or the occasional cup of juice so, when holidays roll around I get excited about flavored coffees and different types of ginger ales and warm ciders. Using ShopRite’s coffees and hot chocolates as a base makes whipping up delicious drinks so easy. Here are two grown-up versions of drinks you’ll want to try this season.

Note: For teetotalers or children, leave out the liqueur or pick up a bottle of hazelnut flavored syrup in the coffee aisle.


Nutty Pumpkin Coffee
Serves 1

Ingredients:

1 ShopRite Colombian Roast K Cup
1 ounce pumpkin simple syrup*
1 ounce hazelnut liqueur or hazelnut flavored syrup
Creamer to taste if desired
Whipped cream for topping

Directions:

1. Make a 12 ounce cup of coffee using the K Cup.
2. Add pumpkin simple syrup and liqueur and stir well.
3. Add creamer if desired and serve topped with whipped cream. Serve hot.

Nutty Pumpkin Hot Cocoa
Serves 1

Ingredients:

1 packet ShopRite Instant Hot Cocoa Mix – with or without marshmallows
1 ounce pumpkin simple syrup*
1 ounce hazelnut liqueur or hazelnut flavored syrup
Whipped cream for topping

Directions:

1. Make one cup of cocoa according to package directions.
2. Stir in simple syrup and liqueur and stir well.
3. Top with whipped cream and serve hot.

*Pumpkin Pie Simple Syrup

Ingredients:

1/2 cup pumpkin puree
1/2 cup granulated sugar
1/2 cup water
1/2 teaspoon pumpkin pie spice

Directions:

1. Combine puree, sugar and water in a small saucepan.
2. Cook over low heat until sugar is completely dissolved and mixture is smooth.
3. Add in pie spice and stir well.
4. Keep in a covered container in the refrigerator for up to two weeks.

Monday, October 16, 2017

No-Knead Honey Whole Wheat Bread


 No-Knead Honey Whole Wheat Bread

When it comes to comfort food the most comforting of all is homemade bread. There is something warm and wonderful about the aroma as it bakes that makes you want to slow down and take the time to savor it. Baking bread can be time-intensive without a machine, and even then it can take longer than anyone wants to wait for fresh-baked bread. No-Knead bread is just as delicious as the kneaded kind and even the kids can handle this - making it just that much more enjoyable for parents.

No-Knead Honey Whole Wheat Bread
Hands-On Time: 10 minutes
Ready In: 1 hour
Serves: Makes 2 - 8 inch loaves

Ingredients:

3 cups warm water, 110 - 120 degrees F
2 packets instant dry yeast
1/4 cup honey - for vegan use agave nectar
4 cups whole wheat flour
2 cups all-purpose flour
2 teaspoons salt

Directions:

1. Grease two 8 1/2 inch by 4 1/2 inch by 2 1/2 inch loaf pans or two 1.5 quart oven-proof bowls.
2. Combine warm water, yeast and honey. Stir to dissolve yeast.
3. In a large bowl, mix together flours and salt. Pour liquid into dry ingredients. Mix thoroughly - dough will be sticky.
4. Divid dough equally between pans. Let stand in a warm spot for 20 minutes until slightly risen.
5. Bake in a 400 degree F oven for 40 minutes. The bottom of the loaves will sound hollow when tapped.
6. Turn out of pans and cool on a rack.

8 servings per loaf=

Monday, October 09, 2017

Maple Glazed

I've heard tell of those who find the football game secondary to the tailgate party. I'm one of those people. Don't get me wrong; I love a good football game, but the fun had with others on a crisp fall day sharing our favorite hearty fall foods just can't be beat.

Most football get-togethers consist of fans of one single team with everyone rooting for the same side, but what happens when you have rivals in your midst? Ply them with good food. That being said, this time of year just begs for everything maple. These two recipes are so good, and so simple. Both have 3 ingredients or less and both are done in 30 minutes! Easy and delicious, my favorite.

Kielbasa in Maple and Beer


Kielbasa in Maple and Beer

Prep Time 5 minutes
Cook Time 30 minutes
Serves 4-6

Ingredients:

1 pound kielbasa, cut into 1" chunks
1 cup beer (any type)
1/2 cup real maple syrup

Directions:

Combine everything in a heavy bottomed sauce pot and simmer until sauce thickens and kielbasa starts to brown (about 30 minutes).


Maple Glazed Nuts


You can use any type of shelled nuts you like, raw or roasted, salted or not. I like to use roasted and salted nuts as we really like the salty-sweet combination. Please do use real maple syrup if you can, the flavor profile is different than using imitation syrup.

Maple Glazed Nuts

Hands-On Time: 5 minutes
Ready In: 25 minutes
Yield: 1 cup

Ingredients:

1 cup nuts, any type (almonds are pictured)
2 Tablespoons real maple syrup

Directions:

1. Heat the nuts in a non-stick pan over medium heat for about 1 minute - just so they start getting warm.
2. Add maple syrup and toss the nuts quickly slowly with a wooden spoon or silicone spatula until the syrup starts to them. This happens quickly, only about 20 seconds. 
3. Moving quickly, remove from heat and spread out evenly on parchment paper or a greased baking sheet to cool. Try to spread them out so they are not touching and let them cool for 20 minutes. 
4. Once cooled, break apart any that are stuck together and serve. 

*Note: Once glazed, they don't store well as an humidity in the air will cause them to start sticking together.

Monday, October 02, 2017

Pumpkin Spice Kentucky Butter Cake

Pumpkin Spice Kentucky Butter Cake


I am winding down here on my abilities to blog and ramping up on my school and children duties. This means I will have to cap myself at one recipe a week for at least the rest of this year. Once January comes I can reevaluate, but for now finishing my own college studies and helping one of the children with cyber school in addition to all the other mom duties going on is taking most of time. I'm sure we'll all live through this. 


Pumpkin Spice Kentucky Butter Cake


This recipe is a variation of one already on my blog. I shared JoAn Henry's recipe for Kentucky Butter Cake quite some time ago, but the notion of turning it seasonal hit me recently and this cake is just awesome. Make sure you mix the pie spice into the other dry ingredients first. I've made the mistake of adding it to wet ingredients and it just never distributes well that way. Once you've made this, sit down with a cup of something warm and enjoy!

Pumpkin Spice Kentucky Butter Cake
Makes one cake


1 cup butter - softened

1 cup pumpkin purée
2 eggs
1 teaspoon table salt
1/2 teaspoon baking soda
2 teaspoons vanilla extract
1 cup granulated sugar

1 cup brown sugar - lightly packed
3 cups all-purpose flour
1 teaspoon baking powder

1 1/2 to 2 teaspoons pumpkin pie spice 
3/4 cup buttermilk

Cream 1 cup butter with sugars.  Blend in eggs and purée. Combine flour, baking soda, baking powder, salt and pumpkin pie spice and stir well so everything is distributed well. Combine and vanilla. Add milk and flour mixtures alternately to sugar mixture, ending with dry mixture. Mix well. Turn into greased and floured 10 inch bundt pan. Bake at 325° for 60 to 65 minutes.

Butter sauce:

1 cup granulated sugar

1 teaspoon pumpkin pie spice
1/4 cup water
1/2 cup butter
1 tablespoon vanilla extract 


Mis pie spice and sugar well, Put sugar, water and butter into a small saucepan. Heat until butter melts; add 1 tablespoon vanilla. Poke holes into top of cake with a fork or wooden skewer. Pour sauce slowly over cake while cake is in pan. Cool before removing from pan. 


Pin this!


Wednesday, September 27, 2017

Veggie Wednesday: Last of the Harvest Salad


We are very much at the end of tomato season, and yet, with 90 degree days this week you'd think it was still mid-summer. Hot days don't match with apples and pumpkins and all things fall, so I went with my gut (no pun intended) and scrounged around for the makings of a beautiful salad.

Most people see purslane as a weed and, indeed, it does appear that way in the yard - tentacling out onto the sidewalk and looking like a general nuisance. However, purslane is somewhat of a wonder in that it contains more Omega 3s than any other leafy plant life. Have a look here to read more!

Also, marigolds are not just pretty, they are edible! Check this out for exactly how to deal with them.

Now, I am not going to give you a recipe as this should be self-explanatory. Tiny little heirloom tomatoes tossed with cucumber, purslane, and your favorite vinaigrette and topped with a beauty of a marigold makes for such a pretty plate. I wish these things were available in my yard all year long.

Monday, September 25, 2017

Beef and Cheese Crostata

Beef and Cheese Crostata


Crostata is usually a sweet dessert, but this savory preparation is a delicious and different dinner that disappears each time I make it. I make two of these as my kids are very hearty eaters. Change the onions to 1 teaspoon onion powder if you have picky eaters. Serve with a veggie and salad.

Beef and Cheese Crostata


Beef and Cheese Crostata

Hands-On Time: 5 minutes
Ready In: 35 minutes
Yield: Serves 3 - 6

Ingredients:

1lb.  ground beef
1/4 cup finely chopped onion (or 1 teaspoon onion powder)
1 clove garlic, minced
1/2 cup prepared brown gravy
1/2 cup finely shredded cheddar cheese
1 refrigerated pie crust

Directions:

1. Preheat oven to 375 degrees F.
2. Remove pie crust from refrigerator and let come to room temperature before unrolling. Make sure crust is 12-inches in diameter. If not, roll until it measures correctly.
3. Place crust on an ungreased baking sheet.
4. Brown ground beef with onions and garlic and drain completely. Season with salt and pepper.
5. Stir in gravy and spoon onto pie crust, leaving an edge of 1-inch.
6. Fold pie crust just over the edge of the meat mixture and bake for 20 minutes or until crust begins to brown.
7. Add cheese to the top and bake for another 5 minutes until cheese is melted.
8. Let cool for 5 minutes and cut into 6 wedges.

Friday, September 22, 2017

Pumpkin Milkshakes

Pumpkin Milkshakes


Pumpkin time usually means warm and comforting baked goods, but I am of the mind that milkshakes are a year-round treat. This one combines vitamin-A rich pumpkin puree, creamy vanilla ice cream and just the right amount of spice to make it the perfect cool harvest drink.

Pumpkin Milkshakes
Hands-On Time: 5 minutes
Ready In: 5 minutes
Serves: 2

Ingredients:

2 cups vanilla ice cream
1/3 cup pumpkin puree
1/2 teaspoon pumpkin pie spice
1/4 cup milk
2 Tablespoons light brown sugar
whipped cream

Directions:

1. In a blender combine ice cream, puree, spice, milk and brown sugar. Pulse until
smooth.
2. Pour into 2 (8 ounce) glasses and top with whipped cream.

Wednesday, September 20, 2017

Barbunya Pilaki

Barbunya Pilaki

The first time I had Pilaki was several months ago when I stopped in to a local Middle Eastern cuisine restaurant, Anatolian Kitchen. My daughter Katie is a vegetarian and I knew there would be excellent options there for her on a lunch date.

My food knowledge is fairly extensive as I read, breathe, and live food on a regular basis, but somehow I had never heard of this particular dish. Pilaki is a Turkish dish made of what you see here in this recipe, and is named differently for the color or type of bean being used: barbunya for red or pink beans, and fasulye with white beans.

Katie really enjoyed this, so when I got home I looked up recipes and used several to come up with what I knew she would like. This is that recipe. By all means, cook your beans from dried if you have the time, but this quicker method is tasty, as well. I also have thrown everything into the pressure cooker for a quick 15 minute cook and that was delicious, as well.

Barbunya Pilaki
Serves 4

Ingredients:

1 14 ounce can of roman, borlotti, or cranberry beans drained- can also use kidney beans (pictured)
4 Tablespoons olive oil
1 medium yellow onion - finely chopped
2 cloves garlic - minced
1 large carrot - peeled and diced
1 large potato - peeled and diced
2 large plum tomatoes - seeded and chopped
2 cups water
1 Tablespoon Kosher salt
1 teaspoon coarse grind black pepper
Juice of 1 lemon
1/4 cup flat leaf parsley - chopped


Directions:

1. Heat olive oil in a heavy bottomed pot, add onions, carrots, and garlic. Cook until onions are translucent, about 5 minutes, stirring occasionally.
2. Add potato, beans and tomatoes with water and bring to a boil. Lower heat to a simmer and cook for 20 minutes or until vegetables are tender and a thick stew has formed.
3. Stir in lemon juice and parsley - reserving a Tablespoon of parsley for serving.
4. Ladle into bowls and to with parsley.

Monday, September 18, 2017

Baked Pennoni

Baked Pennoni

Here is another easy meal for busy school nights. One of my favorite uses for ShopRite Certified organic Imported Specialty Pasta is this recipe. It goes together quickly, bakes in one pan and disappears in no time. Pennoni is perfect here because the cheese and sauce get into each piece of pasta and fill them with cheesy goodness.

I love ShopRite Imported San Marzano DOP tomatoes in the sauce for their rich flavor. Add a green salad for a complete meal the whole family will love.

Baked Pennoni
Serves 4-6

Ingredients:

2 cups ricotta cheese
1 whole egg
1/2 pound ShopRite Imported Pennoni pasta
2 Tablespoons olive oil
1/4 cup chopped onion
1 can ShopRite Imported DOP San Marzano whole tomatoes
4 fresh basil leaves
3 cloves garlic - minced
1/2 teaspoon dried oregano
salt to taste
sugar to taste (about 1 to 2 teaspoons)
1 cup shredded Mozzarella
1 cup grated Parmesan-Romano cheese

Directions:

1. Heat oven to 350 degrees F.
2. Cook Penonni until al dente. Drain and keep warm.
3. Combine ricotta and egg. Blend well and add pepper and 3/4 cup of each cheese. Set aside.
4. Cook onion in oil in a small saucepan until translucent. Crush tomatoes and add to onion with basil, garlic, oregano, salt and sugar. Simmer for 20 minutes.
5. Spray a 2 quart baking dish or casserole with cooking spray and set aside.
6. Combine pasta, sauce and ricotta mixture and blend well. Pour into casserole and top with remaining cheeses.
7. Bake for 30 minutes or until bubbly and slightly browned on top. Let stand for 15 minutes before serving.

Friday, September 15, 2017

Cheddar Walnut Bread

Cheddar Walnut Bread

I love a good sweet bread. Mostly I make things like zucchini, or pumpkin, or banana, but I found myself craving the dense, moist texture of those breads without the sweetness. I wanted a delicious nut and cheese bread that wasn't dry, but also wasn't full of sugar. I searched and searched and all I could find were breads with a large crumb and too much added sugar.

I experimented a lot and finally settled on this recipe. It's not as heavy as a banana bread would be, but not as light as a biscuit or yeast bread. It's somewhere in the middle with a beautiful savory flavor that's just perfect for these crisp fall days.

Cheddar and Walnut Bread
Makes 1 loaf

Ingredients:

1/2 cup butter-melted
1/4 cup vegetable oil - I use olive oil
2 Tablespoons granulated sugar
4 eggs
3 cups all-purpose flour or bread flour
1 cup whole wheat flour
4 teaspoons baking powder
1/2 teaspoon baking soda
1 teaspoon table salt or 1 Tablespoon Kosher salt
1 cup chopped walnuts
1 1/3 cups milk
3 cups finely shredded sharp cheddar cheese

Directions:

1. Preheat oven to 350 degrees F.
2. Mix together butter, oil, salt and sugar.
3. Add eggs one at a time, blending after each addition.
4. Sift together flours, salt, baking powder and baking soda--add to egg mixture alternately with milk. Mix well.
5. Add cheese and nuts and blend until combined.
6. Spoon into two greased  and floured 9x5 loaf pans.
7. Bake at 350 degrees F for 1 hour until a toothpick inserted in the center of each loaf comes out clean.


Wednesday, September 13, 2017

Veggie Wednesday: Roasted Vegetables and Quinoa

Roasted Vegetables and Quinoa

I love the versatility of this dish. It's packed with heart-healthy everything and tastes wonderful hot or cold. Add different vegetables to your liking and change up the cheese if you so wish.

Roasted Vegetables and Quinoa
Serves 4-6

Ingredients:

1 cup diced zucchini
1 cup quartered artichoke hearts - not marinated
1/2 cup pitted Kalamata olives
2 plum tomatoes - diced
1/2 cup roasted red pepper - diced
1/2 cup yellow onion - diced
2 Tablespoons olive oil
1 large clove garlic- minced
1 cup uncooked quinoa
1/2 cup crumbled feta cheese
2 Tablespoons good olive oil vinaigrette
Salt and pepper to your liking

Directions:

1. Toss vegetables with olive oil and garlic and lay on an un-greased baking sheet. Bake at 425 degrees F for 15 minutes, or until vegetables begin to brown on the bottom. Set aside.
2. Cook quinoa according to package directions. This is usually 1 cup of quinoa, rinsed very well, and 2 cups of water with salt brought to a boil, reduced to simmer, and cooked for 10-12 minutes.
3. Combine veggies, quinoa, and dressing and fold together until well blended. Top with feta cheese. Eat hot, room temperature, or cold.

Monday, September 11, 2017

Pasta with Sausage and Peppers


This lighter take on sausage and peppers is a great weeknight meal that takes very little time to prepare. I use leftover sausage links that have already been cooked to make prep time faster. The tri-color peppers add color and flavor, but if only green are available, that works well, too. Serve with a bagged green salad for a quick back-to-school dinner.

Pasta with Sausage and Peppers

Hands-On Time: 5 minutes
Ready In: 20 minutes
Yield: 6-8 servings

Ingredients:

12 ounces farfalle pasta, cooked al dente according to package directions
2 Tablespoons olive oil
3 sweet peppers, one each yellow, green and red, sliced in 2-inch pieces
3 cloves garlic, minced
1/2 cup chicken, vegetable, or beef stock
1 pound sweet Italian sausage, cooked and sliced 1/4-inch thick
1/4 cup fresh basil, chopped
Salt to taste
Red pepper flakes to taste - optional

Directions:

1. Heat a large skillet over medium-high heat and add olive oil. Add peppers and cook briefly until they just start to soften, about 4 minutes. Add garlic and stir.
2. Pour in stock and cook for 2 more minutes.
3. Toss sausage slices with peppers and add in pasta. Toss well so all ingredients are combined.
4. Add basil and salt to taste before serving hot.

Wednesday, September 06, 2017

Veggie Wednesday: Seven Layer Taco Dip


FOOTBALL! Yes, that's right, on Thursday, September 7, 2017 it's football season again. I'm excited, can you tell? Aside from some minor issues and wondering about players and who will stay and who will play, the Steelers still have it going on and I'm crossing all I have for a spectacular season!

On to the dip - this was originally published at Family.com on my blog, and even made its way to ESPN (still there!). No football game is the same without excellent nosh and this is a great start to this season's football food. Seven layers add up to one delicious dip that is a favorite everywhere. The best part of this recipe is that you can substitute any fat percentage in the beans and dairy products without affecting the flavor of the finished product.

Seven Layer Dip

Ingredients:

1 can (16 ounce) refried beans
1 packet (1.25 ounce) taco seasoning mix
1 1/2 cups prepared guacamole
1 cup sour cream
2 Tablespoons chopped fresh cilantro
1 Tablespoon lime juice
1 cup salsa
1/2 cup each shredded Monterey Jack and Cheddar cheese
1 can (4 ounces) sliced black olives - drained
1 cup sliced green onion tops only

Directions:

1. Combine refried beans with taco seasoning and blend well. Set aside.
2. Mix together sour cream with lime juice and cilantro. Set aside.
3. In a 10-inch pie plate or 9x9 baking dish, spread refried beans and top with guacamole, sour cream mixture, salsa, shredded cheeses, sliced olives and green onion.
4. Cover tightly with plastic wrap and store in the refrigerator until serving time, or serve immediately with corn chips.

Monday, September 04, 2017

Chili and Chips

Chili and Chips


This simple Chili and Chips is one of my kids' favorite one-bowl meals, and mine, too! It goes together in one pot and prep-time is super fast. Choose whatever type of tortilla chips you like. Our family goes bean-less and the kids don't like chunks of tomatoes, but any type of tomato can be added along with beans for a heartier chili.

Chili and Chips

Hands-On Time: 5 minutes
Ready In: 35 minutes
Yield: Serves 6

Ingredients:

2 pounds ground beef
2 cans (15 ounces each) tomato puree
1 cup beef stock or broth
2 tablespoons chili powder
1 teaspoon dried oregano
1 teaspoon paprika
1 teaspoon ground cumin
1/2 teaspoon cayenne pepper
1/2 teaspoon salt
1 - 10 ounce bag scoop-type corn chips

Garnishes:
shredded cheese
sliced green onion
sour cream

Directions:

1. Brown ground beef well, breaking up as it cooks to keep any large lumps from forming.
2. Drain excess fat and add tomatoes, stock and seasonings.
3. Simmer for 30 minutes and serve in bowls with corn chips and desired garnishes.

Friday, September 01, 2017

Orange and Chocolate Brownie Bites


Two classic flavors combine in one decadent little bite. These are so delicious and easy to prepare that nobody will know you didn't slave away in the kitchen for hours. These are like the ones you buy at your local store bakery, but so much better!

Orange and Chocolate Brownie Bites

Hands-On Time: 5 minutes
Ready In: 30 minutes
Serves: Makes 24 bites

Bites:

1 c semi-sweet chocolate chips
1/2 cup butter (1 stick)
1/2 cup flour - rounded
1/4 teaspoon salt
2 large eggs
3/4 cup packed light brown sugar
1 Tablespoon orange zest

Frosting:

1 stick butter
2 cups powdered sugar
1 Tablespoon orange zest
2 Tablespoons orange juice

1. Preheat oven to 350 F. Line 24 mini-muffin cups with paper liners or grease well.
2. Melt chocolate chips and butter together until smooth and let cool to room temperature. Set aside.
3. In another bowl, mix flour and salt together and set aside.
4. Mix eggs and brown sugar together with orange zest.
5. Add chocolate mixture to egg and sugar and stir until well blended.
6. Stir in flour until just combined.
7. Divide evenly into muffin cups and bake for 12-15 minutes until the edges are set but the centers are moist and fudgey.
8. Cool for several minutes before frosting.
9. For frosting, blend butter and zest together well. Add powdered sugar a cup at a time and orange juice last. Mix until fluffy.

Wednesday, August 30, 2017

Veggie Wednesday: Fiddlehead Ferns


Raw Fiddlehead Ferns

Fiddlehead ferns, so named for the shape they grow into, are a delicious addition to your spring vegetable repertoire. Similar in flavor to asparagus, with a slightly bitter finish akin to broccoli rabe, they have a wonderful texture and bite to them and have become something I look forward to each year.

Before you dive head-first into a patch of sprouting ferns, there are a few bits of information that will be beneficial to you.

Some fiddlehead ferns are classified as 'toxic' and supposedly the ostrich fern is the least so. The general consensus is that they can cause gastrointestinal upset if too many are eaten. I haven't had problems with them, though, so I feel that the ostrich ferns are just fine. Go easy if you're trying them for the first time just to be on the safe side.

One thing you don't want to do is forage for them yourself unless you are very skilled at foraging. Look at Whole Foods or local farmers' markets during the month of May and you will likely find decent specimens. They can sometimes come with a sort of covering on them that resembles very fine garlic skin, but brownish in color. Simply give them a good rinse in clear water and you should be good to go.

Cooked Fiddlehead Ferns

Although they can be eaten raw in salads, I've not done so, preferring the change of texture once cooked. If you boil them, do so for 5 to 8 minutes only, any longer renders them mushy and flavorless. I like them sauteed in butter and garlic with a bit of sea salt and a squeeze of lemon juice, but I've also had them in a quiche with ham and cheese. Gently coddled by the cooking egg and cream, they are kept from overcooking and still have a nice crunch not unlike that of a lightly cooked fresh green bean.

Quiche with Fiddlehead Ferns

Fiddlehead Quiche

1 c  milk
1/2 c  light cream
3   large eggs
1/2 t salt
1/4 t pepper
1 clove garlic-minced
2 T green onions-sliced
1 c  grated cheese-Swiss or Gruyere
18   fiddlehead crosiers, cooked
2 slices ham-chopped
grated nutmeg, to taste
1    8" pastry shell, unbaked

Beat milk, cream and eggs well. Add salt, pepper, garlic and onions.
Sprinkle half of the cheese in the bottom of the pastry shell.
Arrange fiddleheads and ham over the cheese.
Pour in the egg mixture, add the remaining cheese, and grate fresh nutmeg over the top.
Bake at 375 degrees F for 30 minutes, or until a knife inserted in the center comes out clean.


Whatever you do with them, don't limit yourself - they are really something everyone should try once and I promise you it's worth it.


Monday, August 28, 2017

Orange Pork Cutlets and Baby Bok Choy

Orange Pork Cutlets and Baby Bok Choy

Baby bok choy is the smaller and more tender version of regular bok choy. It cooks quickly and does not need to be separated or chopped to cook.

Orange, soy and garlic combine in a delicious sauce that coats pork chops and baby bok choy perfectly. If baby bok choy is not available, use the more mature version and cut into large chunks. Serve alone or with rice or rice noodles.

Orange Pork Cutlets and Baby Bok Choy

Hands-On Time: 15 minutes
Ready In: 20 minutes
Yield: Serves 4

Ingedients:

1 1/2 pounds thin cut boneless pork chops - about 8
1/2 cup all-purpose flour
1/4 cup cornstarch
1/2 teaspoon Kosher salt
2 Tablespoons vegetable oil
juice and zest from 1 large orange - about 1/3 cup juice
1 large clove garlic - minced
2 tablespoon soy sauce
4 to 8 heads baby bok choy (we eat 2 each because we love it)

Directions:

1. Combine flour, cornstarch and salt in a shallow bowl.
2. Heat oil in a skillet over medium-high heat and add chops. Brown chops for 6 minutes per side and set aside.
3. In the same pan add garlic, soy, juice and zest. Simmer for 2 minutes and add bok choy to pan.
4. Cook for another 4 minutes and push to the side. Add chops back into pan to coat with sauce.
5. *Optional* Serve with rice or rice noodles.

**Note: Any citrus will yield more juice if you first roll it back and forth, using medium pressure, on a firm surface.

Friday, August 25, 2017

After School Snacks

By the time my kids walk through the door after school, they are nearly zombies owing to the fact that they're famished. I think they would eat just about anything at that point, and they tend to make poor choices because they are so hungry. They also eat too much and then aren't so hungry when it comes to dinner time. To keep them from consuming an entire package of licorice (yes, one child did this), I try to have healthier alternatives on hand. Each of these is a favorite and, yes, there is a pizza theme running through - what kid doesn't love pizza?


Graham crackers are a terrific source of 'hidden' whole grains. Kids don't have any idea they're better for them and topped with fruit spread and low fat cream cheese they have just the right combination of whole grain and protein to make the perfect after-school snack. They also taste just like fruit cheesecake!

Use whichever fruit spread you like and complement it with fresh fruit of the same type, or switch it up by adding a different fresh fruit to the top.

Cheesecake Snacks
Hands-On Time: 5 minutes
Ready In: 5 minutes
Serves: 4

Ingredients:

6 whole graham crackers - split in half (Try Annie's Homegrown, or Back to Nature brands)
4 ounces low fat cream cheese
1/4 cup strawberry or other all-fruit spread (this is the stuff without sugar added)
sliced fresh fruit - optional

Directions:

1. Combine cream cheese and fruit spread and stir until smooth.
2. Spread on graham cracker halves and top with fresh sliced fruit if desired.
3. Refrigerate for up to 1 hour, lightly covered.


An old snack standby in our house is packets of cheese and crackers. The kids love them but they can get expensive and there are usually too many preservatives for my liking. Making my own is not only economical, but healthier as I can control the fat content and the amount of preservative the kids are getting. Whip up the cheese ahead of  time and spread it for the kids or let them do it themselves with a safe knife.

Cheese and Cracker Snacks
Hands-On Time: 20 minutes
Ready In: 20 minutes
Serves: 8

Ingredients:

4 ounces low fat or fat free cream cheese
1 cup low fat cheddar cheese - shredded (Shred your own! The pre-shredded stuff has fillers.)
1 Tablespoon milk
1/4 teaspoon salt
1/4 teaspoon paprika
96 snack crackers 1 1/2 to 2 inches in size

Directions:

1. Combine cream cheese and cheddar in a blender with milk and pulse until very smooth.
2. Stir in salt and paprika to taste.
3. Spread evenly on 48 of the crackers. Top with remaining crackers and push down
lightly.
4. Serve immediately or store cheese covered in the refrigerator for up to 3 days.


Little nuggets of energy never tasted so good! Change the add-ins to anything you'd like in the same amounts listed and customize to your liking. You can also roll these in coconut for extra texture.

PB Energy Balls
Hands-On Time: 10 minutes
Ready In: 1 hour 10 minutes
Yield: 24

Ingredients:

1/2 cup peanut butter
1/3 cup honey
1/2 teaspoon vanilla extract
1/4 teaspoon ground cinnamon
1 cup old-fashioned rolled oats
1 cup crisp rice cereal
1/4 cup sunflower seeds or chopped nuts
1/4 cup chopped dried cranberries or mini chocolate chips

Directions:

1. Blend together peanut butter, honey, vanilla extract and ground cinnamon until smooth.
2. Pour in oats, rice cereal, seeds and cranberries and mix until coated well.
3. Refrigerate for 1 hour and roll into one-inch balls.
4. Put into an airtight container and refrigerate for up to 2 weeks.


Kids love pizza, and these crackers are a great mini-version for after school snacks. Add whatever toppings you like, broil for a few minutes and you're good to go!


Pizza Crackers
Hands-On Time: 5 minutes
Ready In: 9 minutes
Yield: 24 crackers

Ingredients:

24 crackers, about 1 1/2 inches in size
1 cup marinara sauce
1 cup shredded mozzarella cheese
1 cup toppings such as, olives, broccoli, peppers, ham, pepperoni, sausage etc.

Directions:

1. Preheat broiler and lay crackers on a baking sheet.
2. Top each cracker with sauce, cheese and desired toppings.
3. Broil 3-4 minutes or until cheese melts.


Pita Pizza Pockets
Hands-On Time: 5 minutes
Ready In: 6 minutes
Serves: 4-8

Ingredients:

4 whole wheat pitas
2 cups shredded mozzarella cheese
1 cup pizza sauce
2 ounces sliced pepperoni

Directions:

1. Cut pitas in half crosswise, making 2 pockets each.
2. Fill each pita half with 2 Tablespoons pizza sauce, 1/4 cup mozzarella and several
slices pepperoni.
3. Microwave for 30 to 60 seconds for 2 halves, checking after the first 30 seconds.
4. Cool briefly if necessary and serve.