Showing posts with label kids. Show all posts

Thursday, May 23, 2013

Cooking with My Kids

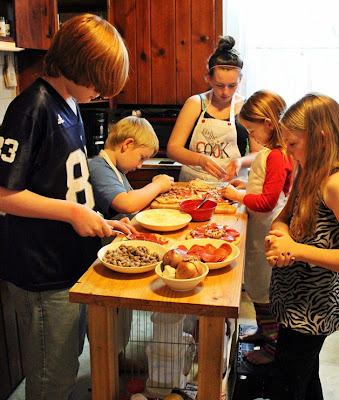
Kids Making Pizza
Five of the Kids Making Pizza
I've been raising children for 23 years now and by the time I've "raised" them all (you know, to the magical age of I'm-never-moving-out-18) I'll have been raising kids for 35 years. That's a lot of kid time and a whole lot of meals, especially as there are so many of them.

One in a while I let go of my OCD self and let them help cook. The results aren't always perfect and I find myself looking over shoulders and correcting, but usually they have a good time. Kids are always more likely to eat something they've helped prepare, so it helps me avoid uneaten meals and rounds of, "Ew! I can't eat that!"

Kids Making Pizza
Another Pizza Night

Not all of the kids are adept at cooking and several just flat out would rather eat, but my 8 year-old, Ian, is something of a whiz in the kitchen. Ian is on the Autism spectrum with high functioning Asperger's. He is bright and cute and loves to be in the kitchen with me. He is also frustrating as hell and some days just the sound of his voice makes me a nervous wreck - you never know what he'll be ready to dish out on any given day. Once I have him in the kitchen, though, he is calm, focused, ready to learn and non-argumentative. A perfect helper and very good at what he does.

Kids Cooking
Ian Cooking Spinach

All of the kids have helped when we make pizza together and they all love that; they can choose whatever toppings they like, stretch their pizza into whatever shape they like and take as much time getting it together as they like. Beyond pizza, though, the other kids don't really like to be in the kitchen helping ... they'd rather hover like buzzards waiting to go in for the kill.

Kids Cooking
The Littlest Munchkin, Lara, Making Pizza

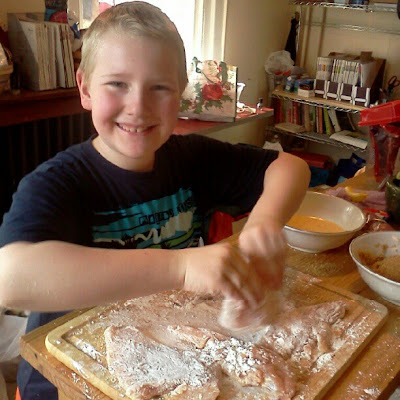
Not too long ago Ian asked (as always) if he could help prepare dinner. I was making fried chicken that night and was convinced there was nothing he could help with. He watched me use a standard breading procedure for chicken cutlets and then announced that he could do it.

I reluctantly told him he could and then explained "wet hand - dry hand" to him. Off he went. He did so well with it that I almost couldn't get the chicken fried fast enough. He truly excelled at breading chicken. I was so amazed and proud I had to take a picture of him - which he loved.

Kids Cooking
Ian Breading Chicken
As soon as his part was done and I assured him there was nothing else I needed help with, he ran off and got into trouble with his siblings. But, while he's in that kitchen with me, with his hands flying and his brain chill and concentrating on the task at hand, he's fine. We talk, he asks questions about what we're doing,  and he even tells me, "I'm learning so much from you, mom!". This from the same child who will tell me he hates me when I won't let him have his way.

I'm thinking a culinary path is in his future, and that would be just fine with me ... because some day HE will be the one making dinner for me.


Monday, June 11, 2012

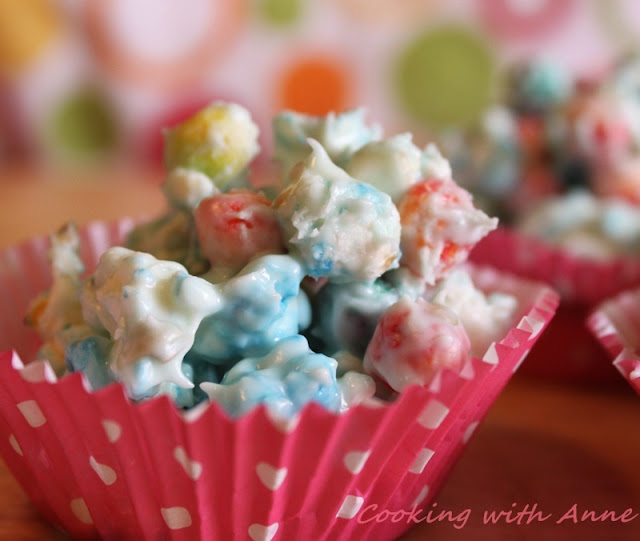
No-Bake Vanilla Snowballs


No-Bake Vanilla Snowballs


Taken directly from my post at Family.com for No-Bake Vanilla Snowballs, these are easier and cuter than ever thanks to Pop-Secret's Magic Colors microwave popcorn. A pretty blue hue adds just the right touch. These are perfect for parties, bake sales or after-school snacks. 


Beauty and the Snowball

Regular popcorn is just as good and any colored cereal can be used. This time I went with Trix because it's such a vibrant contrast to the blue popcorn. Experiment and see what you can come up with!


No-Bake Vanilla Snowballs
Printable Recipe

Ingredients:

One 12 ounce package white chocolate chips or white coating
4 cups popped popcorn
2 cups fruit flavored O's cereal

Directions:

Melt chips or coating until smooth.
Pop popcorn according to directions and place in a large bowl. Shake well to get all the unpopped kernels to the bottom. Measure out 4 cups.
Measure cereal and mix with popcorn.
Blend together with melted chocolate until coated well.
Measure into cupcake liners with a 1/3 cup measure. Grease hands and pat cereal together where needed. 
Let cool for 30 to 45 minutes or until hardened.


Friday, July 31, 2009

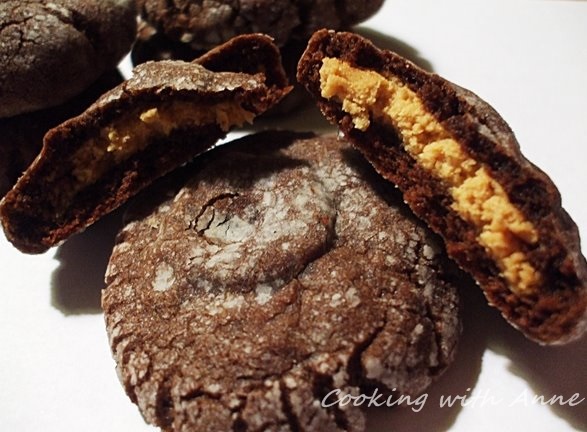
Peanut Butter Munchies


Peanut Butter Munchies
Today in the Lehigh Valley we started out hot and humid, but after a much-needed thunderstorm, things cooled off quite nicely to a very comfortable 70 degrees and for me that means cooking. More specifically today, it was baking.

On our last trip to Philadelphia, I came across a Better Homes and Gardens magazine in the waiting room of a doctor's office. With the only other choices being The Economist and Field & Stream, I chose wisely and read it through twice during the 3 hour waiting time.

This recipe was in there, and as I had extra time on my hands, I copied it down. I made them this evening, in honor of the cooler weather, and the kids are devouring them as I write. Oh, and the storage instructions at the bottom are clearly for people not living on this planet - there's not going to be anything to store in this house.

Peanut Butter Munchies

Makes: 32 cookies
Printable Recipe

1-1/2 cups all-purpose flour
1/2 cup unsweetened cocoa powder
1/2 teaspoon baking soda
1/2 cup butter, softened
1/2 cup granulated sugar
1/2 cup packed brown sugar
1/4 cup peanut butter
1 egg
1 tablespoon milk
1 teaspoon vanilla
3/4 cup sifted powdered sugar
1/2 cup peanut butter
2 tablespoons granulated sugar

1. Preheat oven to 350 degree F. In a medium mixing bowl stir together flour, cocoa powder, and baking soda; set aside.

2. In a large mixing bowl beat together butter, the 1/2 cup granulated sugar, brown sugar, and the 1/4 cup peanut butter with an electric mixer until combined. Add egg, milk, and vanilla; beat well. Beat in as much of the dry ingredients as you can with mixer. Stir in remaining dry ingredients by hand with a wooden spoon. Form chocolate dough into 32 balls about 1-1/4 inches in diameter. Set aside.

3. For peanut butter filling, in a medium mixing bowl combine powdered sugar and the remaining 1/2 cup peanut butter until smooth. Shape mixture into 32 (3/4-inch) balls.

4. On a work surface, slightly flatten a chocolate dough ball and top with a peanut butter ball. Shape the chocolate dough over the peanut butter filling, completely covering the filling. Roll dough into a ball. Repeat with the remaining chocolate dough and peanut butter filling balls.

5. Place balls 2 inches apart on an ungreased cookie sheet. Lightly flatten with the bottom of a glass dipped in the 2 tablespoons granulated sugar. [NOTE: I rolled mine in powdered sugar before flattening slightly]

6. Bake cookies in preheated oven for 8 minutes or until they're just set and surface is slightly cracked. Let cookies stand for 1 minute. Transfer cookies to wire racks; cool. Makes 32 cookies.

To Store: Place in layers separated by waxed paper in an airtight container; cover. Store at room temperature for up to 3 days or freeze for up to 3 months.
Monday, July 20, 2009

Ian (5), Lara (2) and Katie (8)

What is it about Popsicles (which is a brand name, by the way) that is so perfectly Summer? I've written about them before, at Family.com (click for the full article), and my children's love for them is as strong as ever.


Somehow today the only flavor left in the box was orange and the 3 youngest sitting on the stoop, barefoot and enjoying them was too rich to pass up. I haven't had a freeze-pop for a long time, but today when Lara wasn't able to finish hers, rather than tell her the usual, "Drop it in the sink", I took it from her chubby, sticky little hand and finished it. I'm not sure an orange popsicle has ever tasted so good.


Wednesday, August 20, 2008

Veggie Wednesday: Garden Goods


This past Sunday my youngest son, 4, decided to help me in the kitchen. He doesn't ask all the time, but fairly often. The kitchen is very small so I usually decline his request, but this time I let him don an apron (and a folded towel that his 7 year-old sister insisted made him "look like a chef") and help out.

We weren't having anything all too wonderful; baked burgers in gravy, roasted potatoes, green beans with zucchini and salad. He got the burgers and potatoes settled into their respective roasting pans and headed out to the garden with me. We picked green beans, a cucumber, two small zucchini, basil, parsley and chives. The green beans and zucchini were tossed together with butter, garlic and Italian herbs and the basil, parsley and chives were chopped and put into our salad.

You know, everything was decidedly tastier with things we grew ourselves and with such a fine little sous chef to work with.

Sunday, May 11, 2008

Mother's Day

I know of mothers who receive lavish gifts on Mother's Day; things like pearls or diamonds or large-ish household appliances. I am not one of those mothers, and I prefer it that way. I was spoiled absolutely rotten today by my children, and it didn't involve precious gems or machines that go, "whirrrrr".

These are the children responsible for my loverly day:


Quite cute, aren't they?

My oldest daughter (the tallest one in the back), Cassidy, started out my day with an idea that had sprung from my second oldest daughter's head (she's the second tallest in the back, Megan). Cassidy made me a most delicious breakfast of crepes. Yes, crepes. She had asked on Friday if I would teach her to make crepes. I did just that and then she surprised me by duplicating them precisely. We had a choice of apple stuffed or strawberry stuffed and I chose both. Of course. There were also raspberries, sliced kiwi and grapes to go along.


While she was slaving away in the kitchen (crepes for 9 is a true feat!) the rest of the kids showered me with gifts.


A garden made by Erin, complete with climbing Blue Bells along one wall.


Two fabulous cookbooks that Cassidy found in a used bookstore in Kutztown. How neat!

This card is from Erin. She made each of those boxes out of paper. True talent!

Erin taught Declan to make a box, and so he did. He put two lollipops in there for me!
One of Megan's signature cards. The entire inside is full of hand-drawn pictures and funny text that makes me smile.

A card from Katie (she's 7 this week!) that says, "You Rock, Mom". How sweet.

A place mat made by Katie that echos the sentiment of her card. She made this in school.


Megan thought I would like this cake. I've been asked by no less than four of my seven children if I would share it with them.

Lunch was sandwiches with a side of goat's cheese and a French baguette and also whole wheat pita and hummus. Megan knew these were my favorites and made sure to get them.

THEN ... oh yes, there's more ... Cassidy made a dinner of two pastas and two sauces; penne and angel hair, and Alfredo and four-cheese Marinara. It was all topped off with Italian bread, green salad, and the double chocolate cake I had made the night before.

Now, tell me, how on earth could diamonds beat that?

Wednesday, February 13, 2008

One of those weeks

I didn't forget Ready, Set, Cook! and I certainly didn't forget Veggie Wednesday, but this week has been really crazy with the 8 year-old home longer than I expected and weather woes causing early dismissals and snow days. So, I will post R,S,C! submissions next Tuesday (February 19th) and get back to Veggie Wednesday next week as well.

If you didn't get a submission in because you've had "one of those weeks", too, then please feel free to email it to me (irishones7 (@) juno.com) before next Tuesday and I'll gladly add it. I seem to have noticed that this week was a bit bad all around for many people I know. Let's all hope next week looks far better.

Monday, June 04, 2007

Rushing!

I'm on a full-steam-ahead schedule today so I'm rushing to get a post out. Today is the last day of school here which means school until 12 for the older elementary kids and a half day for K...that means that Katie goes to school from 10:30 to 12. I've already been there once today to drop off two of the other kids! Back again at 12 to get them all and we are DONE for the year-whew!

My oldest graduates tonight, so we have the ceremony to look forward to this evening as well. That and the forum I help moderate that needed a weekly set-up and the usual "kid stuff" like feeding and diaper changing and, well...you know.


Busy mama.

~~~~~~~~~~~~~~~~~~~~
SO...check out this blog I found over the weekend called
#1 Jerky Ramblings written by Greg Mathers. He is a distributor for Jerky Direct and shared this recipe with me and gave me permission to pass it on. I love jerky, and this recipe looks delicious!

Smoked Shredded Buffalo Jerky Cheese Log

8 oz cream cheese
2 teaspoon lemon Juice
¼ teaspoon garlic powder
½ teaspoon onion salt
1 tablespoon Worcestershire sauce
1 ½ cup grated cheddar cheese
1 cup (1 pkg) Hickory Smoked Shredded Buffalo Jerky

Put cream cheese, lemon juice, garlic powder, onion salt, Worcestershire sauce, grated cheese, and ½ cup jerky in bowl. Blend well. Take 12 in of wax paper and pour ¼ cup of jerky onto the wax paper. Take ½ of the cheese mixture and create a log of cheese by rolling it over the jerky. Completely cover the log with jerky, roll it up in the wax paper, and place it into the refrigerator overnight. Makes 2 logs.

When ready, cut log into disks and serve with crackers.

You can get the Shredded Buffalo Jerky at AVFundraiser.

Hickory Smoked Shredded Buffalo Jerky can be used as a low fat substitute for bacon. Use it in breakfast burritos, tacos, baked beans, quiche, Sloppy Joes, to top salads, and generally whenever you need a smoky meat flavor in your recipe. Keep a couple of bags handy for an emergency.

Greg

@*@*@*@*@*@*@*@*@*@*@


Tomorrow is our monthly game of Ready, Set, Cook!
BE THERE!

Wednesday, June 14, 2006

Summer Cooking 101 Part II, Big Ideas for Little Tummies

Flag Pizza
See the bottom of this post for a link on a how-to for this cute veggie-packed and kid-friendly pizza!

Feeding kids isn't easy. Anyone who is a parent or caregiver of children knows this one. Their tastes can change from day-to-day and much of the grown-up fare that the rest of us adore just doesn't do it for them.

My kids are not exempt just because I can cook. One of them has changed her tastes over the past year at a truly maddening rate. One week she loves the tuna cakes I've made for years, and the next she's telling me she hates them. I've already warned her that this is not a fast-food joint and she can't just order ala carte here. I think at this point she would rather go hungry than eat something she just doesn't like. I also know from experience with several of the other kids that she will outgrow it.

Some of what I make for the kids is flat out for fun, some of what I make is for hidden nutritional value, some of it is just because they like it.

Here are a few ideas and recipes to get your own imagination going. Almost all of these are great for Summertime too. This is just the very tip of the recipe and idea iceberg, I just don't have room for all of it!
~~~~~~~~~~

  • When it comes to making hoagies, the amount of bread in a normal hoagie roll is just too much for little ones and I often found rolls emptied of their contents and lying on a plate. So, to avoid having this happen I started using hot dog rolls for the smaller kids. Not only do they think kid-sized rolls are "cool" but they can also finish the whole thing. Whole wheat hot dog rolls are not yet the easiest to find but they are out there and are far better than the white flour type.
  • We love pita bread here for all manner of things (mini's are great for kid sandwiches) including pizza. It's about the simplest pizza "dough" going. Just lay out pitas and let the kids top them with their favorites and about 15 minutes in a 400° oven or a few seconds in the microwave is all you need.
  • What kid doesn't like ranch dressing? Well, actually I do have one that doesn't like it. My oldest son defies logic. Any kid eats a veggie disguised in cheese sauce or ranch dressing, right? Not Declan. But the good news is that most kids love the stuff and will eat any manner of cut-up veggie if there's enough dip to go with it.
  • Another way to get the kids to eat fruits and veggies is to make kabobs. Shish Kabob sticks (bamboo skewers) are very cheap and the kids love almost anything on them! Try varied fruits with a healthy dip like:

Honey Lime Yogurt Dressing

2c. plain yogurt
1/2 c. sour cream
1T. lime juice
1/2c. honey
1/4c. heavy cream
1t. parsely finely chopped

Mix together and allow flavors
to blend several hours or overnight.
(I used to serve this at my cafe and it was a big hit there!)

Chicken nuggets, hot dogs, turkey or ham cubes and cheese cubes are all great ideas for kabobs too.

  • Smoothies are a huge favorite here and they are so easy to make. I have quite a few recipes and if you would like them just email me (link above and in my profile) and I'll be more than happy to send them along. Basically any yogurt or ice cream (or even tofu!) with a fruit, fresh or frozen, and a touch of fruit juice will do it. Blend away and watch the kids consume them with lightning speed.

  • Yesterday I pulled a big no-no, nutritionally speaking; I bought freeze-pops. We all know they aren't more than colored sugar water but the kids love them and on a hot day I really don't mind them having one. There are healthier alternatives though and one of them is yogurt tubes. I never buy yogurt tubes that don't go directly to the freezer. The kids love yogurt (I buy plenty in cups) but they don't like the tubes in the "squishy" form as they call it. There are also recipes for fruit pops that you can make yourself with nothing more than popsicle forms (found several for $1 at Dollar Tree and Family Dollar both) and 100% fruit juice.

Another idea is these:

Easy Fudgesicles

1 12-oz. can evaporated milk (NOT condensed)
2 cups whole milk
1/4 to 1/3 cup chocolate syrup
3 level scoops (3/4 cup) hot chocolate mix powder
2 level scoops (1/2 cup) Nestle Quik
Popsicle molds - 8 to 12, depending on mold size

Pour evaporated milk, whole milk, and chocolate syrup
into a bowl and stir until blended. Heat until hot but
not boiling (microwave for about 4 minutes). Stir in
hot chocolate mix powder and Nestle Quik powder (a
wire whisk works best). Pour into popsicle molds and
freeze.

Snacks are a big thing here and if I let my kids do it, they would eat every 5 minutes throughout  the day. So, since I know they'll be asking alot I try to have healthier versions of things on hand. Many times that just means making it myself since the store bought type generally has more salt, sugar and preservatives than what I make. Apples with pb and honey dip go over big here and is a simple thing to prepare.

Also try:

Cheerio Bars
Servings: 6

1/2 c peanut butter
1/2 c sugar
1/2 c honey
3 c Cheerios
peanuts or chocolate chips

Bring sugar and honey to a boil in a saucepan. Remove from heat, stir in
peanut butter until well blended. Pour in cheerios and mix until well coated.
Spread in buttered 9 x 13 pan and let cool. cut in squares.

Cinnamon-Apple Fruit Rolls
Servings: 8

24 oz jar apple sauce
2 t cinnamon

Heat oven to 250. Line jelly roll pan with plastic wrap, securing ends.
In a bowl, combine all ingredients. Pour into prepared pan and spread evenly.
Bake at 250 for 1 1/4 hours. Turn off the oven and let stand in oven
2 to 3 hours until dry.
Cut into 8 squares and remove plastic wrap.
Roll up jelly roll fashion.


  • Two easy ways to make ice cream are in bags and cans. The kids think both ways are really neat and they can be involved in making the ice cream with no mess! Ice cream sandwiches are super easy with store bought cookies. They are also a little smaller that way and easier to handle for little ones.

Zip Lock Bag Ice Cream

2 Tbsp. Sugar
1 cup milk or half and half
1/2 tsp. Vanilla
6 Tblsp. rock salt
1 pint sized plastic zip bag
1 gallon-sized plastic zip bag

Fill the gallon zip bag half full of ice. Add rock salt and seal well (I've used duct tape before to be sure it's sealed!). Pour sugar, milk/half and half, and vanilla into the pint sized plastic bag and seal. Place the pint
sized bag into the gallon bag and seal. Shake the bag for 5-7 minutes.

I've never gotten it to work that fast but it may work differently for you. I use the 5 minutes as a checking time. If it isn't done then, we just keep going.

Tin Can Ice Cream

1 Cup Milk
1 Cup Whipping Cream
1/2 cup sugar
1/2 teaspoon vanilla extract
Nuts or fruit as desired

Put all ingredients in a 1-pound coffee can with a tight fitting plastic
lid. Place lid on can. Place can with ingredients inside a #10 can (larger
coffee can) with a tight fitting lid. Pack larger can with crushed ice
around smaller can. Pour at least 3/4 cup of rock salt evenly over ice.
Place lid on #10 can. Roll back and forth on a table or cement slab for 10
minutes. Open outer can. Remove inner can with ingredients. Remove lid.
Use a rubber spatula to stir up mixture. Scrape sides of can. Replace lid.
Drain ice water from larger can. Insert smaller can: pack with more ice and
rock salt. Roll back and forth for 5 more minutes. Makes about 3 cups. You
can also put a few clean marbles in the can to help stir the ingredients.
Just be sure to remove them before eating to avoid a choking hazard.
Tape this all up with duct tape and the kids can even (gently) kick it around!

Adding in this new and very valuable resource: Claire Crespo's A Very Veggie World cookbook. This link is a FREE download and the book is chock full of terrific kid-friendly veggie ideas, many perfect for the summer. See my post about it here and follow the first link for your own copy!  ~Anne, June 6, 2012