Showing posts with label sweets. Show all posts

Monday, July 10, 2017

Lime Angel Food Cake with Raspberry Sauce

Lime Angel Food Cake with Raspberry Sauce

Fluffy Angel Food Cake takes on a new twist with the addition of lime juice and zest. Paired with a simple raspberry sauce, this cake is at once delicate and decadent and altogether perfect for a lighter summertime dessert. The calorie count makes this even more desirable with most slices (one twelfth of a cake) coming it at around 170 calories.

Lime Angel Food Cake with Raspberry Sauce

Hands-On Time: 15 minutes
Ready In: 60 minutes (including cooling time)
Serves: 12

Ingredients:

10 -12 large egg whites (about 1 1/2 cups)
2 teaspoons lime juice
1 cup granulated sugar
1 Tablespoon lime zest
1 cup all-purpose flour
1 1/2 cups powdered sugar


Directions:

1. Preheat oven to 350 degrees F.
2. Sift together flour and powdered sugar. Set aside.
3. Combine egg whites and lime juice in a large bowl. Beat until soft peaks form.
4. Stir together granulated sugar and lime zest. Add by the tablespoon to egg whites and
continue to beat, adding until all sugar is gone, until stiff peaks form.
5. Fold flour and powdered sugar into stiff-beaten egg whites in four small additions.
6. Turn out into an ungreased 10-inch tube pan.
7. Bake for 40 - 45 minutes or until top springs back when touched lightly.
8. Turn pan over and cool with cake still inside pan. Cool completely.
9. Remove from pan gently and serve with Raspberry Sauce.


Raspberry Sauce

Hands-On Time: 1 minute
Ready In: 1 minute
Serves: Makes 1 1/2 cups

Ingredients:

1 1/2 cups seedless red raspberry preserves
2 Tablespoons lime juice

Directions:

1. Microwave preserves for 30 seconds until warm. This may take more or less time
depending on your
microwave.
2. Stir well until smooth.
3. Add lime juice and stir until well combined.


Monday, October 27, 2014

Meyer Lemon Cake with Chocolate Filling and Lemon Glaze

Meyer Lemon Cake
Meyer Lemon Cake with Chocolate Filling and Lemon Glaze

Yes, I baked again. I feel as though I bake very often - it's what the kids like - but I DO make savory dishes ... I promise. I couldn't help but make this cake. I came across Meyer lemons at Wegmans the other day (so early in the season!) and had to buy them; they're so difficult to find here. Once I had them I honestly had no clue what I was going to do with them.

Then came work. A very dear woman who was working with us for about half a year left us to go home to Florida this week and another worker made her a lemon cake as a sweet send-off. Now, the worker who made it was raised on boxed cake mix and quite honestly doesn't have much time at home to make anything from scratch, so she did her very best, and sweetest, and whipped up that cake for our friend. I then knew what I would be doing with those lemons - making a cake the way I was raised ... from scratch.

The kids were interested in the smooth-skinned specimens and all wanted to try this slightly sweeter lemon. They all liked it and milled about the kitchen as I made the cakes. Once they were baked and cooled and I was making the chocolate filling they were even more interested and the only question on their lips at the sight of the smooth chocolate icing was, "Is that for dessert after dinner?" Though I was done by 1 in the afternoon I had to crush their little hopes and tell them that it was indeed not going to be consumed until later in the day. Poor dears.

Here's the recipe in all its lemony-chocolaty loveliness. Please do let me know if you've made it so we can swap notes.

Meyer Lemon Cake with Chocolate Filling and Lemon Glaze
Beautiful, light and delicious cake!

Meyer Lemon Cake with Chocolate Filling and Lemon Glaze
Makes 1 cake

Ingredients:

3 cups sugar
1 Tablespoon grated Meyer lemon zest
2 sticks unsalted butter cut into cubes
4 1/2  cups cake flour
2 Tablespoons baking powder
1 teaspoon salt
2 1/2 cups buttermilk
8 large egg whites

Chocolate Filling*
Lemon Glaze**

Directions:

1. Preheat oven to 350 degrees F. Grease and flour two 10-inch round cake pans.
2. In a large mixing bowl pour in sugar and add lemon zest. Work zest into sugar well until fragrant. Add butter and beat until fluffy. Set aside.
3. In another smaller bowl combine flour, salt and baking powder.
4. In a third bowl combine egg whites and buttermilk.
5. Add flour and buttermilk mixture to sugar and butter a little at a time until well combined. This makes a thick batter.
6. Pour evenly into both cake pans and bake until a toothpick inserted in the center of each comes out clean. Cool completely before removing from pans.
7. Cover bottom layer with chocolate on the top only. Add second layer and pour glaze over the top. Serve at once.

Notes: Meyer lemons are very hard to zest - I removed the skin and scraped the pith before mincing with a knife. When using zest, always rub it together with the sugar for the very best fragrance and flavor.


*Chocolate Filling:

1 cup semi-sweet chocolate morsels
2 Tablespoons butter
1 - 2 cups confectioner's sugar
Milk as needed

Melt together chips and butter. Add in confectioner's sugar 1/2 cup at a time until smooth and spreadable. Add milk if needed to thin as you go.


**Lemon Glaze:

3 cups confectioner's sugar
2 Tablespoons Meyer lemon juice
Milk as needed

Combine sugar and juice. Stir well and add milk as needed to thin into a drizzling consistency.


Friday, June 06, 2014

Peaches and Cream Crostata

Peaches and Cream Crostata

If strawberries and cream at the beginning of the week wasn't enough, how about another classic combination; Peaches and Cream Crostata. When I made this the first time the kids (even the pickiest!) told me, "This is the best thing I've ever eaten!" I have to agree, it's mighty fine.

Peaches and Cream Crostata
Printable Recipe
Makes 1 crostata that serves 8
Hands-On Time: 15 minutes
Ready In: 1 hour

Dough:

1 cup flour
1 T sugar
1/4 t salt
1 stick butter - diced
2 - 3 T ice water

Stir flour, sugar and salt together well. Add butter and rub together until crumbly. Add water 1 Tablespoon at a time until dough forms a firm ball. Flatten and chill between waxed paper while prepping fruit.

Filling:

3 large peaches peeled and sliced thinly - about 2 cups
Sugar to taste if peaches are not sweet (I often don't need any)
8 ounces cream cheese
1/2 cup granulated sugar
1 teaspoon vanilla extract
1 egg

Prepared caramel sauce to taste

Directions:

Preheat oven to 350 degrees F

1. Roll dough on a well-floured surface into a 12-inch circle.
2. Place dough onto a baking sheet sprayed with vegetable oil (I use a silicone mat)
3. Combine cream cheese and sugar and mix until smooth. Add egg and vanilla.
4. Spread cream cheese mixture into the center of the dough leaving a 2-inch outside edge.
5. Top cream cheese with sliced peaches.
6. Fold dough over the top just at the edge leaving a circle of fruit in the center about 5-
inches in diameter. Don't worry about how it looks, the more rustic, the better!
7. Bake for 45 minutes or until center is set and edges begin to brown lightly.
8. Take out and let cool on pan completely. Top with as much caramel sauce as you like.


Wednesday, June 04, 2014

Pink Lemonade Bars

Pink Lemonade Bars
Pink Lemonade Bars

Pretty in pink lemon squares are a sweet-tart addition to any dessert table. When I make these they're devoured in no time and everyone always wants the recipe. These are great sellers at bake sales, as well. The youngest noseminer seemed to want these the other day after watching someone get sacked on MasterChef, so I dutifully made up a batch today. Let's see if she keeps me.

Pink Lemonade Bars

Hands-On Time: 15 minutes
Ready In: 1 hour 15 minutes
Yield: Makes 24 bars

Ingredients:

Crust:

1 cup (2 sticks) unsalted butter - softened
1/2 cup granulated sugar
1 teaspoon lemon zest
2 cups flour
Pinch of salt

Filling:

6 large eggs
1 cup freshly squeezed lemon juice
1 teaspoon lemon zest
1 1/2 cups granulated sugar
1/2 cup flour
Several drops of red food coloring
Powdered sugar for dusting

Directions:

For Crust:

Preheat oven to 350 F degrees and line a 9 x 13 baking pan with parchment or waxed paper.
Rub lemon zest into sugar until well combined and fragrant.
Cream together butter and 1/2 cup granulated sugar.
Stir flour and salt together and add to butter.
Stir with a wooden spoon until a soft dough forms.
Press dough evenly into the bottom of the prepared pan.
Bake for 20 minutes.
Remove from oven and cool.
Reduce oven heat to 325 degrees.

For Filling:

Rub lemon zest into sugar until well combined and fragrant.
Blend eggs and sugar until lemon-yellow and smooth.
Add lemon juice and food coloring until the color of pink lemonade.
Add flour slowly, stirring constantnly so lumps do not form.
Bake for 35 to 40 minutes or until firm. To check for firmness, give the pan a small shake -- if  there is little movement in the center of the filling, it's done.
Cool completely and dust with powdered sugar before cutting.

Toasted Coconut and Chocolate Chip Banana Nut Bread

Toasted Coconut and Chocolate Chip Banana Nut Bread
Everyone here loves banana bread and when you spruce it up with toasted coconut, peanut butter and chocolate chips it's just that much better! This makes 2 standard size loaves 9 x 5 inches.

Toasted Coconut and Chocolate Chip Banana Nut Bread
Printable Recipe

Makes 2 loaves

5 overripe bananas
3/4 cup granulated sugar
3/4 cup brown sugar
1 Tablespoon vanilla extract
4 eggs
3/4 cup cooking oil (I use olive)
3 cups all-purpose flour
1 teaspoon salt
1 1/2 teaspoons baking soda
1 cup toasted coconut
1 cup chopped walnuts
1 cup mini chocolate chips (regular size is fine)

1. Preheat oven to 350 degrees F. Oil and flour two standard loaf pans.
2. Mash bananas and add sugars. Mix to combine well, working out lumps.
3. Add oil, vanilla and eggs and beat well.
4. Stir together flour, baking soda and salt. Add to banana mixture.
5. Mix coconut and nuts together and set aside 1/2 cup. Blend remaining nuts and coconut into batter along with chocolate chips.
6. Pour batter into pans and top with reserved coconut and nuts.
7. Bake for 1 hour or until done when wooden pick inserted in center comes out clean.
8. Cool for 10 minutes before removing from pans.


Monday, June 02, 2014

Strawberries and Double Cream Muffins

Strawberries and Double Cream Muffins
Strawberries and cream is a classic combination and sour cream in the batter and cream cheese in the center make these muffins doubly delicious!


Strawberries and Double Cream Muffins
Printable Recipe

Makes 18 regular sized muffins


Ingredients:

3 cups all purpose flour
1/2 teaspoon salt
1 Tablespoon baking powder
1/2 teaspoon baking soda
1 cup granulated sugar
1 stick butter
1/2 cup vegetable oil
3/4 cup milk
1/2 cup sour cream
2 large eggs
1 teaspoon vanilla extract
2 cups strawberries - diced

Filling:

8 ounces cream cheese - softened
1/4 cup granulated sugar
1 large egg
1 teaspoon vanilla extract


Directions:

Grease 18 muffin tins and set aside
Heat oven to 375 degrees F

1. Blend together cream cheese and 1/4 cup sugar for filling until smooth. Add egg and vanilla and mix well. Refrigerate until needed.
2. Combine flour, baking soda, baking powder, salt and sugar. Set aside.
3. Melt butter and add to oil. Stir in milk, sour cream, vanilla and eggs.
4. Pour wet ingredients into dry and blend until just combined - there may be a few lumps. Fold in strawberries.
5. Spoon into prepared muffin tins 2/3 full. Drop filling onto top of each muffin - about a tablespoon for each. If refrigerated the filling will sink into the batter and settle in the center while baking.
6. bake for 20-25 minutes or until the tops spring back when touched. Cool completely in tins before removing.


Thursday, February 13, 2014

Pumpkin Granola Muffins

Pumpkin Granola Muffins
Pumpkin Granola Muffins 

Maple sugar and I have a love-hate relationship. For the most part, I love it, but in certain applications, I just can't do it. Flashback to childhood when an adult would approach with a box full of chocolates and offer one. We all know, thanks to Forrest Gump, "...you never know what you're gonna get". Now, some companies have markers for their chocolates, either in the form of a swirl or lines added to the top of the coated candy to clue you in as to what's in them, or they have a "map" on the inside of the box that corresponds to the layout of the chocolates.

I don't recall knowing either of those tricks as a child, so I would take what looked pretty or good and then be completely shocked, often times pleasantly so, but sometimes not so pleasantly. It was that way with the maple flavored candies. One bite and I was struggling to find a place to spit out the candy and dump the uneaten half (we all eat them in two bites ... admit it).

That is one instance in which I decidedly do not like maple sugar. Add maple syrup to pancakes, waffles, French toast, bacon, sausage etc. and I'm in heaven. Breakfast is not the same without it and I know most people feel exactly the same.

My other favorite is in granola, but I always felt as thought I were adding an inferior sugar without much nutritional value when I topped or added it to foods. Imagine my surprise when I found that is not the case. Maple sugar is very full of trace minerals, antioxidants and very good things. Look at this information from the Vermont Maple Sugar Makers Association.

Maple Syrup Nutritional Information
Fact Sheet

  • Maple syrup contains an abundant amount of naturally occurring minerals such as calcium, manganese, potassium, riboflavin and magnesium.
  • Maple syrup is a natural source of beneficial antioxidants, which have been shown to help prevent cancer, support the immune system, lower blood pressure and slow the effects of aging.
  • It’s more nutritious than all other common sweeteners, contains one of the lowest calorie levels, and has been shown to have healthy glycemic qualities.
  • Researchers have found that pure maple syrup contains numerous phenolic compounds, which according to the National Center for Biotechnology Information play an important role in cancer prevention and treatment.
  • Phenolic compounds are also commonly found in plants and in agricultural products known as “super foods,” such as blueberries, tea, red wine and flax-seed.
  • During a recent study at the University of Rhode Island, 34 new beneficial compounds were discovered in pure maple syrup.
  • Additional research is being conducted to synthesize some of these compounds into medications that could fight fatal diseases, including diabetes.
  • For more information, please visit http://vermontmaple.org 


Good stuff, yeah? On to the recipe for Pumpkin Granola Muffins using one of my favorite granolas Earthbound Farm's Famous Maple Almond Granola, which incorporates maple syrup. Yum. 

Pumpkin Granola Muffins
Printable Recipe
Makes 24 standard sized muffins or 12 large

Ingredients:

4 eggs
1 c white sugar
1 c brown sugar
l can pumpkin (15 oz.- about 2 cups)
3/4 c vegetable oil like canola
3/4 c olive oil
1 t vanilla
3 c flour
2 t baking soda
2 t baking powder
l t ground cinnamon or pumpkin pie spice
l t salt
2 cups granola - divided (Earthbound Farms Famous Maple Almond Granola is perfect here) 

Directions: 

1. In a mixing bowl, beat eggs, sugar, pumpkin and oils until smooth.

2. Combine flour, baking soda, baking powder, cinnamon and salt-add to pumpkin mixture and mix well. Fold in 1 1/2 cups of granola. 

3. Fill greased or paper-lined muffin cups three-fourths full and top with a sprinkling of the remaining 1/2 cup of granola. 


4. Bake at 400 degrees F for 16 to 20 minutes or until muffins test done. Cool in pan 10 minutes before removing to a wire rack to cool completely.

Wednesday, February 12, 2014

German Chocolate Icing

German Chocolate Icing
German Chocolate Icing on Gooey Brownies


My oldest daughter is very fond of coconut and loves German Chocolate Cake. This year for her birthday I did a riff on that and topped a gooey brownie with German Chocolate Nut and Coconut Icing. The result was to-die-for!

Choose any brownie you like or use this to ice a full two-layer cake. That means this covers a 9 x 13 pan of brownies with a little left over. I also think this would be just right for Valentine's Day.

German Chocolate Icing
Printable Recipe
Makes about 3 cups

Ingredients:

1 cup granulated sugar
1 cup evaporated milk
1/2 cup butter
3 eggs, beaten well
1 1/3 cups flaked coconut
1 cup chopped pecans, walnuts or almonds - traditional is pecans
1 teaspoon vanilla extract

Directions:

1. In a medium saucepan, melt the butter over medium heat then add sugar, evaporated milk and eggs.

2. Whisk together and cook and stir constantly until thickened. This can take 10 minutes to achieve. You must keep stirring so the eggs don't become scrambled eggs rather than a thickener.

3. Remove from heat and stir in nuts, coconut and vanilla until well blended. Cool for 30 minutes before adding to cooled cake or brownies.

Saturday, January 04, 2014

Cinnamon Rolls

Please excuse the quality of my photo - I haven't had time to set up at the new house! You get the idea.

I've been baking cinnamon rolls for years and years ... and years. For some odd reason I never thought to add them to my blog. I just never felt they were overly special and figured everyone already had a recipe. Well, I do like mine and I think the vanilla pudding mix added to it really adds flavor.

Cinnamon Rolls

Dough:
 
1/4 cup warm water
1 packet dry yeast
1 Tablespoon granulated sugar
1/2 teaspoon table salt
4 cups all purpose flour
1/2 package instant vanilla pudding mix (3.4 oz. package)
1 cup warm milk
1/4 cup butter - softened
1 large egg - lightly beaten


Filling:

1 cup packed light brown sugar
1 Tablespoon ground cinnamon
1/4 cup butter - melted


Cream Cheese Cinnamon Icing:

4 ounces cream cheese- softened  
1/4 cup butter - softened  
1/2 teaspoon vanilla extract
1/2 Tablespoon milk
1 1/2 cups powdered sugar
1/2 teaspoon ground cinnamon


1. Combine warm water, yeast and sugar together and let stand for 5 minutes. If mixture is bubbly proceed with the rest of the recipe.
2. Add salt and 1/2 cup of flour to yeast mixture and blend well.
3. Pour in milk, butter, pudding mix, egg and 1 cup flour and start blending in a stand mixer or with a hand blender.
4. Once smooth add remaining flour 1/2 cup at a time with a wooden spoon or dough hook attachment until flour is incorporated.
5. Run on medium speed for 5 minutes with a dough hook or knead by hand for 8-10 minutes or until dough is smooth and elastic.
6. Cover with plastic or a bread towel and let rise until doubled in bulk - about 1 hour.
7. Roll dough into a rectangle about 15 inches by 24 inches (or follow instructions HERE for "Sunshine Bread").
8. Spread dough with melted butter then sprinkle with sugar and cinnamon. Roll up from the long side and seal.
9. Cut into 12 equal pieces and place in greased round pans. Press down on each roll slightly to help them bake into the proper shape. Cover with plastic or bread towel and let rise again until double in bulk.
10. Bake for 15-20 minutes in a 350 degree F oven until golden brown and puffy.
11. Spread with icing if desired.

Cream Cheese Cinnamon Frosting:
In a small bowl, mix cream cheese, butter, vanilla and milk. Add powdered sugar and cinnamon and mix until smooth. Spread on warm rolls and serve immediately.


Wednesday, May 29, 2013

Raspberry Chocolate Cannoli

Raspberry Chocolate Cannoli
Last night we had a fabulous dinner. Really. I didn't realize just how fabulous until my social media outlets were all abuzz about it. I made braciole and homemade ravioli with my near-famous marinara. The kids loved it and so did the man. I only took phone photos (and it was rainy and yucky here so none were very good) and put them together so you can glimpse what was going on in my kitchen yesterday.

braciole and candy wrapper ravioli
Braciole with filling, rolled and tied, browned, covered in sauce, eggs and flour, pasta dough and machine, "candy wrapper ravioli (filled with Asiago and ricotta) and the finished dinner: Braciole sliced and ravioli cooked al dente before frying in butter.

The only thing that would have made this meal better would be these (or any!) cannoli. Italian cannoli can seem fancy and difficult to make, but with pre-made shells they're a breeze to do. Once finished they can be served with a special dinner or a simple dessert that kids love. Usually made with cinnamon, it's been swapped out here for raspberry extract.

Raspberry Chocolate Cannoli
Printable Recipe
Hands-On Time: 15 minutes
Ready In: 15 minutes
Serves: 6

Ingredients:

6 ready-made cannoli shells
15 ounces ricotta cheese
1/2 cup confectioner's sugar
1/4 teaspoon raspberry extract
1 -2 Tablespoons heavy cream - as needed
1 cup mini chocolate chips
Fresh raspberries - optional

Directions:

1. Whisk together ricotta cheese, confectioner's sugar and raspberry extract until smooth. Add heavy cream if needed. The mixture should be thick enough to pipe and hold its shape.
2. Fold in mini chocolate chips.
3. Transfer filling into a large pastry bag fitted with no tip and a large opening or a large round tip.
4. Pipe filling into each prepared shell, filling each in the center and out to the open ends.
5. Serve immediately with fresh raspberries if desired.

Friday, May 10, 2013

Red Velvet Truffles


Red Velvet Truffles
Red Velvet Truffles

Red velvet cake isn't anything new and neither are red velvet truffles, but I had to make these anyway. I started out a couple weeks ago attempting to make a version that was a riff on the Cookie Dough Bites I made for Disney (see Family.com or Spoonful.com for the recipe), adding cocoa powder and red food coloring, but the result was less than desirable and too heavy.

I went back to the drawing board, read other recipes and then, as usual, did my own thing. These truffles are truly delicious. They aren't heavy and aren't too sweet. The white chocolate surrounding them is the perfect complement to the rich centers.

I first thought of doing the usual crumbled cake and icing, but I felt it would be too sweet. I went with straight up cream cheese and then tried the "dough" once it was together. I was skeptical and wrestled with myself about adding powdered sugar. I'm really glad I didn't.

I also didn't use the usual white coating or white chocolate chips that can sometimes be cloyingly sweet. I instead went with Ghirardelli white chocolate baking bars and the end result was exactly what I was looking for; a rich center that wasn't too sweet or heavy surrounded by a creamy smooth exterior. I'm not specifying a box size for the cake or a recipe for red velvet because most people have their own favorite brands and/or recipe.

I didn't add extra red food coloring, I think the usual color of red velvet is pretty enough and with the off-white of the baking bar the truffles are very classy.

Completely crumbed cake.

Cream cheese added to crumbs.

Baking chocolate bar.

Adding truffle to chocolate.


Perfectly dipped truffle.


Red Velvet Truffles
Printable Recipe
Hands-On Time: 25 minutes
Ready In: 1 hour 25 minutes
Makes: 36 truffles

Ingredients:

One 9x13 size red velvet cake - completely cooled
8 ounces cream cheese - softened to room temperature
4 bars white baking chocolate (16 ounces total)

Directions:

1. Crumble cake completely into a large bowl.
2. Add cream cheese and mix with hands until completely combined with no streaks of cheese showing.
3. Roll between palms into 1" balls and set on a cookie sheet until all are rolled.
4. Melt chocolate in a double boiler or in the microwave until smooth.
5. Dip truffles in melted chocolate and set back on cookie trays.
6. Let stand until hardened or put into freezer until set. Serve at room temperature.

Sunday, April 28, 2013

Simple Strawberry Cake

Strawberry Cake
Strawberry Cake

I feel I need to begin this post with a disclaimer, so I will. This cake is made with a boxed mix AND a boxed gelatin mix. So, there. If you have any arguments, feel free to dial up Tyler Florence who shared a recipe using a boxed mix in his book, Family Meal. Not only was that cake fabulous, but easy to make, and thus, more likely to be made.

This was made by request as a birthday cake, and perfect for this time of year. Because it's so easy to make but so pretty in presentation it's good for every day or to serve to company. This would also be a beautiful addition to any Mother's Day table.

Any boxed yellow cake will do and any brand of gelatin, as well. Just use the sizes recommended for best results.

Strawberry Cake
Printable Recipe
Hands-On Time: 15 minutes
Ready In: 1 hour 45 minutes (includes cooling time)
Serves: 8-10

Ingredients:

1 quart ripe strawberries, washed and hulled - leaving one with the stem and leaves
One yellow cake mix (18.25 ounces)
One strawberry gelatin mix (3 ounces)
2 cups heavy cream
1/4 cup powdered sugar

Directions:

1. Slice all but one strawberry thinly and set aside. Slice one strawberry from end to stem being careful not to cut all the way through. Leaving stem attached, fan out berry and set aside.
2. Blend cake mix as directed on box and place half of batter in another bowl. Mix gelatin into one half of batter.
3. Pour plain batter evenly into two 9-inch round cake pans. Add strawberry batter to top and swirl with a spoon or fork. Bake as directed on box.
4. Cool cakes completely once baked and remove from pans.
5. Add powdered sugar to heavy cream and beat until fluffy.
6. Set one cake on a plate and top with half the whipped cream and half the strawberries.
7. Add second cake layer and whipped cream. Arrange strawberries in concentric circles from center out. Add berry with leaves to the center.

Wednesday, April 24, 2013

Peanut Butter Torte

Peanut Butter Torte
I'm really using the term "torte" loosely here; there is no layering of this cake, but there's so little flour that it can nearly be classified as torte, which as a rule breaker, is good enough for me.

I've been making a cake similar to this for years and years (see that here) and I had a bag of peanut butter baking chips sitting around for some time that I wasn't finding a good use for. I had a moment of clarity and this cake was the result.

Top it with chocolate, of course, for a rich and delicious after-dinner or just with coffee, dessert.

Peanut Butter Torte
Printable Recipe

Makes One 8 or 9 - inch cake

Melt together until smooth:

1 (10 ounces) bag of peanut butter baking chips
6 Tablespoons butter

Allow to cool for 10 minutes

Blend together:

5 egg yolks (set aside whites)
1Tablespoon all purpose flour
1Tablespoon powdered sugar
1/2 teaspoon vanilla extract

Add peanut butter mixture to egg mixture and blend until smooth.

Beat until stiff:

5 egg whites

Gently fold egg whites into peanut butter/egg yolk mixture until well blended.
Do NOT overbeat!

Pour into a greased 8 or 9 -inch spring form pan and bake 425 degrees F for 12 minutes or until center is slightly moving, but not jiggly. If you over bake this is will be dry.The center will set as it cools.

Cut into slices when cooled and served with your favorite chocolate sauce - we like hot fudge.


Saturday, March 30, 2013

Peanut Butter Cup Brownie Bites

Peanut Butter Cup Brownie Bites

Brownie bites are nothing new. I've been making them for years and you can pick them up pre-made in boxes on grocery shelves and at bakeries. I've also made them with cherries in the center (Cherry Brownie Bites) and made them with orange, as well (Orange and Chocolate Brownie Bites) but for this Easter I decided to pop a mini peanut butter cup into each one and see what happened.

YUM is what happened. I posted a quick Instagram pic and people loved it. So, without waiting I wanted to share the basic recipe and a tip or two for getting these to turn out right.

Brownie Bites
Makes 24 Bites
Printable Recipe

1 c semi-sweet chocolate chips
1 stick (1/2 c) butter
1/2 c plus 2 Tablespoons flour
1/4 tsp salt
2 large eggs
3/4 c packed light brown sugar
1 tsp vanilla extract

Preheat oven to 350 F. Line 24 mini-muffin cups with paper liners or grease well.

Melt chocolate chips and butter together until smooth and let cool to room temperature. Set aside.
Mix flour and salt together in a small bowl-set aside.
Mix eggs and brown sugar together until thick and pale. Stir in vanilla and cooled chocolate mixture until well blended. Stir in flour until just combined.
Fill each muffin cup 2/3 full (about 1 tablespoon)
Bake 12-15 minutes (I find 14 works well) until the edges are set but the centers are moist and fudgy.
Cool for 15 minutes before removing.

Now, the only addition here is a mini chocolate covered peanut butter cup pushed directly into the center of each bite. You can add the tiniest bit of dough to the top of each to completely seal them in, but I found letting the top open worked well, too.

Here's the important part: You MUST let these cool completely before attempting to remove from pans. The PB cup is very melty after baking and needs to set or the whole bite will cave in or fall apart; trust me on this one, I already made the mistake of trying to remove them too early. Once cooled, enjoy to your heart's content!


Monday, June 11, 2012

No-Bake Vanilla Snowballs


No-Bake Vanilla Snowballs


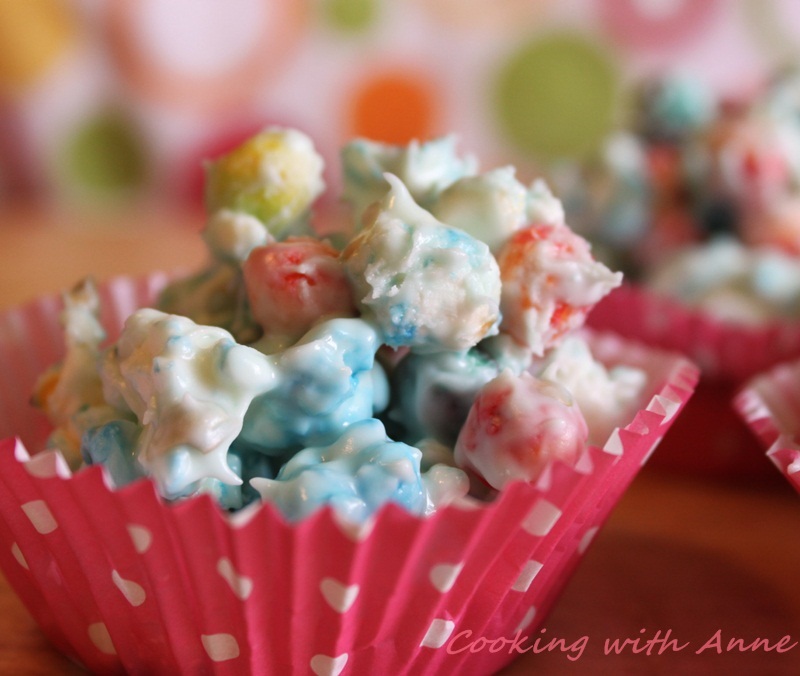
Taken directly from my post at Family.com for No-Bake Vanilla Snowballs, these are easier and cuter than ever thanks to Pop-Secret's Magic Colors microwave popcorn. A pretty blue hue adds just the right touch. These are perfect for parties, bake sales or after-school snacks. 


Beauty and the Snowball

Regular popcorn is just as good and any colored cereal can be used. This time I went with Trix because it's such a vibrant contrast to the blue popcorn. Experiment and see what you can come up with!


No-Bake Vanilla Snowballs
Printable Recipe

Ingredients:

One 12 ounce package white chocolate chips or white coating
4 cups popped popcorn
2 cups fruit flavored O's cereal

Directions:

Melt chips or coating until smooth.
Pop popcorn according to directions and place in a large bowl. Shake well to get all the unpopped kernels to the bottom. Measure out 4 cups.
Measure cereal and mix with popcorn.
Blend together with melted chocolate until coated well.
Measure into cupcake liners with a 1/3 cup measure. Grease hands and pat cereal together where needed. 
Let cool for 30 to 45 minutes or until hardened.


Sunday, June 03, 2012

Sunshine Bread

Sunshine Bread. Instructions below.

A long, long time ago (somewhere around 1990) I started getting recipe cards in the mail. You know, the free box to hold them in with 10 or so cards coming at a time. The set was called "My Great Recipes" and though I paid on time all the time, one day they just stopped coming. This was well before the internet and I never did find a phone number in any of the paperwork that came, so I resigned myself to having the cards I did have and let it be.

I did love those cards. In fact, I still have them. One recipe that caught my eye was "Maple Sunburst Coffee Cake". I believe I made it once and, not being a huge maple fan, I didn't make it again. My kids are big cinnamon roll fans, though so I took my standard cinnamon roll recipe and rolled it out differently.

Two circles of dough with butter and cinnamon/sugar in the center, cut into "rays" which are then twisted and there you have it. A pretty and tasty new way to serve up the usual cinnamon roll!

If you want it to be really sun-shiny, add some grated orange zest to the dough and top with an orange and powdered sugar glaze. Either way is just as yummy.

I won't give you a recipe for cinnamon rolls - there are so many out there already, but I will show you how to roll it and what to do with the filling.

 Half of the cinnamon roll dough. You need two balls of dough.


 Dough rolled to 12-inches in diameter. (Mine was 18-inches because I'd made a huge batch of dough.) Roll two.


The two dough circles with cinnamon/sugar/butter in between. This is a special pan I usually use for pizza. I'd tell you what it really is, but then I'd have to ... well, you know. Use parchment paper to make it easier to move the bread once it's baked.


 Place a small bowl, 3-inches in diameter, in the center of the dough to help guide you in cutting the "rays". (Again, my dough was 18-inches so the bowl was 4-inches in diameter.)


 The cuts shown from the center. When making a 12-inch diameter "sun" should be 1-inch apart on the outside edge. The center will be far closer together than shown. Use a very sharp knife to make the cuts or the dough will stick when you try to lift it to twist.


 Twisted. Take each "ray" and twist three times. Once all "rays" are twisted, let rise again until doubled in bulk. Brush an egg wash onto the bread to make it look nicer when finished baking.


 Bake according to recipe directions, checking after 20 minutes, and remove once the bread is golden brown. Wait for 10 minutes before moving the bread to another surface for serving. You can also keep it on the pan it baked on. In my house it rarely makes it off the baking pan.


 The center of the sun. 


 The finished bread.