Showing posts with label dessert. Show all posts

Monday, October 02, 2017

Pumpkin Spice Kentucky Butter Cake

Pumpkin Spice Kentucky Butter Cake


I am winding down here on my abilities to blog and ramping up on my school and children duties. This means I will have to cap myself at one recipe a week for at least the rest of this year. Once January comes I can reevaluate, but for now finishing my own college studies and helping one of the children with cyber school in addition to all the other mom duties going on is taking most of time. I'm sure we'll all live through this. 


Pumpkin Spice Kentucky Butter Cake


This recipe is a variation of one already on my blog. I shared JoAn Henry's recipe for Kentucky Butter Cake quite some time ago, but the notion of turning it seasonal hit me recently and this cake is just awesome. Make sure you mix the pie spice into the other dry ingredients first. I've made the mistake of adding it to wet ingredients and it just never distributes well that way. Once you've made this, sit down with a cup of something warm and enjoy!

Pumpkin Spice Kentucky Butter Cake
Makes one cake


1 cup butter - softened

1 cup pumpkin purée
2 eggs
1 teaspoon table salt
1/2 teaspoon baking soda
2 teaspoons vanilla extract
1 cup granulated sugar

1 cup brown sugar - lightly packed
3 cups all-purpose flour
1 teaspoon baking powder

1 1/2 to 2 teaspoons pumpkin pie spice 
3/4 cup buttermilk

Cream 1 cup butter with sugars.  Blend in eggs and purée. Combine flour, baking soda, baking powder, salt and pumpkin pie spice and stir well so everything is distributed well. Combine and vanilla. Add milk and flour mixtures alternately to sugar mixture, ending with dry mixture. Mix well. Turn into greased and floured 10 inch bundt pan. Bake at 325° for 60 to 65 minutes.

Butter sauce:

1 cup granulated sugar

1 teaspoon pumpkin pie spice
1/4 cup water
1/2 cup butter
1 tablespoon vanilla extract 


Mis pie spice and sugar well, Put sugar, water and butter into a small saucepan. Heat until butter melts; add 1 tablespoon vanilla. Poke holes into top of cake with a fork or wooden skewer. Pour sauce slowly over cake while cake is in pan. Cool before removing from pan. 


Pin this!


Friday, September 22, 2017

Pumpkin Milkshakes

Pumpkin Milkshakes


Pumpkin time usually means warm and comforting baked goods, but I am of the mind that milkshakes are a year-round treat. This one combines vitamin-A rich pumpkin puree, creamy vanilla ice cream and just the right amount of spice to make it the perfect cool harvest drink.

Pumpkin Milkshakes
Hands-On Time: 5 minutes
Ready In: 5 minutes
Serves: 2

Ingredients:

2 cups vanilla ice cream
1/3 cup pumpkin puree
1/2 teaspoon pumpkin pie spice
1/4 cup milk
2 Tablespoons light brown sugar
whipped cream

Directions:

1. In a blender combine ice cream, puree, spice, milk and brown sugar. Pulse until
smooth.
2. Pour into 2 (8 ounce) glasses and top with whipped cream.

Friday, August 18, 2017

Blueberry Bruschetta


While bruschetta is most often served as a savory preparation, it also makes a lovely and lighter dessert. The smooth cream cheese is a perfect contrast to the sweet-tart berries. Grilling is fairly quick and can be done on a traditional grill or in a grill pan on the stove top.

Blueberry Bruschetta
Hands-On Time: 15 minutes
Ready In: 15 minutes
Serves: 24

Ingredients:

1 French baguette (about 18 inches in length)
1/4 cup butter - melted
8 ounces low fat cream cheese (Neufchatel)
3 cups fresh blueberries, washed
1/4 cup granulated sugar
1/2 teaspoon ground cinnamon

Directions:

1. Combine blueberries, sugar and cinnamon in a bowl and toss well to coat. Set aside in
the refrigerator until ready to use.
2. Slice baguette into 24 slices, about 1/2 inch thick. Slicing on the diagonal provides
more surface area.
3. Brush each slice with butter and grill until lightly toasted on both sides.
4. Spread cream cheese on each bread slice and top with a spoonful of blueberries.
Garnish with mint if desired and serve.

Friday, July 28, 2017

Strawberries & Cream Icebox Cake

Strawberries & Cream Icebox Cake

Just four ingredients make this cake a real treat, in more ways than one. Fresh strawberries combine with rich sweetened condensed milk and cake for a delicious dessert. The necessary make-ahead prep makes it perfect to take along for picnics and summer parties.

Strawberries & Cream Icebox Cake

Hands-On Time: 15 minutes
Ready In: 9 Hours
Serves: 12

Ingredients:

1 boxed white cake mix
12 ounces fresh strawberries
1 can (14 ounces) sweetened condensed milk
1 tub (16 ounces) frozen whipped topping - thawed


Directions:

1. Bake cake in a 9x13 pan according to directions. Cool.
2. Poke holes in cake with a wooden spoon handle or clean chopstick.
3. Pour contents of condensed milk can over cake.
4. Wash strawberries and hull. Slice over top of cake.
5. Cover cake and refrigerate for 8 hours or overnight.
6. Remove cake from refrigerator and top with whipped topping.

Thursday, July 28, 2016

Chocolate Cream and Strawberry Pie


Chocolate Cream and Strawberry Pie

Chocolate Cream and Strawberry Pie

Fasten your seat belts, this chocolate cream is dark and rich and whoa. Slice this beauty of a pie into 16 pieces unless you're truly a chocoholic and can deal with the richness. This is best eaten after a lighter meal for sure.

Try to find strawberries that are on the smaller side and roughly the same size so it looks pretty, you can also slice them on top, but remember sliced berries will weep, so you may have a wet pie afterward.

Chocolate Cream and Strawberry Pie

Chocolate Cream and Strawberry Pie. I used a fluted removable bottom pan for this, a regular pie pan works just as well!

Chocolate Cream and Strawberry Pie

Hands-On Time: 15 minutes
Ready In: 1 hour and 10 minutes
Serves: 8-16

Ingredients:

12 ounces dark chocolate chips
1 cup milk - any fat content
1 large egg - beaten
1  9-inch pie crust - unbaked
1 quart fresh strawberries all roughly the same size, washed and hulled
1/4 cup strawberry jelly or preserves
1 Tablespoon water


Directions:

1. Preheat oven to 325 degrees F.
2. Combine chocolate chips and milk in a heavy saucepan. Heat on low until chips begin to melt. Stir until smooth. Remove from heat.
3. Beat egg in a medium bowl and add 1/4 cup of hot chocolate mixture to egg. Whisk quickly so the egg does not cook, but only thickens.
4. Add egg and chocolate to the first mixture and blend well. The chocolate should be smooth and silky afterward. If it looks lumpy during mixing, stir faster and wait it out, it will usually smooth out.
5. Pour chocolate into pie crust and bake for 25 minutes, or until center is lightly set.
6. Chill pie for 30 minutes.
7. Top pie with strawberries - pointed ends up.
8. Combine strawberry preserves with water and stir until smooth, heat briefly in the microwave if necessary. Brush or drizzle over strawberries.
9. Chill until serving time, at least 30 minutes.

Monday, May 23, 2016

Peach Cobbler

Peach Cobbler
Peach Cobbler


It's just about peach time! Peak time for fresh peaches is usually July in most states, but they're out there as early as May. Choose fruit that yield to slight pressure but aren't mushy and try to avoid hard peaches. All the flavor and sweetness is gained on the tree, not after so no matter what color the skin, you can't really tell until you bite into one. One of the best peaches I ever had came from Newhard Farms in Coplay, PA. Famous for corn, but everything they sell is perfect!

Serve this cobbler warm with vanilla ice cream or whipped cream and watch it  disappear. You can also make this with nectarines, plums or fresh berries for a change of  pace. Canned peaches don't work as well, so try to stick with fresh ripe fruits.


Peach Cobbler

Hands-On Time: 15 minutes
Ready In: 50-55 minutes
Serves: 8

Ingredients:


Filling:

8 large ripe peaches - pitted and sliced, about 6 cups
1/4 cup all-purpose flour
1/3 cup packed light brown sugar
1/4 teaspoon ground cardamom
1/4 teaspoon ground nutmeg
1 teaspoon vanilla extract
1/4 cup butter


Topping:

1 cup all-purpose flour
1 teaspoon baking powder
1/2 teaspoon salt
1/4 cup granulated sugar
1/4 cup butter
1/4 cup to 1/3 cup heavy cream
1 egg - beaten


Directions:

1. Preheat oven to 350 degrees F.
2. Toss together peaches and 1/4 cup flour. Place in the bottom of a greased, shallow 1 - 1/2 quart baking pan.
3. Mix brown sugar, cardamom, nutmeg and vanilla until well blended.
4. Sprinkle brown sugar mixture over peaches in baking dish.
5. Cut 1/4 cup butter in small cubes and dot top of peaches and brown sugar with cubes.
6. Stir together 1 cup flour, baking powder, salt and granulated sugar.
7. Cut second 1/4 cup of butter into small cubes and rub into flour mixture until coarse crumbs form.
8. Add cream to flour and butter and blend until dough forms.
9. Roll out dough on a floured surface to a 1/4-inch thickness. Cut with a 3-inch biscuit cutter and top dough evenly with circles.
10. Brush dough circles with beaten egg.
11. Bake for 35 - 40 minutes until golden and peaches begin bubbling through crust.


Notes:
Dough can be rolled to fit the pan and placed on top completely rather than cutting into circles. Cut slits to vent filling before baking


Tuesday, August 05, 2014

Chocolate Cheesecake

Chocolate Cheesecake

I'm not too good at posting about foods I make very often. I guess I feel like it's nothing new here so nobody else needs the recipe. For this recipe, I know that's very wrong. I've been making cheesecake and chocolate cheesecake for years and years. I've used the same recipe without fail and everyone loves it. I've even been asked to make them for special parties and functions and each time it's nothing but rave reviews.

I've had a lot of cheesecake in my life -- it's one of my favorites. There are different textures and flavors and I'm a big fan of dense cheesecake that doesn't have too much lemon added. My own recipe is still the one I'd rather eat more than any other.

Last week I went to Carnegie Deli at Sands Bethlehem and had their cheesecake. It's so similar to my own that I just fell in love. It's dense and rich and the topping (which I don't do here at home) was to-die-for. Once the kids saw the photos of the cheesecake I started getting requests for it and was told that I haven't made it for a while ... I'm guilty of that.

I dutifully obliged and made up a cheesecake last night. It's just as good as I remember and it was gone in no time.

Chocolate Cheesecake
Serves: 12
Hands-On Time: 15 minutes
Ready In: 5 hours and 10 minutes

Ingredients:

Crust:
20 chocolate cream cookies (like Oreos) processed into fine crumbs
2 Tablespoons unsalted butter - melted

Filling:
4 blocks cream cheese (2 pounds)  (I use Neufchâtel or 1/3 lower fat)
4 large eggs
1 1/4 cups granulated sugar
1 Tablespoon vanilla extract
4 squares unsweetened baking chocolate -4 ounces - melted

Directions:

1. Preheat oven to 325 degrees F
2. Process cookies until well crumbed. Add melted butter and stir well. Press into 9" springform pan and set aside.
3. Mix together cream cheese and sugar with a hand blender or in a stand blender until smooth. Add vanilla and melted chocolate. Mix until well combined.
4. Add eggs and blend until combined completely.
5. Pour into prepared crust and smooth top.
6. Bake for 50-55 minutes. Remove from oven and cool for at least 4 hours until well chilled. Run a thin knife around edge of cake before removing ring.

Monday, December 23, 2013

Nanaimo Bars


Ever since I was a child, and probably before I was born, my mother has been making a confection for Christmas that we always called "Grandma's Chocolate Squares". The recipe had come from my paternal grandmother, Ola Foster, and was passed down to just about everyone.

There wasn't a year that went by without those squares; a rich fudgy bottom studded with walnuts and coconut then slathered with a creamy, buttery center topped off with a layer of dark chocolate. They were always cut into small squares because they were so rich you couldn't eat too much ... unless you were a kid, in which case you'd finish off 5 or 6 squares and go back for more later.

My oldest brother was off at a convention where people were serving a potluck of international delights. Each table had a specialty from that country and Bobby came across a woman who had a platter full of Grandma's Chocolate Squares. He was flabbergasted, of course, and wanted to know how this woman had gotten grandma's recipe.

The woman explained that they were called "Nanaimo Bars" and were a big deal across Canada. Not surprisingly, grandma was born and raised in Ontario. Finally the "squares" had a name. No matter, we still call them "Grandma's Chocolate Squares".

Nanaimo Bars or Grandma's Chocolate Squares
Makes: One 9x9 pan

First Layer:

1/2 C Butter
1/4 C granulated sugar
1 egg
5 T cocoa
1 tsp. vanilla
2 C graham cracker crumbs
1 C coconut
1/2 C chopped walnuts

Second Layer:

1/2 C butter, softened
3 T milk
2 T instant vanilla pudding
2 C powdered sugar

Third Layer:

1  6 oz. Pkg. choc. Chips

First layer: Mix butter, sugar, eggs, cocoa, & vanilla
over hot water until it resembles custard. Add the
crumbs, coconut & walnuts. Press into a 9 X 9-inch
square pan. Cool.

Second Layer: Cream butter, milk, & pudding together,
then blend in powdered sugar. Spread over the first
layer & let stand for 15 minutes.

Third Layer: Melt chocolate & spread over the second
layer. Cut into squares.

Yield: 36 1-1/2-inch squares

Friday, October 04, 2013

Fresh Sliced Pumpkin Pie

Fresh Sliced Pumpkin Pie

Many years ago as a child I read the Little House on the Prairie series and fell in love with it. Since then I've read the entire series again and again countless times; to myself and also aloud to my children. I was fascinated with the way the Ingalls family lived; what they ate, what they wore and how they built their homes.

In one particular book (The Long Winter)  "Ma" makes a pie from a green pumpkin and to everyone's amazement, it tastes nearly like apple pie. I couldn't find a truly green pumpkin here, but when the season is right small pie pumpkins are sold just about everywhere.

I dutifully peeled, seeded and sliced the small pumpkin and layered it with spices and sugar in a pie crust and the result was very good. I wouldn't say it was wonderful or even delicious because I think our mind plays tricks on us when we're so used to something as pureed pumpkin in pies that when we have it in another form, it's just odd.

Making Fresh Sliced Pumpkin Pie

I won't say this was odd, either ... it was good. It was definitely worth the try and I do have at least one child who can't seem to get enough! See what you think. I may change it slightly and try again, just for fun.

Fresh Sliced Pumpkin Pie
Makes 1 Pie
Ready In: 1 hour 20 minutes

Ingredients:

One double pie crust
One 3-pound pie pumpkin
2 tablespoons flour
1/2 cup brown sugar
1 teaspoon pumpkin pie spice

Directions:

1. Preheat oven to 375 degrees F.
2. Wash and peel pumpkin. Remove insides with a sharp-edged spoon and keep the seeds or discard.
3. Slice pumpkin thinly.
4. Place one pie crust in a 9-inch pie pan and dust with flour. Add half of the sliced pumpkin, half of the spic and half of the sugar. Repeat.
5. Top with second crust and seal edges. Vent top and put on a baking sheet in case of spillage.
6. Bake for 1 hour until crust is browned and vents are bubbling with pumpkin juices.
7. Allow to cool for an hour before slicing.


Saturday, March 30, 2013

Peanut Butter Cup Brownie Bites

Peanut Butter Cup Brownie Bites

Brownie bites are nothing new. I've been making them for years and you can pick them up pre-made in boxes on grocery shelves and at bakeries. I've also made them with cherries in the center (Cherry Brownie Bites) and made them with orange, as well (Orange and Chocolate Brownie Bites) but for this Easter I decided to pop a mini peanut butter cup into each one and see what happened.

YUM is what happened. I posted a quick Instagram pic and people loved it. So, without waiting I wanted to share the basic recipe and a tip or two for getting these to turn out right.

Brownie Bites
Makes 24 Bites
Printable Recipe

1 c semi-sweet chocolate chips
1 stick (1/2 c) butter
1/2 c plus 2 Tablespoons flour
1/4 tsp salt
2 large eggs
3/4 c packed light brown sugar
1 tsp vanilla extract

Preheat oven to 350 F. Line 24 mini-muffin cups with paper liners or grease well.

Melt chocolate chips and butter together until smooth and let cool to room temperature. Set aside.
Mix flour and salt together in a small bowl-set aside.
Mix eggs and brown sugar together until thick and pale. Stir in vanilla and cooled chocolate mixture until well blended. Stir in flour until just combined.
Fill each muffin cup 2/3 full (about 1 tablespoon)
Bake 12-15 minutes (I find 14 works well) until the edges are set but the centers are moist and fudgy.
Cool for 15 minutes before removing.

Now, the only addition here is a mini chocolate covered peanut butter cup pushed directly into the center of each bite. You can add the tiniest bit of dough to the top of each to completely seal them in, but I found letting the top open worked well, too.

Here's the important part: You MUST let these cool completely before attempting to remove from pans. The PB cup is very melty after baking and needs to set or the whole bite will cave in or fall apart; trust me on this one, I already made the mistake of trying to remove them too early. Once cooled, enjoy to your heart's content!


Monday, June 11, 2012

No-Bake Vanilla Snowballs


No-Bake Vanilla Snowballs


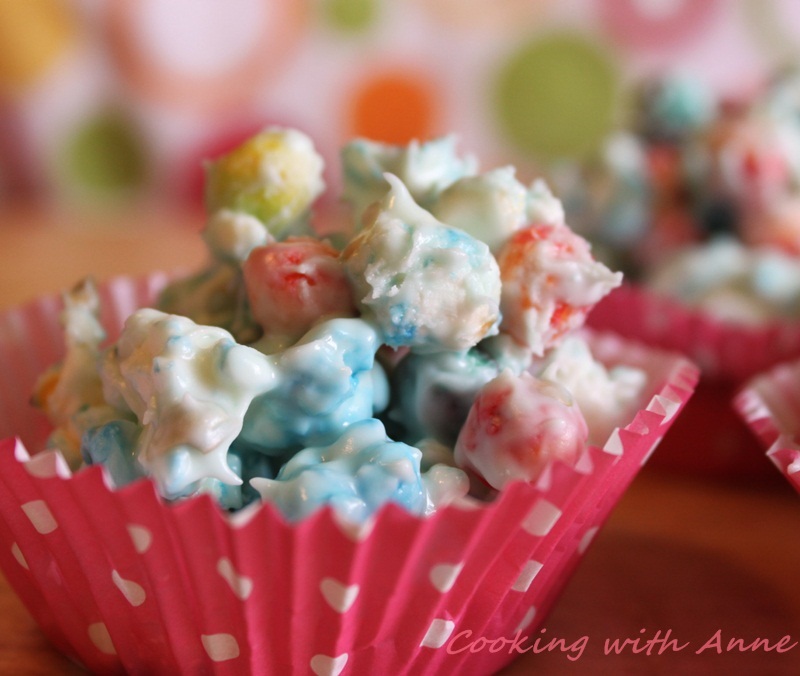
Taken directly from my post at Family.com for No-Bake Vanilla Snowballs, these are easier and cuter than ever thanks to Pop-Secret's Magic Colors microwave popcorn. A pretty blue hue adds just the right touch. These are perfect for parties, bake sales or after-school snacks. 


Beauty and the Snowball

Regular popcorn is just as good and any colored cereal can be used. This time I went with Trix because it's such a vibrant contrast to the blue popcorn. Experiment and see what you can come up with!


No-Bake Vanilla Snowballs
Printable Recipe

Ingredients:

One 12 ounce package white chocolate chips or white coating
4 cups popped popcorn
2 cups fruit flavored O's cereal

Directions:

Melt chips or coating until smooth.
Pop popcorn according to directions and place in a large bowl. Shake well to get all the unpopped kernels to the bottom. Measure out 4 cups.
Measure cereal and mix with popcorn.
Blend together with melted chocolate until coated well.
Measure into cupcake liners with a 1/3 cup measure. Grease hands and pat cereal together where needed. 
Let cool for 30 to 45 minutes or until hardened.


Saturday, April 28, 2012

Pink Lemonade Cupcakes

Pink Lemonade Cupcakes

It seems that the cupcake craze hasn't gone anywhere and may not phase out like I thought it would, so I'm grasping an opportunity here to share a favorite cupcake. The first time I made these they were devoured in no time and it's been that way each time I make them.

I make them at home for the kids, I've made them at work for my consumers and co-workers and everyone loves them and wants to know how I make them. Prepare to be amazed. Well, or just enlightened. These are made the exact same way as my Lime Cupcakes ... with a boxed mix altered slightly and colored with food dye.

For the record, nobody is sure where pink lemonade originated, but it's nothing secretive, it's simply lemonade that's been dyed with food coloring or red fruit. These cupcakes and icing are dyed with red food coloring - the usual liquid drops. Depending on the type of dye you use, the color can vary widely, so experiment until you get the perfect shade of pink.

For the cupcakes pictured, I double icing recipe. If you're going to simply spread icing on top as usual, go with the amounts listed.

Pink Lemonade Cupcakes


Pink Lemonade Cupcakes
Makes 18 to 24
Printable Recipe


1 boxed white cake mix (most are 18.52 ounces)
2 whole eggs
1/3 cup oil 
1 1/4 cups water
zest of half a lemon
juice of half a lemon 
red food dye


Icing:

3/4 cup butter - softened (1 1/2 sticks)
zest of half a lemon
juice of half a lemon

red food dye
powdered sugar (3 -4 cups depending on how much juice your lime holds)

Mix up the cake mix with the eggs, oil, water, zest and juice. Add dye a few drops at a time and mix well until the correct color is reached. Pour into muffin tins, lightly greased or set with cupcake wrappers. Bake at 350 degrees F for 12-15 minutes or until golden brown and springy when touched in the center. Let cool.

Beat the butter until fluffy and add zest.. Pour in juice and powdered sugar a cup at a time, and keep beating until icing forms and is of a nicely spreadable consistency. Add dye and blend until color is right. Frost cooled cupcakes and decorate as desired.

I bet you're wondering why I used a white cake mix and then adulterated the thing with whole eggs? Well, boxed yellow cake mix tastes different than white mix, which I like better, but I wanted a bit of color to these so I added the egg yolks as well. There you go - whip some up and enjoy!


Tuesday, April 10, 2012

Lime Tart with Coconut Crust

Lime Tart with Coconut Crust

Wow, is this stuff ever good. I don't know how else to start this post because this tart turned out so well I wanted to eat the whole thing. I settled with a single fork-full and fed the rest to the kids, who liked it just as much.

The filling is nearly identical to my favorite Key Lime Pie, but the crust is the real star of the show here. Lime zest, flaked coconut and butter ... what's not to love? I think it's perfect from now until oh ... Christmas? Yeah, that would work.

Use Key limes if you can get them. They're sweeter and smaller and worth the effort to find.
Coconut Tart Crust
Close-up of the crust. Mmmmm.


Lime Tart with Coconut Crust
Makes on 9-inch pie
Printable Recipe

1  9-in pie shell
5 egg yolks
14 ounces sweetened condensed milk
1/2 cup lime juice
Zest of 1 lime (about a teaspoon)


Preheat oven to 375. Make the tart crust first and reduce heat to 350.
Put the yolks in a large bowl and beat them with a whisk, just breaking them and mixing
them well. Slowly stir in the condensed milk. Mixing well, stir in the lime juice. Pour the filling into the
tart shell (below). Bake for about 12-to-15 minutes. Remove and cool completely before cutting.
Serve with freshly whipped cream if desired.

1 1/2 cups shredded sweetened coconut
6 Tablespoons unsalted butter
3/4 cup all-purpose flour
1/2 cup confectioners' sugar
1/2 teaspoon lime zest
pinch of salt

Combine butter and coconut in a large bowl. Beat with a hand mixer until well combined. Add zest and beat just until incorporated. Stir in flour and sugar with a wooden spoon. This is a sticky dough - flour hands or coat with more confectioner's sugar.

Press into and up sides of a well-greased, fluted 9-inch pie pan with a removable bottom. Bake at  375 degrees F. for 12-15 minutes or until lightly browned. Set aside while making pie filling.


Tuesday, March 20, 2012

Funny Cake

Funny Cake


Once in a while someone comes along and reminds me about a food I've eaten in the past that I completely forgot about. Such was the case not too long ago when I was reminded of funny cake and I decided to take that memory and augment a little.


When I was a young child in the 70s my mother went through a phase where she would purchase milk and eggs from a delivery truck. I couldn't  remember who the older man was that delivered those items in his step van, but I'll never forget his visits.

I would sit out on the front stoop of our home on Linden Street in Bethlehem with my stepdad and wait paitently for the truck to come. Mom would sometimes be with us, and she was always the purchaser, but my step-father and I were the watching committee. As soon as the truck would roll down the hill, if she wasn't there already, we would call for mom.

She always bought eggs and milk, but some weeks there would be extras. A tin of potato chips, a bag of pretzels, a wet-bottomed shoo-fly pie for my step-dad and, not often enough, a funny cake for my brothers and me. We'd devour it in one sitting and wish for more.

Mom never made shoo-fly or funny cake; I think it may have been something she considered an Amish secret, shrouded in mystery and not to be uncovered by mere "English" (what the Amish call the rest off us) people. Or she just may not have had a recipe.

Funny Cake

Once I was older I discovered recipes for both. My first time with shoo-fly pie was disaster. Pie filling puffed up and dripped out of the pies and into the bottom of the oven. Blackened molasses is like no other odor in the world. Funny cake was made now and then, but not often enough - just the way mom bought them. In fact, I don't think my kids would recognize one if they were introduced to it.

I called mom to inquire about the deliveries and the man who made them and she told me that all she remembered was his last name: Fegely.  After a quick search on the internet for milk deliveries in the Lehigh Valley by a Fegely, I came across Howard Fegely, owner of Fegely's Dairy and founder of Limeport Stadium. I have no idea if the man who delivered our milk was related to the dairy Fegely's, but I did try my best to find out and turned up empty-handed.

No matter, I made funny cake for the kids and they did exactly as expected; they devoured it in no time because some memories are just more delicious than others.

Funny Cake


Funny Cake
Makes one 9-inch "cake"
Printable Recipe

1 - 9" unbaked pie crust
1 cup granulated sugar
1 large egg - beaten
1/4 cup butter or shortening (shortening or lard would be more traditional here)
1 cup flour
1/2 cup milk
1 teaspoon baking powder
1/2 teaspoon vanilla extract

Preheat oven to 350 degrees F.
Cream butter or shortening with sugar until fluffy and add egg. Blend well. Add remaining ingredients and pour into a 9-inch unbaked pie shell.

1/2 cup granulated sugar
6 Tablespoons hot water
4 Tablespoons cocoa powder
1/4 teaspoon vanilla extract

Blend these together and pour over the first part in the shell. Bake for 35 minutes or until a toothpick inserted in the center of the cake comes out clean. While baking the chocolate settles underneath the vanilla part and makes a gooey chocolate layer.


Monday, March 07, 2011

Rice Pudding and Raw Milk


Just about a year ago I began buying raw milk. Not for daily or even weekly consumption, but for a once-in-awhile thing. I'm not completely sure what my motivation was beyond the fact that it's a bit controversial and from much that I've read, if conditions are right, it isn't all together unsafe. In fact, for many people with lactose intolerance, raw milk can be a Godsend.

Nobody here has lactose issues, and for the most part I'm fully happy with the pasteurized 2% that I buy for daily use, but the crunchy/hippie/farmer type in me had to go out and give it a try. I wrote about the first couple excursions at Blog Catalog, so I won't repeat myself, but I will add that the scene changes ever so slightly each time I visit the farm. Sometimes it's laundry day, sometimes there's nothing going on; this time it was ... meat grinding day?

Saturday was rather gray and blah, and the farm looking austere from the lack of foliage on the trees only added to it. Once I walked into the garage however, the air took on an almost sinister feel when I caught sight of a young Mennonite man pushing meat into a grinder. Add to it the fact that he had a strange grin on his face and the whole scene became a bit "Children of the Corn".

I'm hopeful the meat was for personal consumption and not for sale, because thinking of eating anything from that farm other than milk, eggs or honey safely ensconced in plastic jugs, cardboard egg containers and glass jars makes me feel a little queasy. No matter, I grabbed what I'd come for and left without looking back (except to look at the chickens, can't help myself).

Then came the question of what I'd be making with these 'less-than-usual' ingredients I'd traveled nearly 30 miles for. No idea, as usual, it's just something I like to do and I usually figure it all out later. This time it turned out to be rice pudding. I have several kids who can never get enough of this, and my step-father always gets a container, but it takes a few hours to make, so I don't tackle it too often.

Raw milk is perfect for this. The original recipe uses 8 cups (half a gallon) of milk to a single cup of rice, so the result is ultra rich and creamy and raw milk, with its full-fat content from the layer of cream atop can only add to it. I don't care how bad it is, it's not something we have frequently, so we'll counter it with steam for dinner a couple nights this week.


It may seem a waste to cook with raw milk, but there's more to using raw milk than the mere fact that it hasn't been pasteurized or homogenized, just like there's a point to buying milk directly from a farm that produces it: flavor. I could well purchase whole milk for this right at the local grocery, but there is no denying that the flavor of fresh milk, raw or otherwise, is far superior to that found in the standard dairy case. Besides, only half is used to make this recipe, the rest is consumed straight-up or in cereal where everyone gets the most benefit from it.

If you have the time to do this (a lazy Sunday would be good) give it a try. It takes frequent checking and stirring, but the end result is so worth it, you'll be glad you took the time to make it. This was also posted at Family.com a couple years ago.

Rice Pudding
Serves 8-12
Printable Recipe

1 cup long grain rice
2 cups water
8 cups milk
1/2 cup sugar
1 beaten egg
1 teaspoon vanilla extract or 1 vanilla bean split and seeds scraped - set aside seeds

Cook the rice in the water following package directions -- this usually means adding the rice to the water, bringing to a brief boil, reducing heat and simmering, covered tighly for 20 minutes until the rice absorbs all the water and is tender.

In a large pot combine the cooked rice, milk and scraped vanilla bean if you're using it. Cook over a very low flame, stirring from time to time (every 10 minutes is good), until all the milk has cooked into the rice. This can take an hour to an hour and a half. You'll also have to skim the top 'skin' that forms each time you stir.

Once the milk is absorbed, remove from the heat, remove the vanilla bean if used and quickly add the beaten egg, stirring constantly so the egg thickens the pudding but does not cook. Stir in the sugar and vanilla seeds or extract until well combined.

Pour into a large flat pan like a 9x13 baking pan. Cool in the refrigerator, covered, for several hours before serving.

Monday, January 24, 2011

Almond Cake


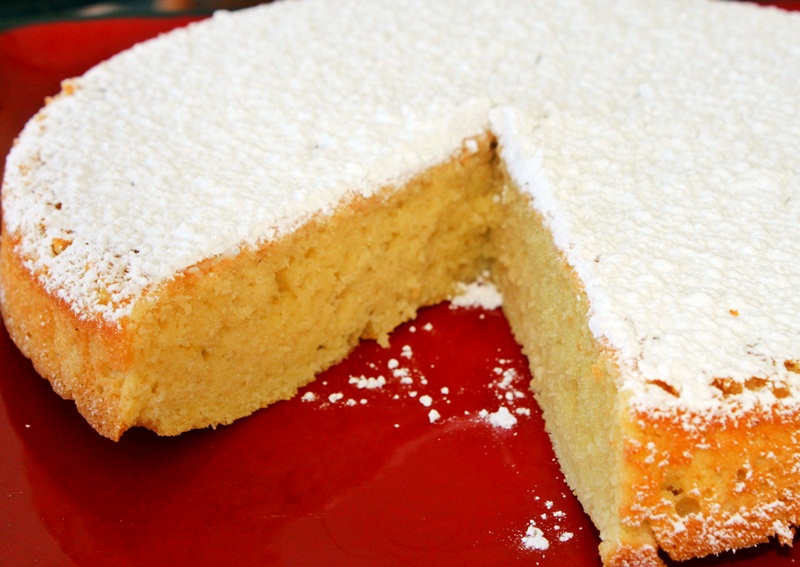
Moist and rich in almond flavor, this is the perfect ending to any meal. Dust with powdered sugar, sliced almonds or even a chocolate sauce for an extra delicious dessert.

Almond Cake
Hands-On Time: 5 minutes
Total Time: 35 minutes
Serves: 8
Printable Recipe

Ingredients:

1 cup all-purpose flour
1 teaspoon baking powder
1/4 cup almond paste
1 1/2 sticks (6 ounces) unsalted butter - softened
1/2 cup granulated sugar
1/2 teaspoon vanilla extract
4 large eggs
1/4 cup powdered sugar

Directions:

1. Preheat oven to 350 degrees F. Grease an 8-inch round cake pan.
2. Combine flour and baking powder and set aside.
3. Mix together almond paste and butter until smooth. Add sugar and beat until fluffy.
4. Add eggs and vanilla extra and beat until well combined. Add flour mixture until just blended.
5. Pour into prepared pan and bake for 30 minutes or until the top springs back when touched in the center.
6. Cool in pan for 5 minutes then turn out onto a rack to finish cooling. Sprinkle with powdered sugar.

While you're here check out Sweets for Saturday at Sweet as Sugar Cookies. Sweetness overload you won't want to miss!

Monday, January 03, 2011

Bread Pudding with Vanilla Custard


Chocolate Chip Bread Puddiing
Chocolate Chip Bread Pudding

Bread Pudding with Vanilla Custard
Serves 8
Printable Recipe

1 loaf Italian bread - about 8-10 cups cubed
4 large eggs
4 cups milk
1 1/2 cups granulated sugar
1 teaspoon vanilla extract
1 teaspoon ground cinnamon
1/2 teaspoon ground nutmeg
2 cups chocolate chips (optional)

1. Preheat oven to 350 degrees F. Grease a 9x13 baking dish.
2. Toss bread cubes with chocolate chips if using and lay in an even layer in prepared pan.
3. Mix together milk, eggs, sugar, cinnamon and nutmeg until smooth and well blended. Pour over bread cubes.
4. Cover with foil and bake for 45 minutes. Remove foil and bake for another 30 minutes or until puffy and golden.
5. Remove from oven and keep warm.

Bread Pudding

Vanilla Custard

2 large eggs
1/2 cup sugar
2 cups heavy cream or half and half
1 teaspoon vanilla extract

1. Beat eggs and sugar together until pale and lemon yellow with no streaks.2. Bring cream just to a boil in a heavy saucepan.
3. Remove from heat and temper the eggs with the cream-adding a quarter cup at a time-1/2 cup total- and whisking quickly so the eggs do not cook.
4. Put the cream back on the stove over a low flame and add the egg/cream mixture in a thin stream, whisking the entire time, until the sauce forms and is thick enough to coat the back of a spoon.

Vanilla Custard

5. Remove from heat as soon as it thickens and add the vanilla, mixing well to combine. Serve immediately over the pudding. Makes about 2 1/2 cups.


Monday, March 30, 2009

St. Andrè Dessert Tart

A most delicious and decadent tart


In the world of cheeses there is one that stands head and shoulders above the rest in terms of richness. That cheese is St. Andrè. Hailing from France (mais, oui) it is a triple crème cheese with a soft rind and a butterfat content of 70% - rich, indeed.

St. Andrè triple crème cheese - just starting to soften at the top, if left at room temperature for 20 minutes it will become soft and very spreadable.

It pairs perfectly with several light beers and is perfect for spreading on a French baguette. I decided to do something a bit more decadent and designed this dessert tart using this truly luxurious cheese. The crust is very tender and delicate and the filling was perfectly done - not too set, just right. I may make this again with cream cheese replacing the ricotta. Not that it's not divine as-is, but the ricotta makes the texture a bit more grainy than I'd like. I think cream cheese or mascarpone would do very well here.

Find out more about St. Andrè Cheese at the Ile de France website or check out their interactive cheese map for other delicious French cheeses.

Orange, pine nuts and St. Andrè cheese make this tart a wonderfully delicious treat.


St. Andrè Dessert Tart

Serves 8

1 cup lightly toasted pine nuts - divided
1 stick butter
1 1/2 c unbleached all-purpose flour
1/2 teaspoon salt
1-2 Tablespoons milk
1 cup ricotta cheese
12 ounces St. Andre cheese - rind removed and at room temperature
1/2 cup sugar
3 large eggs
1/4 teaspoon orange extract
1 teaspoon orange zest
(Larger amounts of orange flavoring mask the cheese too much)

Process 1/2 cup toasted pine nuts until finely chopped. Add butter and pulse until smooth. Add flour and salt and pulse until crumbly. Add milk, as needed, and run processor on low speed until a ball forms. Remove dough from processor and let stand, covered, for 10 minutes.

Meanwhile, combine ricotta, St. Andre, sugar, eggs, extract and zest in processor and pulse until very smooth and well combined. Fold in remaining pine nuts.

Press dough into and up the sides of a greased 10-inch spring-form pan or a pan with removable sides. Pour in filling and bake at 350 degrees F for 40 - 45 minutes or until center is nearly set. Shake the pan gently to determine this. A little jiggle in the center is what you're looking for.

Let cool for 20 minutes or so before refrigerating. Serve chilled.