Friday, February 28, 2014

505 Southwestern Salsas, Sauces and Chiles

Mexican Pizza
Mexican Pizza with 505 Southwestern Salsa - 10- inch flour tortilla topped with salsa, ground beef, Mexican blend cheese, baked for 10 minutes then topped with black olives and sour cream. So easy!
Take a look at the salsa section of your local grocer and you'll see that salsas seem to be a dime a dozen these days. Some of them aren't even worth a dime a dozen, though. I do have my own favorite, or so I thought.

I was sent a box filled with salsas, sauces and green chiles to try from 505 Southwestern and I've found a brand new favorite salsa*. Honestly. I've already gone out and purchased more to have on hand and I'm not the only one in the house that fell in love. Last night several of my children finished off a jar in one sitting. I may be hiding salsa along with my chocolate soon.

What's this salsa? 505 Southwestern's All American Salsa, Medium heat. Wow. Even though the kids thought it was a bit spicy, they couldn't stop eating it and neither could I. My boyfriend is a heat lover and even though this is only medium heat, he loves it as well.

Not only is this salsa delicious it also benefits the Wounded Warrior Project:  Flagship Food Group will contribute 1% of the purchase price of every bottle of 505 Southwestern All American Salsa, with a minimum donation of $100,000 to WWP from May 1, 2013 through April 30, 2014. Awesome.

Each of 505 Southwestern's products are 

Extra Fresh — our chiles are picked, flame-roasted & flash-frozen during harvest
All Natural — we use only natural ingredients to preserve the just-picked flavor
Gluten Free — we use rice flour as a binder where necessary, not wheat
Zero Trans Fat — only natural vegetables, spices, herbs and fruits are used
New Mexico — all our chiles come from the Hatch Valley in New Mexico!

You just can't go wrong with these salsas and sauces. If you're stuck for ideas, let me help you out. First, you can go to www.505chile.com and search for recipes, or you can use one of the recipes I've provided below. Both turned out wonderfully using 505 products and my family has already asked me when I'm making them again!

Green Chile and Chicken Enchiladas
Enchiladas go creamy and spicy in this rich and flavorful version of chicken enchiladas. Diced Hatch chiles and sharp cotija cheese add to the flavor. Evaporated milk is a smart choice here instead of milk or cream, providing creaminess without all the calories or fat.

Green Chile and Chicken Enchiladas

Hands-On Time: 20 minutes
Ready In: 60 minutes
Yield: 6 Servings

Ingredients:

1 1/2 pounds cooked white meat chicken - chopped
2 large cloves garlic - minced
2 Tablespoons fresh cilantro - finely chopped
1 Tablespoon ground cumin
1/2 Tablespoon Kosher salt OR 1 1/2 teaspoons table salt
1 can (12 ounces) evaporated milk
2 cups 505 Southwestern All Natural Diced Flame Roasted Green Chile
12 six-inch corn tortillas
2 cups (8 ounces) shredded Mexican Blend cheese - divided
1/2 cup Mexican Crema or sour cream
1 cup (4 ounces) crumbled Cotija cheese or Feta cheese


Directions:

1. Preheat oven to 350 degrees F. Grease a 9 x 11 baking pan and set aside.
2. Toss chopped chicken with garlic, cilantro, cumin and salt.
3. Blend together evaporated milk and salsa in a large bowl.
4. Wrap tortillas in paper toweling and lightly mist toweling with water. Place in microwave and heat for 1 -2 minutes (check after 1 minute) until warmed and pliable.
5. Set aside 1/2 cup of Mexican blend cheese for end of assembly. Use remaining 1 1/2 cups for inside enchiladas.
6. Working quickly with one tortilla at a time, dip tortilla into salsa mixture, top with chicken and shredded cheese. Roll and set seam-side down into baking pan. Repeat until all tortillas, chicken and cheese are used.
7. Whisk crema or sour cream into remaining salsa mixture until well blended. Pour over top of enchiladas.
8. Top enchiladas with Cotija (or Feta) cheese and reserved Mexican Blend cheese.
9. Cover with foil and bake for 20 minutes. Remove foil and continue baking for another 10 minutes or until bubbly and lightly browned.
10. Let stand 10 minutes before serving.


Easy Beef Enchiladas

Hands-On Time: 20 Minutes
Ready In: 50 Minutes
Serves: 8

Ingredients:

1 pound lean ground beef
1 small onion, chopped
1 Tablespoon Kosher salt or 1 1/2 teaspoons table salt
1 jar (16 ounces) 505 Southwestern Enchilada and Tamale Sauce
16  - 6-inch  flour tortillas
2 cups shredded sharp Cheddar cheese

Directions:

1.Preheat oven to 350 degrees F  and grease a 9x13 baking pan.
2. In a large skillet over medium high heat, cook the ground beef and onion until beef is evenly browned and onion is tender.
3. Pour 3/4 cup of enchilada sauce into the bottom of the pan and spread across evenly.
4. Divide beef and 1 1/2 cups cheese between the tortillas rolling each up and setting, seam side down, into the pan.
5. Pour the remaining sauce over the top of the enchiladas and sprinkle with the remaining cheese.
6. Bake, covered with foil, for 20 minutes. Remove foil and bake until cheese is bubbly - about 5 to 10 minutes.


*Product provided by 505 Southwestern. All opinions are my own. This was not a paid endorsement. 


Saturday, February 15, 2014

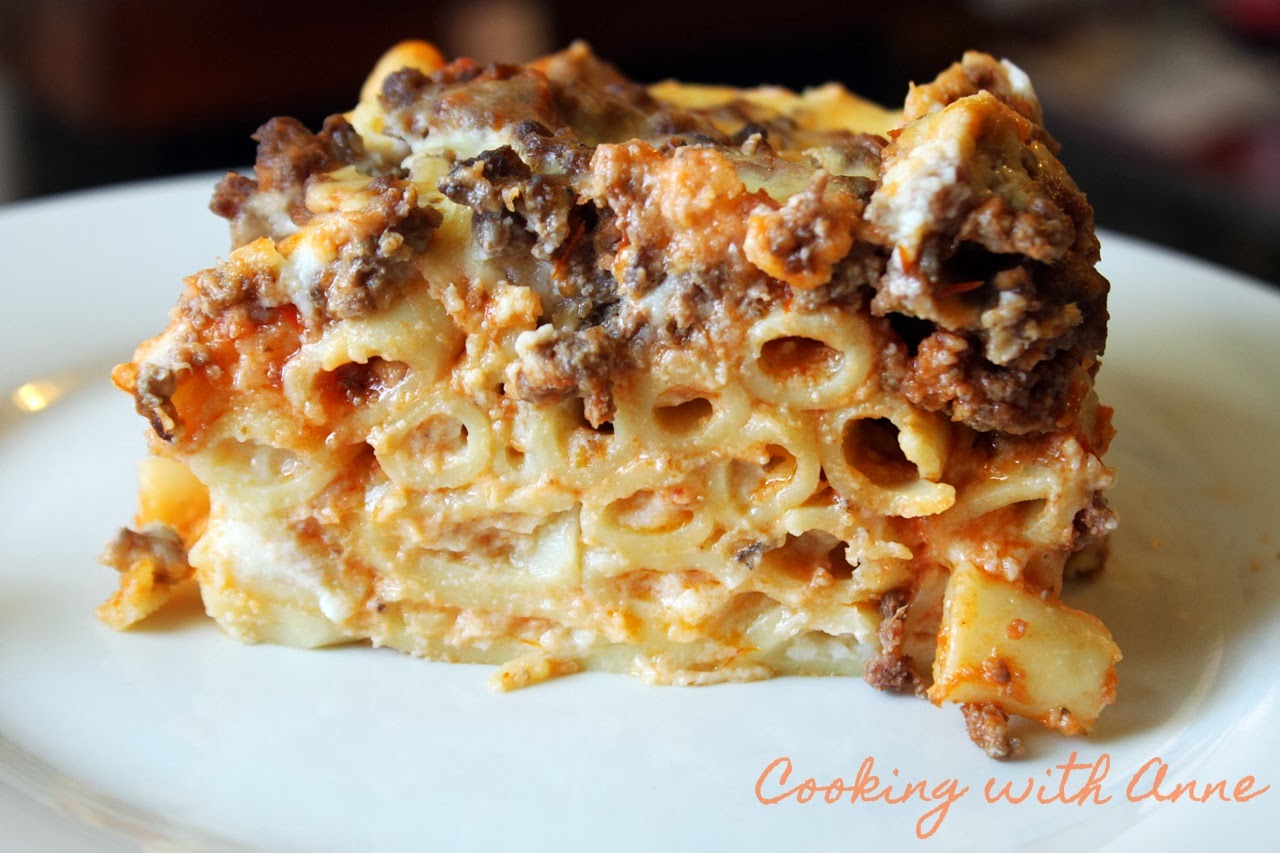
Baked Ziti with Meat Sauce and Béchamel

Baked Ziti with Meat Sauce and Béchamel


I made this recently just in time for an unexpected houseful of people. It was divine. I love pastitsio but some of the kids don't like the usual spices used in it so I compromised and used the standard Italian meat sauce.

The Béchamel usually forms its own layer atop everything, but my pan wasn't big enough so it all sort of settled together. It was just as good that way!

Baked Ziti with Meat Sauce and Béchamel


Baked Ziti with Meat Sauce and Béchamel
Printable Recipe
Serves: 8
Ready In: 1 hour

Ingredients:

1 pound ziti - cooked and kept warm
1 1/2 pounds ground beef
1 small onion, chopped
2 cloves garlic - minced
2 cups prepared marinara or other tomato based spaghetti sauce
4 cups milk
1/2 cup unsalted butter
1/2 cup all-purpose flour
3 large eggs
1 teaspoon freshly ground nutmeg
1 teaspoon salt
1 cup finely shredded Parmesan cheese

Directions:

Preheat oven to 355 degrees F. Lightly oil a 9 x 13-inch baking pan and set aside.

For Meat Sauce:

1. Brown ground beef with onion and garlic until no longer pink. Drain excess fat.
2. Add sauce and stir well. Set aside.

Make the Béchamel:

1. Heat milk until just hot and set aside.
2. Melt butter in a medium saucepan over low heat and add flour. Stir until smooth and cook several minutes.
3. Pour milk into roux in a thin stream and whisk constantly until milk starts to thicken.
4. Whisk eggs until light and add a cup of hot milk sauce to them and stir briskly so the eggs do not cook.
5. Pour into milk and roux and continue cooking until sauce is thickened.
6. Add nutmeg, salt and 1 cup shredded cheese and stir until cheese is melted. Use to assemble immediately.

Assemble:

1. Pour 1 cup Béchamel into ziti and stir well. Layer ziti in the bottom of the prepared pan.
2. Spread meat sauce over ziti and level with a spoon.
3. Pour remaining Béchamel over the top and spread evenly over all to cover completely.
4. Bake for 30 minutes or until bubbly and lightly browned on top.
5. Let stand for 10 minutes before cutting.

Thursday, February 13, 2014

Pumpkin Granola Muffins

Pumpkin Granola Muffins
Pumpkin Granola Muffins 

Maple sugar and I have a love-hate relationship. For the most part, I love it, but in certain applications, I just can't do it. Flashback to childhood when an adult would approach with a box full of chocolates and offer one. We all know, thanks to Forrest Gump, "...you never know what you're gonna get". Now, some companies have markers for their chocolates, either in the form of a swirl or lines added to the top of the coated candy to clue you in as to what's in them, or they have a "map" on the inside of the box that corresponds to the layout of the chocolates.

I don't recall knowing either of those tricks as a child, so I would take what looked pretty or good and then be completely shocked, often times pleasantly so, but sometimes not so pleasantly. It was that way with the maple flavored candies. One bite and I was struggling to find a place to spit out the candy and dump the uneaten half (we all eat them in two bites ... admit it).

That is one instance in which I decidedly do not like maple sugar. Add maple syrup to pancakes, waffles, French toast, bacon, sausage etc. and I'm in heaven. Breakfast is not the same without it and I know most people feel exactly the same.

My other favorite is in granola, but I always felt as thought I were adding an inferior sugar without much nutritional value when I topped or added it to foods. Imagine my surprise when I found that is not the case. Maple sugar is very full of trace minerals, antioxidants and very good things. Look at this information from the Vermont Maple Sugar Makers Association.

Maple Syrup Nutritional Information
Fact Sheet

  • Maple syrup contains an abundant amount of naturally occurring minerals such as calcium, manganese, potassium, riboflavin and magnesium.
  • Maple syrup is a natural source of beneficial antioxidants, which have been shown to help prevent cancer, support the immune system, lower blood pressure and slow the effects of aging.
  • It’s more nutritious than all other common sweeteners, contains one of the lowest calorie levels, and has been shown to have healthy glycemic qualities.
  • Researchers have found that pure maple syrup contains numerous phenolic compounds, which according to the National Center for Biotechnology Information play an important role in cancer prevention and treatment.
  • Phenolic compounds are also commonly found in plants and in agricultural products known as “super foods,” such as blueberries, tea, red wine and flax-seed.
  • During a recent study at the University of Rhode Island, 34 new beneficial compounds were discovered in pure maple syrup.
  • Additional research is being conducted to synthesize some of these compounds into medications that could fight fatal diseases, including diabetes.
  • For more information, please visit http://vermontmaple.org 


Good stuff, yeah? On to the recipe for Pumpkin Granola Muffins using one of my favorite granolas Earthbound Farm's Famous Maple Almond Granola, which incorporates maple syrup. Yum. 

Pumpkin Granola Muffins
Printable Recipe
Makes 24 standard sized muffins or 12 large

Ingredients:

4 eggs
1 c white sugar
1 c brown sugar
l can pumpkin (15 oz.- about 2 cups)
3/4 c vegetable oil like canola
3/4 c olive oil
1 t vanilla
3 c flour
2 t baking soda
2 t baking powder
l t ground cinnamon or pumpkin pie spice
l t salt
2 cups granola - divided (Earthbound Farms Famous Maple Almond Granola is perfect here) 

Directions: 

1. In a mixing bowl, beat eggs, sugar, pumpkin and oils until smooth.

2. Combine flour, baking soda, baking powder, cinnamon and salt-add to pumpkin mixture and mix well. Fold in 1 1/2 cups of granola. 

3. Fill greased or paper-lined muffin cups three-fourths full and top with a sprinkling of the remaining 1/2 cup of granola. 


4. Bake at 400 degrees F for 16 to 20 minutes or until muffins test done. Cool in pan 10 minutes before removing to a wire rack to cool completely.

Wednesday, February 12, 2014

German Chocolate Icing

German Chocolate Icing
German Chocolate Icing on Gooey Brownies


My oldest daughter is very fond of coconut and loves German Chocolate Cake. This year for her birthday I did a riff on that and topped a gooey brownie with German Chocolate Nut and Coconut Icing. The result was to-die-for!

Choose any brownie you like or use this to ice a full two-layer cake. That means this covers a 9 x 13 pan of brownies with a little left over. I also think this would be just right for Valentine's Day.

German Chocolate Icing
Printable Recipe
Makes about 3 cups

Ingredients:

1 cup granulated sugar
1 cup evaporated milk
1/2 cup butter
3 eggs, beaten well
1 1/3 cups flaked coconut
1 cup chopped pecans, walnuts or almonds - traditional is pecans
1 teaspoon vanilla extract

Directions:

1. In a medium saucepan, melt the butter over medium heat then add sugar, evaporated milk and eggs.

2. Whisk together and cook and stir constantly until thickened. This can take 10 minutes to achieve. You must keep stirring so the eggs don't become scrambled eggs rather than a thickener.

3. Remove from heat and stir in nuts, coconut and vanilla until well blended. Cool for 30 minutes before adding to cooled cake or brownies.

Tuesday, February 11, 2014

Ravioli Lasagna


Ravioli Lasagna
Ravioli Lasagna


We are mere days from yet another snow storm in Pennsylvania and I've packed the refrigerators and pantry out with as much as I could fit in. The freezers are full to overflowing and in the event that we lose power, we still have a gas stove and the food can all go to the attached garage, which is quite chilly these days. I think we'll be safe and snug no matter what.

This is something I've been making for quite some time and never got around to writing down or sharing. I guess I felt it was so easy that the name was sort of self-explanatory. The ravioli cover the pasta and ricotta element of lasagna so all you need is a hearty meat sauce and mozzarella to complete the delicious picture.

See if this doesn't become a tried-and-true favorite for busy nights in your home and those days when warming your tummy helps to warm your whole self.


Ravioli Lasagna
Ravioli Lasagna

Ravioli Lasagna
Printable Recipe
Serves 8-10
Ready In: 45 minutes

Ingredients:

3 pounds large round cheese ravioli
1 pound bulk Italian sausage (I used hot) or any ground meat you like
3 cups pasta sauce (whatever you like)
2 cups mozzarella cheese (I also add 1/2 cup shredded Parmesan sometimes)

Directions:

1. Preheat oven to 350 degrees F.
2. Grease a baking dish - 9x13 or 8x11 is good.
3. Brown sausage in a skillet and drain grease if necessary. Add sauce and cook until heated through.
4. Lay out half of the ravioli in the bottom of the prepared dish.
5. Top with half the sauce and half the cheese. Repeat the second layer.
6. Bake for 30 minutes or until lightly browned and bubbly. Cool for 10 minutes before cutting.


Thursday, February 06, 2014

Winter Greens and Ham Salad

Winter Greens and Ham Salad
Leftover holiday ham gets a fresh new spin with this winter salad. Each ingredient is available throughout the winter months and the combination of sweet and savory with a crunch is delicious. Change the pecans to any nut you like and alter the sweetness of the dressing with more or less honey.

Winter Greens and Ham Salad
Printable Recipe
Hands-On Time: 15 minutes
Ready In: 15 minutes
Serves: 6

Ingredients:

4 cups torn romaine lettuce
2 cups baby arugula
8 ounces cooked ham - leftover preferably cut into thin strips
1 cup jicama strips
1 medium pear cut into thin slices
1/2 cup toasted pecans
1/2 cup bleu cheese crumbles
1 cup orange juice
2 Tablespoons balsamic vinegar
2 teaspoons honey
salt and pepper to taste

Directions:

1. Toss romaine and arugula together and portion out between 6 plates.
2. Top with ham strips, jicama stips, peear slices, pecans and bleu cheese.
3. Stir together orange juice, balsamic vinegar and honey until well blended. Season with salt and pepper to taste and pour over salads before serving.

Sunday, February 02, 2014

Spicy Super Bowl with Hatch Green Chiles

Here we are ... Super Bowl Sunday! This year I've had the pleasure of using hatch green chiles directly from The Hatch Chile Store (in new mexico, of course!)  for my recipes and the results have been beautiful!

If you don't know what hatch chiles are, let me tell you. True hatch green chiles are grown only in New Mexico in Hatch Valley. Conceivably you could take the seeds and grow these strains elsewhere, but then they wouldn't be "Hatch" chiles, now would they?

Hatch chiles range from very mild with almost no heat to Extra Hot. I was lucky enough to get the Hot version for my forays in the kitchen. They aren't an overbearing heat, which is good for me, I like to be able to taste my food and not be overwhelmed by the spiciness some chiles have. They have a very short season, which makes them highly coveted; mid August to late September, so when you can get them, make sure you do! If you can't, please visit The Hatch Chile Store for fresh and frozen varieties.

I took two recipes I already had and adapted them to use the Hatch chiles and they are wonderful. Firstly I used them in my Pulled Pork sandwiches which usually are made with jalapeños. The flavor of a Hatch chile is different, but the heat is close to the same in Scoville units to the jalapeño so the end result is very good. I also used them in the "mayo" that's put on the top of these sandwiches. 

Next up was chili, of course! I took my recipe for White Bean and Sausage Chili and added these in where there were no hot peppers at all originally. Coupled with the smokiness of the meats (bacon, ham and sausage) and the mild flavor of green bell peppers, it played very nicely and added a bit more of a kick than cayenne pepper alone. 

Lastly I used the whole peppers in a Chile Relleno Casserole. Yes, I cheated. I don't have time to batter and fry a whole batch of chiles, so I went second best and shrouded them in a lovely puffy batter that baked up beautifully. 

Spicy Pulled Pork and Hatch Chile Mayo


Spicy Pulled Pork and Hatch Chile Mayo
Printable Recipe

5 pound pork shoulder
1 cup diced Hot Frozen Chopped Hatch Green Chiles - thawed and divided
3 Tablespoons Kosher salt

1 tablespoon freshly ground black pepper
6 large cloves garlic - minced
2 cups water

1. Preheat oven to 325 degrees F.
2. Rinse pork and dry well. Place in a large roasting pan, fat side up.
3. Rub salt, pepper and garlic all over pork.
4. Add 1/2 cup chiles around roast and pour water into bottom of pan - do not pour over pork.
5. Roast for 5 hours or until fat forms a crisp crust and pork is easily shredded. Strain pan drippings well and set aside.
6. Cool until able to handle and remove excess fat and shred well.
7. Add remaining 1/2 cup of chiles to pork.
8. Pour 1 cup pan drippings over shredded pork and mix well.
9. Mound onto rolls and top with hatch Green Chile Mayo.

Hatch Green Chile Mayo

1/2 cup mayonnaise
1/2 cup sour cream
2 Tablespoons minced 
Hot Frozen Chopped Hatch Green Chiles - thawed
2 Tablespoons finely chopped fresh cilantro
2 Tablespoons fresh lime juice

Combine all and let stand for 10 minutes before using for shredded pork sandwiches.


White Bean and Sausage Chile with Hatch Chiles


White Bean and Sausage Chili
Serves 8

Ready In: 1 hour 15 minutes
Printable Recipe

2 slices bacon - diced
1 cup diced tavern ham or other ham
1 shallot - minced
1 white leek - sliced thinly
4 cloves garlic - minced
1 medium onion - diced
1 large green pepper - diced

1 cup Hot Frozen Chopped Hatch Green Chiles - thawed
1 pound bulk sausage
4 cups cooked white beans such as cannellini, northern or navy
4 cups chicken stock
1 teaspoon dried and crushed oregano
1 teaspoon cayenne pepper
Sliced and fried green onion (a.k.a. scallions/spring onion) and leeks and sour cream for garnish

1. Heat a heavy soup pot over medium heat. Add bacon and cook until crisp.
2. Add ham, reduce heat to low and cook for 5 minutes.
3. Add shallots, leeks, garlic, chiles, onion and pepper. Stir well and cook for 10 minutes.
4. Crumble sausage well and cook until no longer pink - stirring often to break up.
5. Add stock and beans and simmer for 45 minutes to an hour.
6. Stir in oregano and cayenne and simmer for another 10 minutes.
7. Serve with sour cream and fried green onions and leeks.


Chiles Relleno Casserole


Chiles Relleno Casserole
Printable Recipe
Serves 8
Ready In: 1 hour

8 Hot Whole Frozen Hatch Green Chiles - thawed
1 1/2 cups finely shredded Monterey Jack cheese
6 large whole eggs
1 cup milk
1/4 cup all-purpose flour
1 teaspoon Kosher salt
1 teaspoon smoked paprika
Freshly ground black pepper - several turns or 1/4 teaspoon
Relleno Sauce - see below

1. Preheat oven to 350 degrees F
2. Cut stems from chiles and open to lay flat. Remove seeds and as much of the ribs as possible without tearing the chile.
3. Divide cheese evenly among chiles - this will depend on the size of the chile, they each vary. Roll up and set into a greased baking dish (9 x 11 works well) seam side down. Repeat with each chile.
4. Blend together eggs, milk, flour, salt, pepper and paprika until smooth. Pour over chiles.
5. bake for 30-35 minutes or until puffy and just beginning to brown on top.
6. Let stand for 15 minutes before cutting into squares.

Relleno Sauce

1 (28 ounce) can whole tomatoes
1 cup chopped Spanish or sweet onion
2 large cloves garlic
1 cup water

1. Put ingredients into a blender and puree until smooth.
2. Pour into a saucepan and cook over low heat for 30 minutes.
3. Serve hot with chiles relleno or chiles relleno casserole.

*Hatch Green Chiles provided by The Hatch Chile Store. All opinions are my own and not influenced in any way by free product.