Monday, December 23, 2013

Nanaimo Bars


Ever since I was a child, and probably before I was born, my mother has been making a confection for Christmas that we always called "Grandma's Chocolate Squares". The recipe had come from my paternal grandmother, Ola Foster, and was passed down to just about everyone.

There wasn't a year that went by without those squares; a rich fudgy bottom studded with walnuts and coconut then slathered with a creamy, buttery center topped off with a layer of dark chocolate. They were always cut into small squares because they were so rich you couldn't eat too much ... unless you were a kid, in which case you'd finish off 5 or 6 squares and go back for more later.

My oldest brother was off at a convention where people were serving a potluck of international delights. Each table had a specialty from that country and Bobby came across a woman who had a platter full of Grandma's Chocolate Squares. He was flabbergasted, of course, and wanted to know how this woman had gotten grandma's recipe.

The woman explained that they were called "Nanaimo Bars" and were a big deal across Canada. Not surprisingly, grandma was born and raised in Ontario. Finally the "squares" had a name. No matter, we still call them "Grandma's Chocolate Squares".

Nanaimo Bars or Grandma's Chocolate Squares
Makes: One 9x9 pan

First Layer:

1/2 C Butter
1/4 C granulated sugar
1 egg
5 T cocoa
1 tsp. vanilla
2 C graham cracker crumbs
1 C coconut
1/2 C chopped walnuts

Second Layer:

1/2 C butter, softened
3 T milk
2 T instant vanilla pudding
2 C powdered sugar

Third Layer:

1  6 oz. Pkg. choc. Chips

First layer: Mix butter, sugar, eggs, cocoa, & vanilla
over hot water until it resembles custard. Add the
crumbs, coconut & walnuts. Press into a 9 X 9-inch
square pan. Cool.

Second Layer: Cream butter, milk, & pudding together,
then blend in powdered sugar. Spread over the first
layer & let stand for 15 minutes.

Third Layer: Melt chocolate & spread over the second
layer. Cut into squares.

Yield: 36 1-1/2-inch squares

Monday, December 02, 2013

Snowman Cookies

Snowman Cookies 

When it comes to making cookies, it's nothing I'm so fond of. I've explained reasons for this before, so I'll just stick to what I like about these particular cookies. They're easy.

I don't have the best hand for decorating cookies or cakes or the like, so if I'm going to do it at all, it needs to be simple. Likewise, if I'm making cut cookies, I don't appreciate the type that need to be pried from the cookie sheet in tiny measures so parts don't break off ... like antlers or legs etc. Round cookies are good. Round cookies don't have odd edges or take excessive time to cut out and transfer from counter to cookie sheet to racks.

I first started making these several years ago and the kids really loved them. The design is simple and the cookies are delicious (who doesn't love a good butter cookie?) and they take almost no time to decorate and still turn out looking good. My kind of cookie.

First, the cookie itself. This is a nice butter cookie recipe that rolls well and bakes quickly. When rolling I always use a combination of half flour and half confectioners' sugar. There's nothing like biting into a cookie that tastes of too much flour from the rolling process. Keep the dough you're not rolling in the refrigerator until you need it and work quickly so the dough doesn't get too warm when you are rolling.

Butter Cookies for Rolling
Makes 24  cookies that are 3 inches in diameter

1 cup butter - softened
1 cup granulated sugar
1 large egg
1 Tablespoon vanilla extract
2 1/4 to 2 1/2 cups flour
1 teaspoon baking powder

Icing:

1 cup powdered sugar
4 teaspoons milk (or more if needed)
Orange and black food coloring paste or drops

1. Cream together butter and sugar until fluffy.
2. Add egg and vanilla and mix well.
3. Add flour and baking powder in small amounts until well incorporated. This makes a stiff dough.
4. Divide dough in half and flatten into a disc. Wrap in plastic and refrigerate for 2 hours.
5. Dust a board or other surface with flour and powdered sugar and roll dough to 1/4" thick.
6. Cut 12 rounds of dough, re-rolling as needed and place rounds on a greased baking sheet. I use a 3" biscuit cutter for this that works perfectly.
7. Bake at 375 degrees F for 12-15 minutes or until edges of cookies just begin to brown.
8. Cool for 2 minutes before removing to racks to cool completely.

Make Icing:

Combine powdered sugar and milk until smooth. Divide into 3 portions, white being the largest, and add food coloring to 2 parts making one black and one orange. keep covered until ready to use as it will dry out quickly.

Now to decorate!

Cooled Cookies

Three Icing Colors

Drop icing in the center of each cookie  with a spoon. It will start to spread.

Finish spreading with a knife to near the edge. The icing will spread a bit more once spread with the knife, so leave a small edge.

Let this dry for 15 minutes before applying the colored icing.

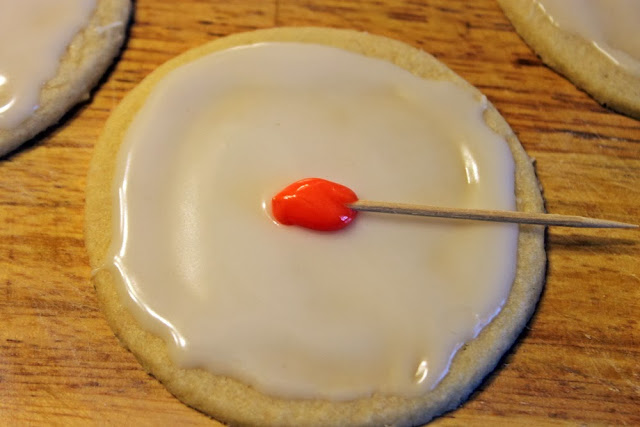
Use a toothpick to add the nose. Put some in the center of the cookie and pull gently to the side to create a pointy nose.

"Carrot" nose!

Add eyes and smile with a toothpick as well. Be careful not to let it drip where you don't want it.

You can also make them look a bit more like "The Snowman" Cute!

Adorable and easy finished snowman cookies. Don't make these too far ahead of time or the icing will "bleed" and not look so pretty anymore. 


Sun Chips and Holiday Entertaining Giveaway

***We have a WINNER! My most-adorable littlest noseminer, Lara, picked number FOUR as today's winner. That's you, Sandy Smith! Congratulations and thank you to all who entered!***


When SunChips® were first launched in the early 1990s, I wasn't quite sure what to make of them. I'd never had a chip that wasn't wholly savory and the multigrains in SunChips® gave them a slightly sweet flavor. I found though, that once I got started, they were very addictive and difficult to put down.

I still feel that way about each and every flavor produced by SunChips®. The best part about these is the fact that they double in use as a chip OR cracker. You can top these babies with just about anything and they hold up and keep their crunch while adding a unique flavor profile to whatever they're paired with. Just about any recipe you have that uses a cracker underneath is great for use with SunChips®. Likewise, any recipe that calls for tortilla chips is perfect with SunChips® (I think this Taco Casserole is a winner!)

Try using them crushed in place of bread crumbs for an extra flavor kick. In fact, Sweet & Spicy BBQ SunChips® would be so good as a coating for chicken or pork before baking or frying. Give it a try.


I also have a sweet giveaway going on and you don't want to miss entering! Check out this photo below for the prize winnings:

·        Sweet & Spicy BBQ SunChips®

·        SunChips® Tote Bag

·        SunChips® Tumbler

·        Chip Bowl (I also filled this with clementines for my holiday table!)

·        Fall Napkin Set

·        Four delicious recipes using SunChips®

Share any component of this post on your favorite social media (Twitter, Pinterest, Facebook etc.) and share a comment HERE on this post sharing a link to your own share to be entered. Make sure to leave a form of contact as well. That's it! One winner will be chosen by randomizer on Monday, December 9th at 11:59 P.M. EST so get your entry in TODAY!

Disclosure: SunChips products and prizes were provided free of charge to me and to one lucky winner. All opinions and views are my own.