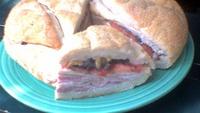
Bento is, very simply put, a Japanese lunchbox that's making waves across the U.S.. Traditionally made with rice, meat, poultry or fish and pickled or other cooked vegetables and often leftovers, bento can be as intricate or simple as you'd like. The bento I send always come back empty and the kids prefer them to the usual bagged lunch.
Bento boxes can be as simple or elaborate as the food they hold, from lacquered boxes with built-in dividers to reusable plastic containers available just about everywhere lately. It's important to keep moist foods separate from dry foods to decrease the risk of spoilage. Silicone muffin liners are ideal for keeping foods separate, but anything from dry lettuce leaves to waxed paper works as well.
While leftovers are perfect, any food that tastes as good chilled as it does hot will do. To keep foods cold until lunch time, small condiment packets like ketchup, mustard, mayo or relish, when frozen, are the perfect size ice-pack whether meant to be consumed or not.
Fill-ins help food keep its shape and stay put; some ideas for fill-ins are grape tomatoes, grapes, baby carrots, individually wrapped cheeses and dried fruit. Experiment with your and your kids' favorites and have fun with it, your kids, and you, will have the most envied lunches at school and work.
My bento, range from very fancy to very simple. I'm sure there will be days where I'll do "fancy", but more often than not I'll use up leftovers from the night before in different ways. Let's face it, kids are suckers ... and I mean that in the nicest way. You can take a simple sandwich and cut it in a different shape and the kids will find that both fascinating and somehow tastier.
Here are some bento ideas to get you started.
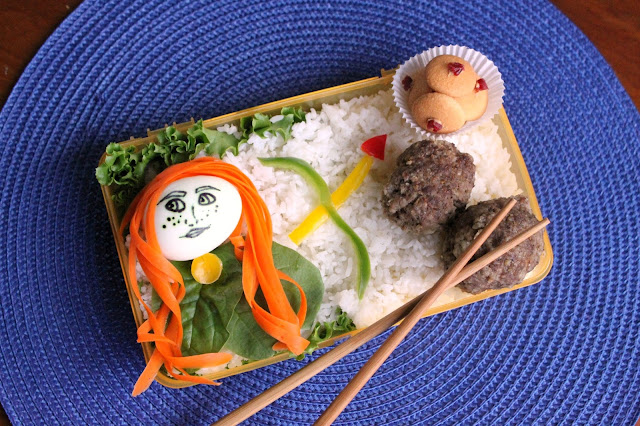 |
| Merida Bento |
- Hard boiled egg for Merida's face. Use edible markers to draw features.
- Thin carrot strips made with a vegetable peeler are Merida's hair.
- Green, yellow and red peppers are cut to make Merida's bow and arrow.
- Baby spinach leaves make Merida's cloak.
- A small round of yellow pepper is her cloak pin.
- Two meatballs stand in for mini haggis.
- Mini vanilla wafers with bits of dried cranberry fixed with a dab of icing are Scottish sweet buns.
- The background is seasoned rice, though mashed potatoes would work very well, too!
 |
| Halloween Bento |
- Frankenstein's monster is a large green pepper slice with cheese and black olive eyes. His mouth is red pepper and his "scars" are edible black marker.
- The bolts on the sides of his neck are yellow pepper and his hair is black olive slivers attached with cream cheese.
- He is sitting on a bed of carrot peels.
- The "fingers" are hot dogs cut in half with cheese nails.
- The pumpkin is a mini cheese round colored on with edible marker.
- The mummy is a mini cheese round with cheese strips for bandages and cheese eyes dotted with edible marker pupils.
- The ghost sandwich is a sandwich made in the usual way and cut into a ghost shape. The eyes and mouth are black olive rounds.
- The background is green leaf lettuce and broccoli florets are used to fill in gaps.
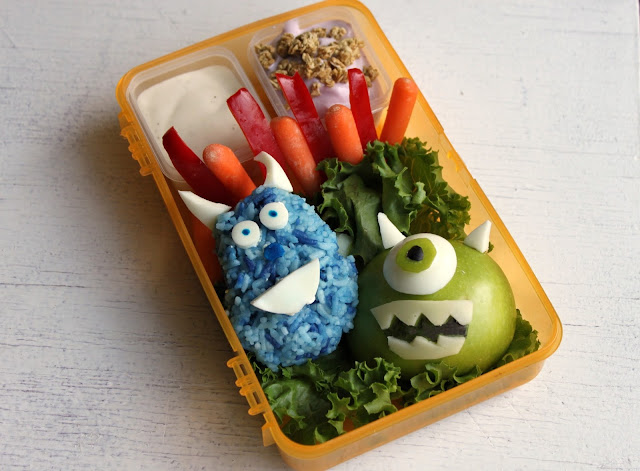 |
| Monsters Inc. Bento |
- Mike Wazowski is half a green apple turned upside-down. His eye is a round of hard-boiled egg with a black green apple iris and black olive pupil, held together with a dab of cream cheese. His teeth are cut from cheese and his mouth is black edible marker. Mike's horns are made from hard boiled egg whites.
- Sully is rice dyed with blue food coloring. His smile, eyes, horns and nose are cut from hard boiled egg white. The nose is colored with edible marker as are his pupils.
- Underneath Mike and Sully is green leaf lettuce.
- The background is baby carrots and red peppers with ranch dip.
- Dessert is blueberry yogurt with granola topping.
 |
| Butterfly Bento |
- The butterfly is made of a sandwich cut into a butterfly shape. The wings are decorated with cut outs of cheese and red pepper. The body is a red pepper strip.
- Across the top is a wax covered mini cheese with the center cut out to resemble a flower with a red pepper middle.
- A deviled egg "tulip" is in the center.
- The wax flower removed from the mini cheese wax is set on a clementine.
- Baby carrots, black and green olives and strawberries are fill-ins and the background is green leaf lettuce.
 |
| All-American Bento |
This All-American bento is super fast and a real favorite with my kids. The sandwich roll is filled with Deviled Egg Salad and wrapped with waxed paper. The other munchies are, cereal mix, grape tomatoes, baby carrots and celery sticks, waxed wrapped cheese and red & green grapes.
This is like deviled eggs in a sandwich - traditional egg salad with a mustard kick.
Deviled Egg Salad
Hands-On Time: 10 minutes
Ready In: 10 minutes
Serves: 4
Ingredients:
4 large eggs - hard boiled
4 Tablespoons mayonnaise
1 teaspoon prepared yellow mustard
1/2 teaspoon paprika
1 teaspoon freshly snipped dill - optional
Directions:
1. Remove yolks from eggs and set aside. Chop egg whites finely.
2. Combine yolks, mayo, mustard, paprika and dill. Mash with a fork until smooth.
3. Fold egg whites back into yolks and spread on bread or flour tortillas to make 4 sandwiches.
 |
| Americanized Bento |
This Americanized version of bento is emptied in no time flat. The usual sandwich is filled with an unusual spread and put together with cheese and peanut butter crackers, baby carrots, Ranch dip, a hard boiled egg, green olives and grape tomatoes.
Turkey or chicken bologna make this phony and the relish gives it an extra kick of flavor making it taste a bit like deviled ham salad.
Phony Baloney Sandwich Spread
Hands-On Time: 5 minutes
Ready In: 5 minutes
Serves: 4
Ingredients:
8 ounces turkey or chicken bologna - about 8 slices
4 Tablespoons mayonnaise
2 Tablespoons sweet relish
Directions:
1. Combine all ingredients in a blender or food processor and pulse until finely chopped and well blended.
2. Spread on bread to make 4 sandwiches.
 |
| Indian Bento |
Indian spices were the inspiration for this bento filled with Mini Meat Samosas with Spiced Yogurt Dip, Spicy Chickpeas with Tomatoes, lentils with rice and cucumber sticks. A dry lettuce leaf keeps the saucy chickpeas separate from the rice and samosas and a small lidded container keeps the dip in place.
Chickpeas, red-ripe tomato and spices combine to make a very flavorful side dish that won't overwhelm any entree. Kosher salt has a more subtle flavor that really works with these spices and helps to pull the juices from the tomatoes.
Spicy Chickpeas and Tomatoes
Hands-On Time: 10 minutes
Ready In: 15 minutes
Serves: 4
Ingredients:
2 cups cooked chickpeas
1 large tomato - seeded and diced
1 large green pepper - seeded and diced
1 cup yellow onion - finely chopped
2 Tablespoons olive oil
1 teaspoon ground coriander
1 teaspoon ground cumin
1 teaspoon Kosher salt
Directions:
1. Heat oil in a skillet over medium-high heat. Add onion and pepper and cook until fragrant - about 3 minutes.
2. Add chickpeas, tomato, spices and salt. Stir well and heat through. Serve.
Samosas are meat-filled turnovers popular in India. The usual filling is lamb, but ground beef is not only more readily available, but also more frugal. Served with a spiced yogurt dip, these are ideal for lunch or served as an appetizer.
Mini Meat Samosas and Spiced Yogurt Dip
Hands-On Time: 30 minutes
Ready In: 40 minutes
Serves: Makes 30 turnovers
Ingredients:
1/2 pound lean ground beef
1/2 medium yellow onion - chopped
1 clove garlic - minced
1 Tablespoon freshly grated ginger
1/4 teaspoon cayenne pepper
1/2 teaspoon ground turmeric
1/2 teaspoon ground cumin
1/2 teaspoon ground coriander
1/2 teaspoon garam masala powder
1 teaspoon Kosher salt
2 Tablespoons lemon juice
1/4 cup cilantro leaves - finely chopped
1 Tablespoon fresh mint - finely chopped
10 egg roll wrappers
oil for frying
Directions:
1. Brown ground beef in a large skillet and drain well. Remove and set aside.
2. Add oil to pan and cook onion until soft. Add ground beef back in to onion.
3. Stir in garlic, ginger, spices, salt, lemon juice, cilantro and mint. Heat through.
4. Cut egg roll wrappers into 3 even strips.
5. Place one teaspoon of meat filling onto one end of strip and fold over to form a triangle. Continue folding over and over to make a triangle shaped turnover. Place a small dab of water on the end of the strip and press down to seal.
6. Heat oil one inch of oil over medium to medium-low heat and fry turnovers in small batches until golden brown. 7. Drain well on paper toweling before serving.
Spiced Yogurt Dip
Combine 1 cup plain yogurt with 1/2 teaspoon ground coriander, 1/2 teaspoon ground cumin, 2 Tablespoons chopped fresh cilantro, 1 Tablespoon honey and salt to taste. Blend well and chill until serving time.
 |
| Mediterranean Bento |
A Mediterranean-themed bento is packed with red pepper hummus, whole wheat pita wedges, Kalamata olives, red pepper strips, tabbouleh, rice-stuffed grape leaves and grape tomato fill-ins. Waxed muffin liners and small containers with lids keep the foods separate.
Red Pepper Hummus
Hands-On Time:
Ready In:
Serves: Makes 2 cups
2 cups cooked and drained garbanzo beans (chickpeas)
1/2 cup tahini (sesame paste)
1 teaspoon minced garlic
1 teaspoon salt
1 cup seeded and chopped red pepper
juice of 1 lemon or 4 Tablespoons
1. Toss everything into a blender and pulse until smooth.
2. Cover and chill until serving time.
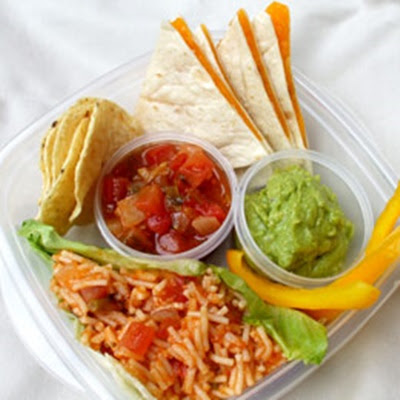 |
| Mexican Bento |
This Mexican-inspired bento is filled with cheese quesadilla wedges, Spanish rice, guacamole, salsa, tortilla chips and yellow pepper strips. A dry lettuce leaf helps to keep the rice separate from other foods and small containers with lids house the salsa and guacamole.
Making your own Spanish rice is so easy, you'll never go back to boxed again. You're also in control of just how spicy or mild to make it.
Spanish Rice
Hands-On Time: 5 minutes
Ready In: 25 minutes
Serves: 4
2 Tablespoons oil
1/2 cup chopped Spanish onion
2 cloves garlic - minced
1 cup white rice
2 cups chicken broth
1 cup salsa
1 teaspoon chili powder
1. Heat a saucepan over medium heat and add oil. Stir in onion and garlic and cook until fragrant, about 2 minutes.
2. Stir in rice and add chicken broth slowly. Add salsa and chili powder and bring to a boil.
3. Reduce heat to low and lid tightly. Simmer for 20 minutes.
4. Fluff with a fork and serve.
Fresh salsa goes together quickly and the flavor is markedly different than the store-bought versions. Make it mild or hot by altering the amount of peppers added.
Fresh Salsa
Hands-On Time: 15 minutes
Ready In: 1 hour and 15 minutes
Serves: Makes 3 cups
3 large ripe tomatoes - peeled, seeded and chopped
1 small white onion - chopped
3 garlic cloves - minced
chiles (as many as you like) stemmed, seeded and chopped (or 1 small can of chopped mild green chiles)
1/4 cup chopped fresh cilantro
1 lime - juiced
1 teaspoon Kosher salt
Sugar to taste if the tomatoes are acidic
1. Combine all and mix well.
2. Allow flavors to blend for at least 1 hr.
3. Taste for seasoning and serve at room temperature.
4. Refrigerate unused portion.
Smooth and creamy avocados get spiced up just right with onion, garlic and lime juice. Serve with tortillas chips, tacos or fajitas.
Guacamole
Hands-On Time: 15 minutes
Ready In: 15 minutes
Serves: Makes 3 cups
2 ripe Haas avocados scooped out and mashed
1 medium onion chopped fine
5 scallions chopped fine
2 cloves of garlic - minced
1 jalepeno pepper - seeded and chopped fine (optional)
1 cup chopped fresh cilantro
1 lime - juiced or 3 tablespoons
Salt and pepper to taste
Sugar or honey to taste, if needed
1. Combine all ingredients, except avocado, and blend well.
2. Mash avocado last to keep it from browning before adding to remaining ingredients.
3. Place plastic wrap directly on the guacamole to help keep browning to a minimum if storing before serving.
Here is some of the gear I have on-hand for lunch packing:
 |
| Our insulated lunch bags came from Michaels for the girls and ALDI for the boys. |
Don't miss my Garden Bento on the ShopRite Potluck Blog this month!