Sunday, January 02, 2011

Happy New Year


A couple days late with that sentiment isn't so bad, is it? I've been busier than I hoped I'd be this past year and the amount of posts I had is evidence of that. I don't do resolutions, but I do promise to try and be a bit more vigilant in 2011.

I think I got caught up in wanting to write what I thought others wanted to read. That's all well and good because artists want to please their fans, but I also need to get back to why I started this in the first place and that was simply for me and my kids.

This coming year looks to be filled with positive changes for us and I'll try and keep those of you who are loyal readers in the loop, but it's all good things, not easy and some rather difficult, but all for the best in the end.

Here's a typical Southern recipe for the New Year, one that actually comes from my own upbringing. We aren't Southern, but the influence in the area of Indiana where my mother grew up was heavily Southern and many of her recipes reflect that.

You can chill out some with the bacon here, but it really is necessary for the right flavor. Try and get organic produce when you can and feel free to substitute canned black-eyed peas if you like.

Black-Eyed Peas and Collard Greens
Serves 8
Printable Recipe

1/2 pound bacon - cut into small dice
3 cloves garlic - minced
1 small yellow onion - chopped
1 Tablespoon apple cider vinegar
salt to taste
1/4 teaspoon cayenne pepper
15 large collard leaves - rinsed, dried and chopped
1 pound dried black-eyed peas
1 bay leaf

1. Pick over beans and rinse. Cover with cold water and soak overnight.
2. Drain water from beans and place in a heavy pot. Cover with 1-inch of water and bring to a boil. Reduce to a simmer and add 1 clove minced garlic, 1 bay leaf and 1 Tablespoon salt (the salt will NOT make the beans tough, that's an old wives' tale). Cook 45 minutes to 1 hour or until beans are cooked through. Remove bay leaf, drain well and set aside.
3. Heat the same large pot over medium heat and add bacon. Cook until crisp and add onion and garlic. Cook just until onion turns translucent. Drain grease and add chopped greens. Stir well and add 1 cup water, vinegar and cayenne. Lid tightly and reduce to a simmer. Cook for 45 minutes or until greens are tender.
4. Add drained beans and heat through before serving.

Wednesday, December 22, 2010

Lucky Leaf Pot-A-Cakes


I admit to being a baker who uses canned pie filling. It's not anything I'm ashamed of, on the contrary, I think it makes me a smarter baker. While fresh cherry pie is lovely, pitting cherries is not, and while fresh blueberries are the bomb, some days I just need them ready to go. I will admit that using apple pie filling from a can is something you'll almost never see me do, but I've slipped there on occasion, too.

Lucky Leaf recently sent along a few recipes for me to try along with cans of their pie fillings to make them with. The first was a clear winner in our house. Lucky Leaf Pot-A-Cakes was the Grand-Prize Winner of the Lucky Leaf Blue Ribbon Recipe challenge, submitted by Gloria Herdman of Pomeroy, Ohio. A combination of streusel bread, blueberry pie filling and cheesecake, they were absolutely yummy.

Pot-A-Cakes

Ingredients

1 21-ounce can LUCKY LEAF ® Premium Blueberry Pie Filling
1 8-ounce package cream cheese, softened
1 4-serving size package (3.4 ounces) French vanilla instant pudding mix
1 1/3 cups whipping cream
1 17.4- to 18.3-ounce package cinnamon streusel quick bread mix
2/3 cup water
2 eggs
2 tablespoons vegetable oil

Preparation

1. Preheat oven to 350°F. Divide pie filling among eight 10-ounce custard cups or ramekins (for one dish recipe see below). Set cups on a large baking sheet; set aside.
2. In a large bowl beat cream cheese with an electric mixer on medium speed until smooth. Beat in pudding mix. Gradually beat in whipping cream until well combined (mixture will be thick). Spoon evenly over pie filling in cups.
3. In another large bowl combine quick bread mix, water, eggs, and oil. Stir until combined but slightly lumpy. Spoon 1/4 cup of the batter over the cream cheese mixture in each cup. Sprinkle evenly with all but 1/4 cup of the packaged streusel mixture. Spoon remaining batter over the streusel (batter won't cover the streusel layer). Sprinkle with reserved streusel. (Note: Cups will be full.)
4. Bake for 25 to 30 minutes or until tops are golden brown and a toothpick inserted into top portion comes out clean. Cool slightly. If desired, drizzle tops of cakes with icing* before serving. Serve warm.

*Icing: If your quick bread does not contain an icing packet, in a small bowl combine 3/4 cup powdered sugar, 2 teaspoons milk, and 1/4 teaspoon vanilla. If necessary, stir in additional milk, 1 teaspoon at a time, to make drizzling consistency.

One Dish Method: Prepare batters as above. Spread pie filling in a 3-quart rectangular baking dish. Dollop pudding mixture atop. Spoon on about 1/2 of the batter and sprinkle with all but 1/4 cup of the streusel. Spoon on remaining batter and sprinkle with reserved streusel. Bake in a 350°F for 40 minutes. Cool slightly and drizzle with icing.

Servings: 8

Cooking Time: 25 minutes


Lucky Leaf products provided free of charge. This post and resulting opinions are my own and have not be influenced by free product.

Monday, December 20, 2010

Sweet Potato Pound Cake with Dulce de Leche

Sweet Potato Pound Cake with Dulce de Leche
Leftovers are a fact of life, especially during the holidays. I'm a straight-up kind of girl when it comes to them so it's rare that I make anything different from a leftover holiday food. This cake, though, is something I'd make extra sweet potatoes for any day.

When this was done, still warm from the oven and topped with thick dulce de leche, the result was something that can really only be described as foodgasmic. There were no words for just how good that cake was. I made it again with the same delicious results and expect it to stand the test of time here.


Sweet Potato Pound Cake with Dulce de Leche
Serves: 12
Printable Recipe

Ingredients:

2 cups leftover mashed sweet potatoes
1 cup unsalted butter - softened
4 large eggs
1 teaspoon vanilla extract
1 cup granulated sugar
1 cup unpacked light brown sugar
3 1/4 cups all-purpose flour
1/4 cup milk
2 teaspoons baking powder
1/2 teaspoon baking soda
1/2 teaspoon salt
2 teaspoons pumpkin pie spice
2 cups prepared dulce de leche

1. Preheat oven to 350 degrees F. Grease a 12-cup bundt pan and set aside.
2. Mix together butter and sugars until light and fluffy. Add sweet potatoes, vanilla, eggs and milk and stir until smooth.
3. Combine flour, baking soda, baking powder, salt and pumpkin pie spice and add to wet ingredients slowly. Batter will be thick.
4. Spoon batter into prepared pan and bake for 55 to 60 minutes or until a toothpick inserted near the center comes out clean.
5. Cool for 10 minutes and invert onto a clean serving platter.
6. Heat dulce de leche until smooth and warm and serve over slices of cake.

*Notes: If you don't have pumpkin pie spice on-hand you can use 1 teaspoon ground cinnamon, 1/2 teaspoon ground ginger and 1/4 teaspoon each ground nutmeg and cloves.


Saturday, December 18, 2010

Timpano

Have you ever seen Stanley Tucci and Tony Shalhoub in Big Night? If not, and you are anywhere near a serious foodie, or even just a fan of either actor, you must watch it. The story is that of 3 brothers who own a flailing restaurant and are in need of financial assistance. Their search for funding leads them to believe they will be serving a famous musician at their restaurant and they plan a 'big night' with an even bigger meal for the musician and the friends they've invited.

The pièce de résistance of the huge meal is Timpano. Watch here:


I scoured the web and found Stanley Tucci's mama's recipe for Timpano and tackled it over three day's time. It was just as good as the guests in the clip make it out to be. I had children making noises that rivaled the dinner scene from What About Bob? It really is that good.

I won't share the recipe here, but it can be found in Cucina & Famiglia: Two Italian Families Share Their Stories, Recipes, And Traditions by Joan T. Tucci, Gianni Scappin and Mimi S. Taf

Here, however, is the building of a Timpano:


Timpano
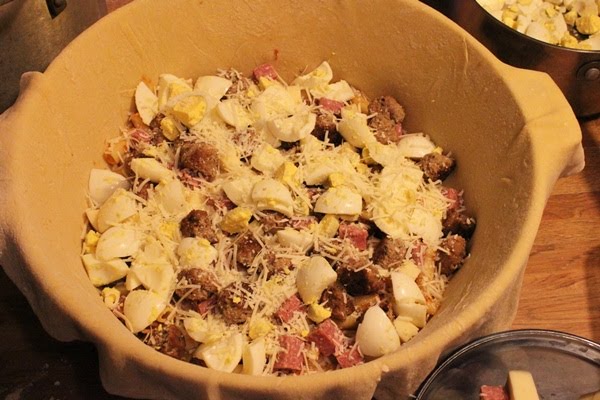
You need a very large pan. The usual is a 14-inch enamel coated basin, but I have a 6.9 quart caldero on hand from IMUSA which I used. The end result doesn't look the same on the outside, but I promise it tastes just as good.


Timpano
Adding pasta tossed with Ragu Tucci to the first layer.


TimpanoLayering salami, provolone, hard-boiled eggs, Romano cheese and tiny meatballs to the layer.


Timpano
More Ragu to top the first layer. Repeat.


Timpano
Top the second layer with a last layer of just pasta and Ragu before closing up and baking.


Timpano
The baked Timpano. Mine looks more disc-like than drum-like, so if you can get the right pan, do so.


TimpanoOne HUGE slice of Timpano. This serves up to 16 very easily. Be prepared for leftovers if you don't have a crowd to feed.


Tuesday, November 16, 2010

Salt-Crusted Turkey

Salt Crusted Turkey
Each year that I host Thanksgiving I brine my turkey. Usually it's a simple salt and water solution that the turkey soaks in overnight. The salt pulls the moisture to the surface of the turkey and keeps it that way, resulting in a very delicious bird.

This year, I'm switching things up a bit. Rather than soak the bird in brine, which calls for a large enough vessel to completely cover the turkey, I'm salt-crusting. There are many recipes out there for a salt-crusted turkey, but they are for a crust which bakes around the bird and is then broken away once baked. My own thoughts were to crust the turkey with salt and herbs, marinate for several hours in the refrigerator, and then roast as usual.The ending was pure bliss. The turkey was moist and delicious and the salt and herbs weren't overpowering. The gravy was even wonderful after augmenting the drippings with salt-free stock and water.

I suggest trying it beforehand with smaller poultry like a roasting chicken, but do try it, my whole family loved this and there's no way I'll be able to have Thanksgiving this year without it.

First thing's first, though - you need to start with a quality turkey. I prefer Butterball, I've never had one yet that wasn't perfect and I know each time I purchase one I'm getting the best there is. So, I started with the right turkey and the recipe goes a little something like this:

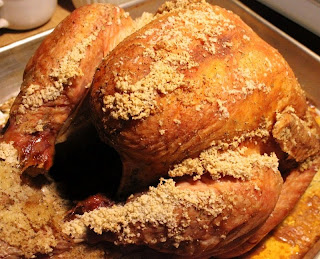
For a 10-12 pound turkey, combine 1 cup Kosher salt, 2 teaspoons ground sage, 2 teaspoons crushed thyme and 1 teaspoon crushed tarragon. Mix well and coat the washed and dried turkey with the mixture, inside and out, leaving a crust surrounding the bird. Refrigerate, covered lightly, for 4 hours or up to 8.
Salt Crusted Turkey
Properly crusted bird

Roast the turkey according to directions and when it's done, break away any excess salt crust, being careful not to let it fall into the drippings in the pan, and discard. Baste the finished turkey with pan drippings or extra salt-free stock.

Salt Crusted Turkey
Perfectly roasted

Carve as usual and make sure to add enough water or salt-free stock to the drippings, tasting frequently, to lower the heavy salt content. You can also play it safe and use purchased turkey gravy.

Now, here's the fun part of this post - I have 2 FREE BUTTERBALL TURKEY CERTIFICATES to give away and all you need to do is post here in the comments about your favorite turkey preparation or holiday memory and I will choose 2 winners on Friday the 20th of November.

**Turkey for this post and turkey certificates were given to me free of charge. this post contains my unbiased opinions of Butterball and I was not sent compensation in any other way.