Showing posts with label Pasta. Show all posts

Monday, September 11, 2017

Pasta with Sausage and Peppers


This lighter take on sausage and peppers is a great weeknight meal that takes very little time to prepare. I use leftover sausage links that have already been cooked to make prep time faster. The tri-color peppers add color and flavor, but if only green are available, that works well, too. Serve with a bagged green salad for a quick back-to-school dinner.

Pasta with Sausage and Peppers

Hands-On Time: 5 minutes
Ready In: 20 minutes
Yield: 6-8 servings

Ingredients:

12 ounces farfalle pasta, cooked al dente according to package directions
2 Tablespoons olive oil
3 sweet peppers, one each yellow, green and red, sliced in 2-inch pieces
3 cloves garlic, minced
1/2 cup chicken, vegetable, or beef stock
1 pound sweet Italian sausage, cooked and sliced 1/4-inch thick
1/4 cup fresh basil, chopped
Salt to taste
Red pepper flakes to taste - optional

Directions:

1. Heat a large skillet over medium-high heat and add olive oil. Add peppers and cook briefly until they just start to soften, about 4 minutes. Add garlic and stir.
2. Pour in stock and cook for 2 more minutes.
3. Toss sausage slices with peppers and add in pasta. Toss well so all ingredients are combined.
4. Add basil and salt to taste before serving hot.

Monday, July 31, 2017

Antipasto Pasta Salad

Antipasto Pasta Salad

My family just loves pasta salad, especially in the summer. This one is excellent for potluck picnics or dinner at home. This has all the best elements of a great antipasto plate tossed together in a delicious salad. Take out the meat for a veggie friendly version, and make sure you dress it within an hour of consuming or the pasta will soak up all the liquid and you'll be left with a dry salad.

Antipasto Pasta Salad

Hands-On Time: 10 minutes
Ready In: 20 minutes
Yield: 6-8 servings

Ingredients:

1 pound rotini pasta cooked according to package directions until al dente and cooled
8 ounces fresh mozzarella cut into 1/2-inch cubes or 8 ounces baby bocconcini
8 ounces hard salami cut into 1/2-inch cubes
1 cup grape tomatoes cut into quarters
1/2 cup jarred roasted red peppers diced
1 (6 ounce) jar marinated artichoke heart quarters - diced and marinade reserved
1 cup black olives, halved
2 Tablespoons each fresh basil and Italian flat leaf parsley, chopped
1/2 cup sliced pepperoncini - optional (not shown in photo)

Directions:

1. Combine all ingredients in a large bowl and toss well to combine.
2. Refrigerate for up to one hour after dressing has been added.
*NOTE- If taking to a picnic etc. take the dressing along with you and add just before serving, but not more than one hour prior.

Monday, February 16, 2015

Daniel East's Over-The-Top Tuna Pasta Salad

I've shared recipes of Dan's before, (see The Soup and Daniel East's Classic Turkey Noodle Soup)  but this one takes the cake, I didn't have ONE child who didn't love this - me, too!

While I was putting it together I kept thinking, "This is too much ... this isn't enough" but I kept going and had watchful little eyes all the while; my 8 year-old was on the edge of her seat to try this. She would glance at the clock and back at me and then say, "It's not lunchtime, can we eat this when it's done?" Adorable.

Daniel East's Over-The-Top Tuna Pasta Salad
Daniel East's Over-The-Top Tuna Pasta Salad 

Regardless of what I thought when assembling it, this was absolutely perfect. The heat from the black pepper was there, but not too much, the dressing was divine and the garnish exactly right. Everyone who tried it fell in love. Give this a try and see what you think!

Daniel East's Over-The-Top Tuna Pasta Salad 

Yes, there are a lot of ingredients, but most are commonly found and help make this look as good as it tastes. 

Ingredients

1-  16oz box rotini pasta (regular or wheat)
2-  4.5oz cans of premium white tuna in water

Dressing: 

1 c Hellman's mayonnaise
4 tbsp extra virgin olive oil
2 tbsp lime juice (fresh or bottled)
½ tsp garlic powder
½ tsp paprika 
1 tbsp ground black pepper 
1 tsp sea salt or Kosher salt 
2 tbsp Worcestershire sauce

Garnish:

¼ c sliced toasted unsalted almonds
¼ c diced red onion
¼ c shredded carrots
¼ c chopped yellow bell pepper
½ c shredded/chopped fresh baby spinach 
¼ c diced ripe tomato
¼ c chopped broccoli 
1 tsp chopped oregano (1/2 tsp dry OK too)
1 c shredded Monterey Jack cheese
½ c shaved Parmesan cheese (fresh preferred but grated is OK too)

Directions
Cook, drain and cool the pasta. Set aside.
Drain the tuna and break apart with a fork; then, add to pasta.
Add garnishes to pasta and toss to incorporate.
Combine mayonnaise, olive oil, Worcestershire, lime juice, and dry spices in a small bowl. Blend well.
Pour dressing over all and toss gently until evenly distributed.
Chill for 20-30 min and serve. 

Enjoy!


©2015 Daniel M. East. All rights reserved. Reproduced with permission. 

Monday, August 18, 2014

Chicken Cannelloni

Chicken Cannelloni
Chicken Cannelloni

 Cannelloni is a lovely stuffed pasta dish very popular in Italian cuisine. Usually pasta sheets, cannelloni shells or manicotti shells are used. I improvised and used egg roll wrappers instead. Egg roll wrappers are a pasta, but a very thin and delicate one, which just adds to the appeal of this dish. Egg roll wrappers are also far easier to stuff and roll than cooked pasta shells, which can be slippery and messy and often split or fall apart when stuffing. The whole process goes far smoother when time is of the essence - which is always around here.

I love a good Béchamel sauce and usually make my own, but for a quicker and easier solution I've used jarred Alfredo sauce. Use a deep dish for this so the pasta will cook well and not be chewy or underdone. 

Almost better than dinner was dessert ... one of our favorite biscottis, Blueberry - White Morsels Biscotti - click for the recipe! 

Blueberry Biscotti
Blueberry Biscotti

Chicken Cannelloni
Makes 12 - Serves 6

Ingredients:

12 egg roll wrappers - 5" squares
16 oz ricotta cheese
1 large egg
1 teaspoon Kosher salt or 1/2 teaspoon table salt
1/2 teaspoon freshly ground pepper
1 teaspoon dried basil - crushed
1 clove garlic - minced
1/2 cup grated Parmesan cheese
1 lb cooked chicken breast - finely chopped
1 cup finely shredded Fontina, Provolone or Italian blend cheese - divided
1 jar (16 oz) Alfredo sauce or 2 cups homemade Béchamel

Directions:

Preheat oven to 350 degrees F.

1. Combine ricotta, egg, Parmesan, basil, garlic, salt and pepper. Whisk together well.
2. Fold in chicken and 1/2 cup of Fontina (or other) cheese. Set filling aside.
3. Grease a 9x13 deep baking pan with olive oil. Spread 1/2 cup of Alfredo or Béchamel sauce across the bottom of the pan.
4. Lay out an egg roll wrapper and keep the rest covered with a damp towel so they won't dry out. Place 1/4 to 1/3 cup of filling in the center of the wrapper and roll wrapper tightly around it. The rolls should be about an inch and a half in diameter. Lay, seam side down, in pan on top of sauce. Stuff and roll remaining wrappers and set in the pan in the same way.
5. Top rolls with remaining sauce, covering each completely. Sprinkle the other 1/2 cup of Fontina over the cannelloni.
6. Cover tightly with foil and bake for 30 minutes until bubbly. Let stand 10 minutes before serving.


*Notes:
Liquid needs to be exact with egg roll wrappers. Too much liquid will cause them to fall apart and too little will cause the edges to be dry and crisp.
Spinach can be added once it is cooked and drained very well - about a cup for this size recipe should do it.
I used 50% fat free Alfredo sauce and 2 egg whites instead of 1 egg to help cut back the fat in this recipe.
**Originally posted at Family.com: http://family.go.com/food/recipe-788409-chicken-cannelloni--t/

Monday, June 23, 2014

Pesto Pasta Salad

Pesto Pasta Salad
Pesto Pasta Salad


I LOVE pesto and this is the most fabulous 4-ingredient pasta salad ever. Garlicky pesto and sweet peas team up with mild mozzarella and al dente pasta for a super-quick and super-tasty pasta salad. Leave as-is for a meatless meal or side or add chunks of pre-cooked chicken or shrimp for a meal in a bowl. Change the peas to any small green vegetable you'd like, as well.


Pesto Pasta Salad
Pesto Pasta Salad

Pesto Pasta Salad

Hands-On Time: 10 minutes
Ready In: 20 minutes
Serves: 4 as a meal or 6 as a side

Ingredients:

8 ounces uncooked pasta such as cavatappi (in photo)
8 ounces mozzarella cheese cut into 1/2-inch dice
8 ounces prepared pesto sauce (bottled or homemade are both fine)*
1 cup cooked and drained peas or other green vegetable


Directions:

1. Cook pasta according to package directions until al dente. Drain and rinse under cold water until cool. Drain again.

2. Toss pasta with mozzarella cubes, pesto and peas until well coated and serve immediately or refrigerate, covered, up to 4 hours. If refrigerated longer, you may need more pesto sauce to make up for any soaked up by the cheese and pasta.


*Homemade Pesto:

Pesto
Makes about 1 cup

Printable Recipe

2 cups fresh basil leaves, packed
1/4 cup grated Parmesan cheese
1/2 cup Olive oil
3 tablespoons pine nuts or walnuts
3 garlic cloves, finely minced
salt as needed

Place basil leaves in small batches in food processor and whip until well chopped (do about 3/4 cup at a time). Add about 1/3 the nuts and garlic, blend again.
Add about 1/3 of the Parmesan cheese; blend while slowly adding about 1/3 of the olive oil, stopping to scrape down sides of container.
Process basil pesto it forms a thick smooth paste. Repeat until all ingredients are used, mix all batches together well. Serve over pasta. Basil pesto keeps in refrigerator one week, or freeze for a few months.


Originally posted to Family.com: http://family.go.com/food/recipe-926995-pesto-pasta-salad-t/


Monday, June 09, 2014

Pasta with Anything

Pasta with Anything
Pasta with Anything. Here with grape tomatoes, baby spinach, artichoke hearts and Parmesan cheese.

This "recipe" is also known as, "How to make all of your kids happy with one meal." Trust me on this, it works. Simply clear out the fridge of any little bits and pieces of still edible "stuff" and throw it together with a favorite pasta and there's dinner. Everyone has an individualized plate full of pasta and fresh ingredients.

Now, I do this plate by plate so it does take a little more time (especially with the amount of people I feed nightly), but it's very worth it when they get excited to see me prepping and then finish their plates and even ask for more. Occasionally I'll be lucky enough to have two children want the same thing and then I can do two plates at once. Either way it takes mere minutes per plate once everything is prepped.

Start with a favorite pasta; a pound for 4 is the norm so we cook up two pounds. I keep it warm in a colander over a water bath. When I need it to come apart I dunk the whole colander in the water for a moment and then use a pasta fork to pull out what I need. We're partial to pappardelle here.

Find whatever fixings you're happy with and go for it. Here are two photos of things we've used before. Use your imagination and let it run wild!


Pasta with Anything Options


More Options

Pasta with Anything
Simple How-To
Serves 4

1 pound pasta cooked as desired and kept warm
Olive oil
Several bowls of veggies, meats, cheeses, fresh herbs and nuts

1. Keep pasta warm in a colander over a water bath.
2. Heat a large non-stick skillet over medium-high heat.
3. Add olive oil and desired ingredients minus cheese and stir briefly until cooked to desired doneness.
4. Add pasta and toss well. Top with cheese if desired and serve.
5. Repeat for other plates of pasta.

Saturday, February 15, 2014

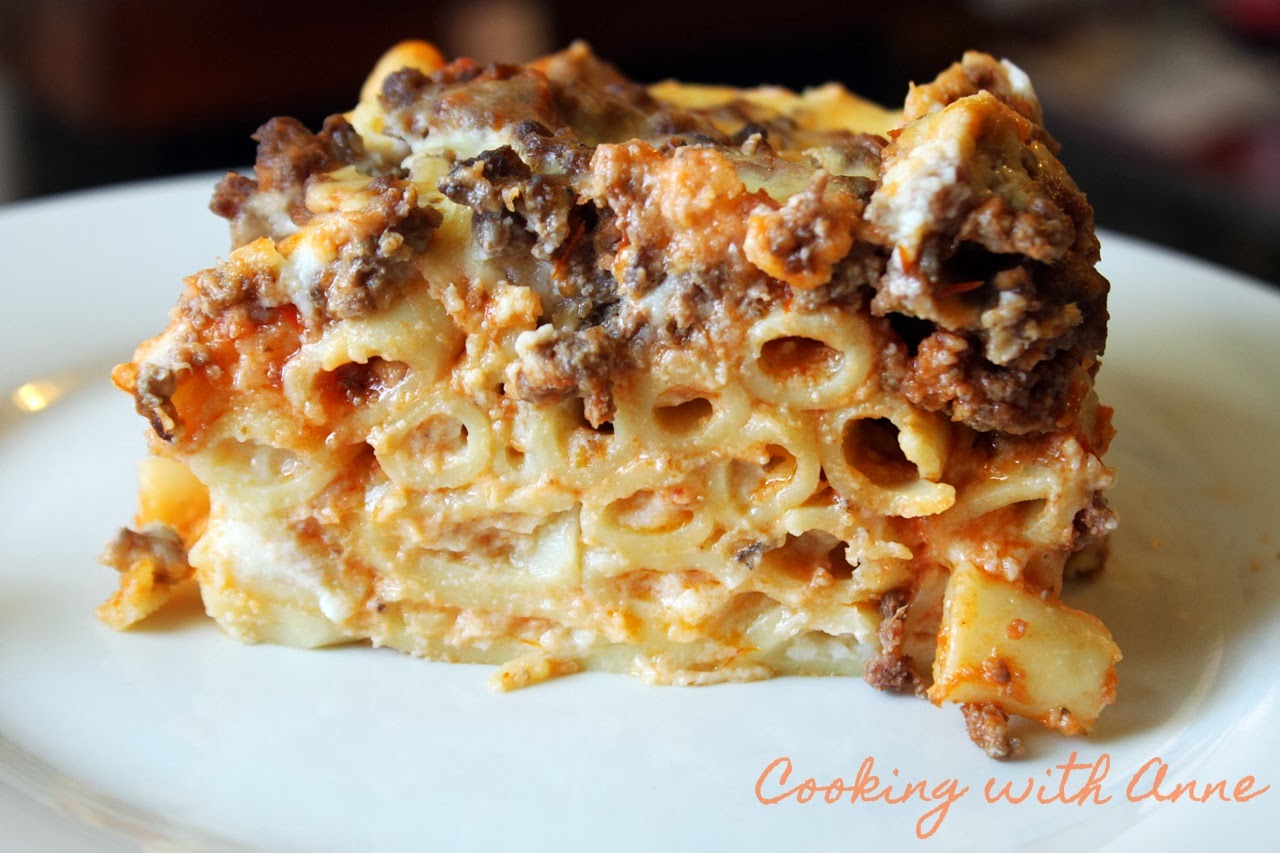
Baked Ziti with Meat Sauce and Béchamel

Baked Ziti with Meat Sauce and Béchamel


I made this recently just in time for an unexpected houseful of people. It was divine. I love pastitsio but some of the kids don't like the usual spices used in it so I compromised and used the standard Italian meat sauce.

The Béchamel usually forms its own layer atop everything, but my pan wasn't big enough so it all sort of settled together. It was just as good that way!

Baked Ziti with Meat Sauce and Béchamel


Baked Ziti with Meat Sauce and Béchamel
Printable Recipe
Serves: 8
Ready In: 1 hour

Ingredients:

1 pound ziti - cooked and kept warm
1 1/2 pounds ground beef
1 small onion, chopped
2 cloves garlic - minced
2 cups prepared marinara or other tomato based spaghetti sauce
4 cups milk
1/2 cup unsalted butter
1/2 cup all-purpose flour
3 large eggs
1 teaspoon freshly ground nutmeg
1 teaspoon salt
1 cup finely shredded Parmesan cheese

Directions:

Preheat oven to 355 degrees F. Lightly oil a 9 x 13-inch baking pan and set aside.

For Meat Sauce:

1. Brown ground beef with onion and garlic until no longer pink. Drain excess fat.
2. Add sauce and stir well. Set aside.

Make the Béchamel:

1. Heat milk until just hot and set aside.
2. Melt butter in a medium saucepan over low heat and add flour. Stir until smooth and cook several minutes.
3. Pour milk into roux in a thin stream and whisk constantly until milk starts to thicken.
4. Whisk eggs until light and add a cup of hot milk sauce to them and stir briskly so the eggs do not cook.
5. Pour into milk and roux and continue cooking until sauce is thickened.
6. Add nutmeg, salt and 1 cup shredded cheese and stir until cheese is melted. Use to assemble immediately.

Assemble:

1. Pour 1 cup Béchamel into ziti and stir well. Layer ziti in the bottom of the prepared pan.
2. Spread meat sauce over ziti and level with a spoon.
3. Pour remaining Béchamel over the top and spread evenly over all to cover completely.
4. Bake for 30 minutes or until bubbly and lightly browned on top.
5. Let stand for 10 minutes before cutting.

Tuesday, February 11, 2014

Ravioli Lasagna


Ravioli Lasagna
Ravioli Lasagna


We are mere days from yet another snow storm in Pennsylvania and I've packed the refrigerators and pantry out with as much as I could fit in. The freezers are full to overflowing and in the event that we lose power, we still have a gas stove and the food can all go to the attached garage, which is quite chilly these days. I think we'll be safe and snug no matter what.

This is something I've been making for quite some time and never got around to writing down or sharing. I guess I felt it was so easy that the name was sort of self-explanatory. The ravioli cover the pasta and ricotta element of lasagna so all you need is a hearty meat sauce and mozzarella to complete the delicious picture.

See if this doesn't become a tried-and-true favorite for busy nights in your home and those days when warming your tummy helps to warm your whole self.


Ravioli Lasagna
Ravioli Lasagna

Ravioli Lasagna
Printable Recipe
Serves 8-10
Ready In: 45 minutes

Ingredients:

3 pounds large round cheese ravioli
1 pound bulk Italian sausage (I used hot) or any ground meat you like
3 cups pasta sauce (whatever you like)
2 cups mozzarella cheese (I also add 1/2 cup shredded Parmesan sometimes)

Directions:

1. Preheat oven to 350 degrees F.
2. Grease a baking dish - 9x13 or 8x11 is good.
3. Brown sausage in a skillet and drain grease if necessary. Add sauce and cook until heated through.
4. Lay out half of the ravioli in the bottom of the prepared dish.
5. Top with half the sauce and half the cheese. Repeat the second layer.
6. Bake for 30 minutes or until lightly browned and bubbly. Cool for 10 minutes before cutting.


Monday, June 24, 2013

Country Crock Casseroles - Easy Mac & Cheese Veggie Chicken Casserole and Giveaway

Winners! We have a winner and 5 Runners Up! Our Grand-Prize Winner is Gayle Daniel and the Runners Up will be notified via email about their prize! Thank you so much to everyone who entered and keep tuned for more great giveaways!

**************************************************************************

I'm very pleased to be working with Country Crock again sharing fabulous casserole recipes and hosting fun giveaways. If you don't already know, I'm also a Country Crock Correspondent so this chance to share with you was one I readily accepted.

First of all, I need to share this totally cute box I received with all the things I needed to prepare this first casserole and share the giveaway with you.

 From top to bottom, L to R: Top of box; inside the first lid; inside the second lid; the sides and back. Adorable, isn't it? My girls are currently playing "restaurant" with the box, but I have a sneaking suspicion it  make become a new home for some doll clothes.

This month we're sharing a recipe from Country Crock for an easy mac and cheese that you can change up any way your taste buds desire. I took this easy recipe and put my own spin on it. Try both and let me know what you think!

Use the original recipe to create your own version of Easy Mac and Veggie Chicken Casserole and make sure to share it here and on your favorite social media networks. Use the hashtag #CountryCrockCasserole so I can find you and share it, too!

This is the 8-inch, 1 quart capacity casserole dish that I'm GIVING AWAY. Look below for your chance to WIN!


Here's the original yummy recipe from Country Crock:

Easy Mac and Cheese Veggie Chicken Casserole

Ingredients:

4 Tbsp. Country Crock Spread, melted, Divided
1 cup 2% milk
8 ounces dry rotini pasta, Cooked and drained
2 cups diced cooked chicken
4 cups assorted frozen vegetables, thawed
2-1/4 cups finely shredded low fat cheddar cheese
1/4 cup plain dry bread crumbs
1 Tbsp. grated Parmesan cheese

Directions:

1. Preheat oven to 400 degrees. Combine 3 tablespoons Country Crock Spread, milk, rotini, chicken, vegetables and cheddar cheese in 8-inch baking dish.
2. Combine breadcrumbs, Parmesan cheese and remaining Spread in small bowl; sprinkle over top of casserole.
3. Bake until heated through and crumbs are toasted, about 30 minutes.


And this is my spiced up version using grilled chicken, Mexican crema, roasted poblanos and Cotija cheese:

Country Crock Spread, green peppers, Cotija cheese and cilantro - just a few of the ingredients for my spicy take on this delicious casserole.
Green Chile Chicken Mac and Cheese Casserole


Green Chile Chicken Mac and Cheese Casserole

Ingredients:

4 Tbsp. Country Crock Spread, melted, Divided
1/2 cup 2% milk
1/2 cup Mexican crema (or sour cream)
8 ounces dry rotini pasta, Cooked and drained
2 cups diced grilled chicken
1 1/2 cups frozen corn - thawed
1 cup roasted and diced poblano chile 
1 1/2 cups green pepper - diced
2 cups finely shredded low fat Mexican blend cheese or Monterey Jack
1/4 cup grated Cotija cheese
1/4 cup plain dry bread crumbs
1 Tbsp. grated Cotija cheese
1 Tbsp. fresh cilantro - chopped fine

Directions:

1. Preheat oven to 400 degrees. Cook green pepper in 3 tablespoons Country Crock Spread until tender. Combine peppers and Spread with, milk, crema, rotini, chicken, corn, chiles and cheeses in an 8-inch baking dish.
2. Combine breadcrumbs, 1 tablespoon Cotija cheese, chopped cilantro and remaining Spread in small bowl; sprinkle over top of casserole.
3. Bake until heated through and crumbs are toasted, about 30 minutes.


Now, how to WIN!


Grand Prize for one lucky reader includes the following items:

·        Casserole dish
·        Country Crock VIP Coupon (good for one free product)
·        Recipe Card

Five runners up will receive: A Country Crock VIP Coupon. 

To enter: Pin this blog post to Pinterest including the #CountryCrockCasserole hashtag, and the URL to this post. If you do not have Pinterest you can choose one of the following alternatives to enter:

·        Tweet a link to you blog post using #CountryCrockCasserole
·        Post a link to your blog post on Facebook using #CountryCrockCasserole


Do all three and you'll be entered THREE times! PLEASE remember to include the URL of your Pin, Tweet or FB post in a comment here so I can make sure you're entered! This giveaway ends on July 8th at 12:01 A.M. Eastern Time. Good luck!

*Disclosure: I received product, a product coupon and stipend for extra ingredients from Country Crock for free.



Monday, May 20, 2013

Cincinnati Chili

Cincinnati Chili
Cincinnati Chili


Cincinnati Chili is not only well-loved but well-debated. Ask anyone who lives in, or once lived in, Cincinnati and they will tell you exactly what their chili should or shouldn't contain. They'll also tell you which chili parlor (there are more than 140 in Cincinnati) is the best and which 'way' they prefer their bowl.

Its origins being Greek in nature, the spice blend is different than Texas chili, and the beans are an option, not a must. Cinnamon, allspice and cumin are heavy-hitters in this chili and the flavor is like no other.

There's no denying the intrigue and fun of this dish, though and this version is as close to the 'real-deal' as you may find. I'm sure I'll hear an argument to the contrary, and from passionate Cincinnati Chili lovers, I'd expect no less.

Cincinnati Chili
Printable Recipe
Ready In: 3 hours
Serves: 6

Ingredients:

1 pound ground round
3 cups water
3 Tablespoons tomato paste
1 teaspoon ground cinnamon
1 clove garlic, minced
1 bay leaf
1 Tablespoon chili powder
1/2 teaspoon allspice
1 teaspoon paprika
1 Tablespoon ground cumin
Salt and ground pepper to taste
1 pound spaghetti - cooked and kept warm
2 cups kidney beans - cooked and kept warm
8 ounces finely shredded sharp cheddar cheese
1 medium white onion - chopped

Directions:

1. Break up ground round as finely as possible and add to a large pot. Add water, tomato paste, garlic, bay leaf and spices. Cook at a simmer (medium-low heat), breaking up beef as it cooks so it will be very fine. This is important to the end product.
2. Cook beef for a total of 3 hours, leaving the grease that forms on top - that's a vital part of the flavor. Remove the bay leaf and stir well. Season with salt and pepper as desired.
3. For the different 'ways' to eat Cincinnati Chili, follow the instructions below:

2-way: Cooked spaghetti topped with chili.
3-Way: 2-way with shredded cheddar added on top.
4-Way: 3-Way with diced onions on top.
5-Way: 4-Way with cooked kidney beans added on top.


Monday, March 25, 2013

Ravioli in Walnut Cream Sauce

Ravioli in Walnut Cream Sauce

I love to make homemade pasta, not for the actual making, which can be tedious and painstaking at times, but because the result is so worth the while. When I can't make my own pasta refrigerated fresh is second-best to me, especially when it comes to ravioli, but a really good homemade sauce can make just about any pasta sing.

Something I've seen used often in pasta sauces used with stuffed pasta especially, is walnuts. Most often they're paired with sage and top a squash stuffed pasta, but I've taken them and paired them with lemony Italian parsley, heavy cream and shallots for a delicious and surprisingly light pasta sauce.

The California walnuts were given to be by California Walnuts and I can tell you now, I'd purchase them anyway; they're lovely, large and perfectly yummy with no trace of bitterness that I've found in other brands of walnut.

Here's what I did with my latest bag of beauties;

Ravioli in Walnut Cream Sauce
Serves 4
Printable Recipe

1 pound fresh cheese ravioli
2 Tablespoons unsalted butter
2 Tablespoons olive oil
1/2 cup California Walnuts, roughly chopped
Pinch of Kosher salt
1/2 teaspoon Italian seasoning blend, crushed
2 Tablespoons minced shallot
1/4 cup Italian parsley, chopped
1/2 cup white wine
1/2 cup heavy cream (light cream or half and half is fine here, as well)
2 Tablespoons Parmesan cheese, freshly grated

1. Cook ravioli according to directions and keep warm.
2. Heat oil and butter over medium-high heat in a medium non-stick frying pan just until melted. Add Italian seasoning and salt and stir briefly.
3. Add walnuts and stir several times. They will brown quickly, so don't leave them unattended. As soon as they begin to brown, remove from heat and take them from the pan with a slotted spoon and drain on paper toweling.
4. Add shallot to pan and stir until it begins to soften, about 3 minutes. Add wine and bring to a simmer.
5. Stir in cream, reserved walnuts and Parmesan cheese until smooth. Toss in parsley, adjust seasoning with salt and serve on top of warm ravioli.

Thursday, May 10, 2012

Crispy Ravioli with Asparagus

Crispy Ravioli with Asparagus

This dish is something I make often. The very first time was a spin on one of Michael Symon's recipes for a get-together I had. I couldn't find gnocchi that I liked and didn't have time to make my own, so I substituted ravioli and the rest is history. The other ingredients are also loosely based on the original recipe, but I like asparagus here and nobody but I would eat morels, so mushrooms were out.

We've had this with green beans and peas as well, and the addition of fresh shrimp is perfect for a heartier meal. It goes together very quickly and can be adapted to tastes. I really like this method for ravioli - it's a bit like a fried pierogi with onions, but with a brightness from the lemon zest and Italian parsley. The next time you go meatless, give this one a try!

Crispy Ravioli with Asparagus
Serves 4
Printable Recipe

2 Tablespoons butter
2 Tablespoons olive oil
1 shallot, diced fine
2 cloves garlic, minced
1 pound fresh cheese ravioli (I prefer mini)
1 pound fresh asparagus, washed and woody stems cut, cut into 1" lengths
zest of one lemon
2 Tablespoons freshly chopped Italian flat-leaf parsley
1 teaspoon or more Kosher salt
1/2 cup shredded fresh Parmigiana cheese

1. Melt butter in a large non-stick pan over medium-high heat and add olive oil. Saute shallots and garlic briefly and add ravioli - you do not need to cook the ravioli ahead of time.
2. Keep the ravioli moving so they will brown but not stick and add the asparagus. Cook until asparagus is crisp-tender, about 4 minutes.
3. Remove from heat and add lemon zest, parsley and salt. Toss to coat.
4. Add shredded cheese to each serving.

Saturday, December 18, 2010

Timpano

Have you ever seen Stanley Tucci and Tony Shalhoub in Big Night? If not, and you are anywhere near a serious foodie, or even just a fan of either actor, you must watch it. The story is that of 3 brothers who own a flailing restaurant and are in need of financial assistance. Their search for funding leads them to believe they will be serving a famous musician at their restaurant and they plan a 'big night' with an even bigger meal for the musician and the friends they've invited.

The pièce de résistance of the huge meal is Timpano. Watch here:


I scoured the web and found Stanley Tucci's mama's recipe for Timpano and tackled it over three day's time. It was just as good as the guests in the clip make it out to be. I had children making noises that rivaled the dinner scene from What About Bob? It really is that good.

I won't share the recipe here, but it can be found in Cucina & Famiglia: Two Italian Families Share Their Stories, Recipes, And Traditions by Joan T. Tucci, Gianni Scappin and Mimi S. Taf

Here, however, is the building of a Timpano:


Timpano
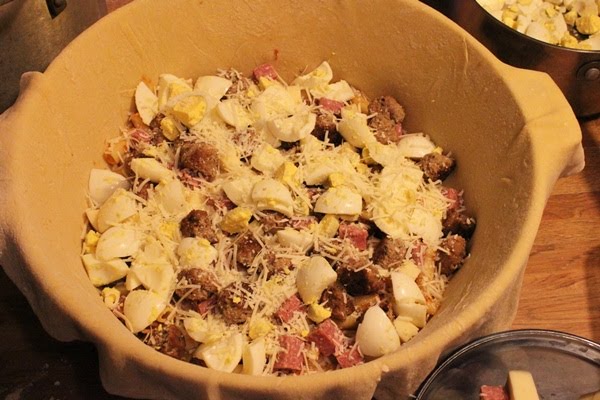
You need a very large pan. The usual is a 14-inch enamel coated basin, but I have a 6.9 quart caldero on hand from IMUSA which I used. The end result doesn't look the same on the outside, but I promise it tastes just as good.


Timpano
Adding pasta tossed with Ragu Tucci to the first layer.


TimpanoLayering salami, provolone, hard-boiled eggs, Romano cheese and tiny meatballs to the layer.


Timpano
More Ragu to top the first layer. Repeat.


Timpano
Top the second layer with a last layer of just pasta and Ragu before closing up and baking.


Timpano
The baked Timpano. Mine looks more disc-like than drum-like, so if you can get the right pan, do so.


TimpanoOne HUGE slice of Timpano. This serves up to 16 very easily. Be prepared for leftovers if you don't have a crowd to feed.


Thursday, October 08, 2009

Carnation Evaporated Milk - The Cooking Milk


Our Favorite Macaroni and Cheese with Bacon

Our Favorite Macaroni and Cheese

I recall at one time thinking that evaporated milk and sweetened condensed milk were one and the same. Imagine that realization coming from attempting to substitute one for another. After that single incident, I shied away from evaporated milk, not really understanding what it was or why anyone would use it.

I started getting back into it quite accidentally; my mother was moving to a smaller home and cleared out her overfull cabinets, passing the contents on to me and my brood. Within the cans and boxes given to me were several cans of evaporated milk. I figured if mom used it, it couldn't be all bad and there must be some way to use it up.

I experimented and came to love it. It was cheaper than cream and healthier, too (twice the protein and calcium of regular milk) - but every bit as rich. When I used it for things like cream soups, baking pies or macaroni and cheese, there was no difference in performance between it and cream, but it was definitely creamier and richer than using milk. I now always have cans on-hand for things like my favorite salmon chowder and the kids' favorite macaroni and cheese. The fact that I like Carnation more than any other is par for the course here. I've used Carnation everything - including formula for my babies who needed extra help - since I've been old enough to purchase my own food.

My mother used it for pies most often, but the fact that it translates so well into savory dishes seems to have been lost on her. Here are two recipes using Carnation Evaporated Milk that are pretty near perfection. The first recipe, Loaded Potato Potluck Favorite, comes from the Carnation Holiday Cookbooklet. You can download it for yourself here: http://bit.ly/CEMholiday
These were awesome and didn't last very long at all. The green onion is optional, but I love the stuff, so there's no way I would leave it out. I think it added just the right contrast to the cheese and bacon, too.


Creamy, delicious, perfect.

The second is our own favorite macaroni and cheese - see photo above. Using evaporated milk in lieu of regular milk does nothing but make this even better than usual. The cheese seemed to melt better in the evaporated milk and the overall result is heavenly.

Our Favorite Macaroni and Cheese with Bacon
Prep Time: 20 minutes
Total Time: 50 minutes
Serves 8
1 pound elbow macaroni - cooked al dente
1 can (12 ounces) Carnation Evaporated Milk (any fat content works as well as the next)
1 pound (4 cups) shredded Monterey Jack cheese
1 cup shredded Cheddar cheese
1/2 pound bacon - cooked crisp and crumbled
1 teaspoon Kosher salt
1 teaspoon smoked paprika

1. Preheat oven to 350 degrees F
2. In a small saucepan heat evaporated milk gently just until hot. Do not boil.
3. Add shredded Monterey Jack cheese and stir until melted. Add salt and paprika and blend well.
4. Toss cooked macaroni with bacon and pour cheese mixture over all. Stir and pour into a greased 9x13 baking dish.
5. Top with cheddar cheese and bake for 20-30 minutes or until bubbly and just beginning to brown.

For more information about Carnation Evaporated Milk, check out the following links:

Cooking Benefits of evaporated milk:
http://bit.ly/cookingbenefits

Nutrition Info:
http://bit.ly/o2onutrition

The different types of evaporated milk:
http://bit.ly/rightmilkforyou

Carnation Virtual Kitchen:
http://bit.ly/carnationvirtualkitchen

Additional Recipe Ideas:
http://bit.ly/additionalrecipes

Recipe Personality Quiz:
http://bit.ly/recipepersonalityquiz

Coupons for product and stipend for recipes graciously provided by Carnation and Cassie Boorn of One2One Network. This is not a paid product endorsement.

Monday, May 11, 2009

Lemon Dishes


I love lemons. I think they're beautiful to look at and the uses for both the juice and rind are endless. They're easily used in both savory and sweet dishes, and I don't know of many people who don't appreciate them.

We recently had a meal that was lemon-based and absolutely delicious. We started with a salad made of simple endive drizzled with a dressing of POM Wonderful 100% Pomegranate Juice and lemon before moving on to a lemon and garlic-roasted chicken and lemon orzo. We ended with my favorite cupcakes, making a fully fabulous sunshiny-lemon meal.


Lemon Curd-Filled Lemon Cupcakes


Pomegranate and Lemon Dressing
Makes 1 cup
Printable Recipe

8 ounces POM Wonderful 100% Pomegranate Juice
1 Tablespoon lemon zest
2 Tablespoons lemon juice
2 Tablespoons olive oil
1 Tablespoon minced shallots
1 teaspoon honey
salt to taste

Reduce pomegranate juice to 3/4 cup by simmering gently for 15 minutes. Add remaining ingredients and chill well before serving.


Lemon and Garlic-Roasted Chicken
Serves 4-6
Printable Recipe

One 5-6 pound roasting chicken
1 whole lemon
6 whole cloves garlic
olive oil
salt & pepper to taste

Loosen breast skin on chicken by slowly working the handle of a wooden spoon under skin on both sides. Slice lemon thinly and slide slices under breast skin. Toss any extra lemon and the garlic cloves into the cavity of the bird. Brush bird with olive oil, sprinkle with salt and pepper and roast, uncovered, until desired doneness is reached. Usually 350 degrees F for 1 1/2 to 2 hours is sufficient.


Lemon Orzo
Serves 4
Printable Recipe

1 cup dry orzo, cooked until al dente (about 2 cups cooked)
2 Tablespoons minced shallots
1 Tablespoon lemon zest
1 Tablespoon lemon juice
2 Tablespoons olive oil
salt & pepper to taste


Combine all and heat through.

Wednesday, October 29, 2008

Quadrucci - Making Pasta


Pasta is such a diverse and widely consumed product that many people have no idea how easy it is to make your own. Pasta is also so cheap that many people wonder why one would make their own. For myself it's a feeling of accomplishment. I've always enjoyed making something that most people think can only be store-bought: cream puffs, wonton soup, fortune cookies.

The first time I ever made pasta with a machine rather than rolling it out myself was in school. Every pasta dish that was served at the school restaurant was made from fresh pasta. Making pound after pound was a bit tedious, but worth it.

Making your own pasta is like making anything else homemade; you get to be in control of what goes into it. Whole egg or egg white, salt or no salt, semolina flour or all-purpose flour. Water or not, oil or not.

Most store-bought pastas are made from semolina flour - a flour made most often from durum wheat. It's usually more coarse than standard all-purpose flour, so many people mix the two for pasta making. I've made pasta from all semolina and from half and half and I prefer the latter. All semolina makes a very stiff dough.

Here's the recipe based on what I made last week.

Basic Pasta Dough
Printable Recipe

1 cup semolina flour
1 cup all purpose flour
1 teaspoon salt
3 large eggs

I don't usually add salt to my pasta, but I was making quadrucci, which are rather large, and wanted a little more flavor because they were being served simply, in broth.

Combine flours and salt and make a well in the center. Drop 3 eggs into the well and start mixing them into the flour until a stiff dough forms. If you are making pasta on a very dry day you may want to add a tablespoon or so of water to the eggs. Cover the dough and let it stand for 10 minutes.

Roll out or run through a pasta machine and cut as desired.

Fresh pasta cooks faster than its dry counterpart, so you need to keep an eye on it as it cooks. As with dry pasta, timing depends on the size and shape of the pasta.

I made quadrucci with herbs encased in the center of each. It makes for a very pretty presentation and isn't very difficult to do. The photo above is the finished quadrucci in broth.

The making of pasta:


Stirring together egg and flour.
Dough at the proper consistency and ready to rest.
Run dough through each setting twice starting with the widest first - number 1.
Turn the dial to the next number and run the dough through again - twice. Do this until you reach the desired setting. I like number 7.
Lay very dry flat-leaf herbs on half of the sheet of pasta. Make sure to space them well, they will expand in size once run through the machine again.
Fold the other half of the pasta sheet over the herbs and press down lightly so they don't move when transferring the sheet to the machine.
Run the pasta sheet through the machine on the number just before the one you decide on. Run it through one more time on the correct setting. For example, I wanted a number 7 thickness, so I ran the dough through 6 first and then through 7. This is the way the sheet should look when finished. Cut into squares with an herb in the center of each square. Cook in boiling stock until done.

This is an example of quadrucci with herbs done the wrong way. Any moisture on the herb at all will cause the pasta to tear, resulting in exposed herb. All is not lost, however!


Run the damaged dough through the machine several more times so the herbs distribute themselves throughout and then cut it to a desired shape. I made fettuccine with mine.

That 'damaged' pasta looks pretty good! These are ravioli made with a full sheet of pasta.


This is thin spaghetti the kids helped to make.


All-in-all, not difficult! It helps to have a machine to get the dough to the right thickness, but you can roll and cut pasta by hand, as well.