Friday, July 31, 2009

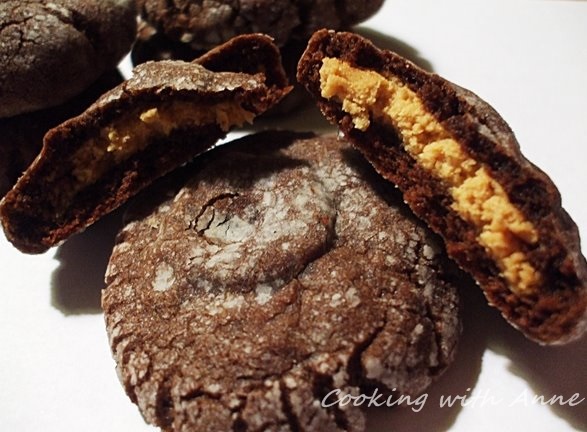
Peanut Butter Munchies


Peanut Butter Munchies
Today in the Lehigh Valley we started out hot and humid, but after a much-needed thunderstorm, things cooled off quite nicely to a very comfortable 70 degrees and for me that means cooking. More specifically today, it was baking.

On our last trip to Philadelphia, I came across a Better Homes and Gardens magazine in the waiting room of a doctor's office. With the only other choices being The Economist and Field & Stream, I chose wisely and read it through twice during the 3 hour waiting time.

This recipe was in there, and as I had extra time on my hands, I copied it down. I made them this evening, in honor of the cooler weather, and the kids are devouring them as I write. Oh, and the storage instructions at the bottom are clearly for people not living on this planet - there's not going to be anything to store in this house.

Peanut Butter Munchies

Makes: 32 cookies
Printable Recipe

1-1/2 cups all-purpose flour
1/2 cup unsweetened cocoa powder
1/2 teaspoon baking soda
1/2 cup butter, softened
1/2 cup granulated sugar
1/2 cup packed brown sugar
1/4 cup peanut butter
1 egg
1 tablespoon milk
1 teaspoon vanilla
3/4 cup sifted powdered sugar
1/2 cup peanut butter
2 tablespoons granulated sugar

1. Preheat oven to 350 degree F. In a medium mixing bowl stir together flour, cocoa powder, and baking soda; set aside.

2. In a large mixing bowl beat together butter, the 1/2 cup granulated sugar, brown sugar, and the 1/4 cup peanut butter with an electric mixer until combined. Add egg, milk, and vanilla; beat well. Beat in as much of the dry ingredients as you can with mixer. Stir in remaining dry ingredients by hand with a wooden spoon. Form chocolate dough into 32 balls about 1-1/4 inches in diameter. Set aside.

3. For peanut butter filling, in a medium mixing bowl combine powdered sugar and the remaining 1/2 cup peanut butter until smooth. Shape mixture into 32 (3/4-inch) balls.

4. On a work surface, slightly flatten a chocolate dough ball and top with a peanut butter ball. Shape the chocolate dough over the peanut butter filling, completely covering the filling. Roll dough into a ball. Repeat with the remaining chocolate dough and peanut butter filling balls.

5. Place balls 2 inches apart on an ungreased cookie sheet. Lightly flatten with the bottom of a glass dipped in the 2 tablespoons granulated sugar. [NOTE: I rolled mine in powdered sugar before flattening slightly]

6. Bake cookies in preheated oven for 8 minutes or until they're just set and surface is slightly cracked. Let cookies stand for 1 minute. Transfer cookies to wire racks; cool. Makes 32 cookies.

To Store: Place in layers separated by waxed paper in an airtight container; cover. Store at room temperature for up to 3 days or freeze for up to 3 months.

Wednesday, July 22, 2009

Ile de France Cheese of the Month: St. Albray


Cheese of the month for August at Ile de France is St. Albray - another soft-ripened cheese that has, so far, been my favorite of the edible rind variety. This cheese is equally delicious served cold, at room temperature or even melted.

Each section of cheese is an 8 ounce portion of a larger wheel that looks like a flower when intact. The presentation of a full wheel would be stunning at a large gathering.

I had in mind a stacked salad of the panzanella variety, but once I knew this cheese was on its way, I decided to do a French version of that, and this is the delicious result. The St. Albray was the perfect complement to the intense flavor of the tapenade and red peppers.


French Bread Stacked Salad with St. Albray Cheese
Serves 4
Printable Recipe

12 1/2-inch thick slices of day-old French bread
8 slices plum tomato
4 ounces bottled roasted red peppers
8 slices St. Albray cheese - rind on
1 cup prepared tapenade (my recipe is HERE)
4 basil leaves for garnish
olive oil for garnish

Lay out 8 bread slices, setting 4 aside
Layer each slice of bread with tapenade, red pepper, cheese and tomato.
Stack 2 slices of prepared bread together and top with a plain slice of bread.
Top each stack with a basil leaf and drizzle with olive oil.

Monday, July 20, 2009

Blueberry Corn Muffins


Blueberry Corn Muffins

This recipe is adapted from the Raspberry Corn Muffins in the Earthbound Farm Organic Cookbook, Food to Live By. Please purchase the book to see that and other wonderful recipes by Myra Goodman.

This makes a moist muffin that is not quite as moist the second day. Either way, they are delicious!

Blueberry Corn Muffins
Makes 18 regular size muffins or 9 larger
Printable Recipe

1 1/2 cups all-purpose flour
1 cup cornmeal - I like regular grind for texture
1 Tablespoon baking powder
1/2 teaspoon salt
1/2 teaspoon freshly grated nutmeg
2 large eggs
3/4 cup packed brown sugar
1/2 cup olive oil
1 cup sour milk (1 Tablespoon lemon juice and enough milk to make 1 cup)
1 pint fresh blueberries - washed and dried

Preheat oven to 400 degrees F and place cupcake liners in 18 muffin cups.
Combine flour, cornmeal, baking powder, salt and brown sugar. Blend well. Make a well in the center and add eggs, oil and milk. Stir until there are no more lumps. Add blueberries and fold in. Fill muffin cups 2/3 full and sprinkle with coarse sugar. Bake for 20-25 minutes or until tops of muffins spring back when touched.


Ian (5), Lara (2) and Katie (8)

What is it about Popsicles (which is a brand name, by the way) that is so perfectly Summer? I've written about them before, at Family.com (click for the full article), and my children's love for them is as strong as ever.


Somehow today the only flavor left in the box was orange and the 3 youngest sitting on the stoop, barefoot and enjoying them was too rich to pass up. I haven't had a freeze-pop for a long time, but today when Lara wasn't able to finish hers, rather than tell her the usual, "Drop it in the sink", I took it from her chubby, sticky little hand and finished it. I'm not sure an orange popsicle has ever tasted so good.


Saturday, July 18, 2009

Wednesday, July 15, 2009

Harry Potter Inspired Food

Making Pumpkin Pasties

Two years ago my editor and I at Disney's Family.com devised a series of posts about Harry Potter-inspired food. I researched as much as I could (which wasn't difficult seeing as I am a huge HP fan and the original idea to make the food was mine) and came up with several recipes that tied in with the final HP book and 5th HP movie, which were released within just weeks of one another. The kids still ask for Pumpkin Pasties.

The result is in this post and linked at the bottom of that post to the others:

Dessert at Grimmauld Place and other Harry Potter-Inspired Recipes

Have fun!

Tuesday, July 14, 2009

Turmeric Shrimp in Banana Leaves with Banana Salsa


Inspired by this month's ingredients for the Royal Foodie Joust - turmeric, banana and honey - I came up with this. We just had this for dinner and it was summer-all-over. Ian ate more than his fair share and my brother-in-law, Tim stopped by and declared the salsa a hit. He balked at the name, but bent over the bowl and inhaled and quickly turned to me and said he would try it. He even told me to mention that he loved it.

I think it was very refreshing, and I love the earthiness of the turmeric with the shrimp. The flavor that the banana leaf imparts to the shrimp was just another delicious layer.

So, here's the recipe - roughly:

Turmeric Shrimp in Banana Leaves with Banana Salsa
Serves 4
Printable Recipe

1 pound large shrimp in shell
1 teaspoon ground turmeric
1/2 teaspoon ground cumin
1/2 teaspoon ground coriander
1 clove garlic - minced
4 sections of banana leaf - 8x8 each
kosher salt

For Salsa:

1/2 cup red onion - diced
1/2 each red and yellow pepper - diced
1 medium cucumber - peeled, seeded and diced
1 large just ripe banana (a little green is best) - diced
1/4 cup chopped fresh cilantro
1 lime - juiced
1 Tablespoon honey
1 teaspoon kosher salt

Rinse banana leaves and set aside. Heat oven to 400 degrees F.
Gently toast spices in a small pan - this works best before spices are ground, but still helps to boost flavor when they have been ground. Combine spices and garlic and make a paste. Toss with shrimp (I like the shell on, but you can remove it) until well coated. Divide shrimp between banana leaves and fold up into small packets. Set, seam side down, in a shallow pan and put into the oven. Bake for 10 - 15 minutes. Remove from oven and open each on a plate. Serve with banana salsa.

For salsa - combine onion, cucumber, peppers, cilantro, lime juice, honey and salt. Stir well. Cut and add banana just before service. Toss gently once banana is added.

America's Most Wanted Recipes - Cookbook Review


With so many people buckling down in a waning economy the meals they looked forward to at their favorite restaurants are nothing but a distant memory of late. Restaurants like Applebee's, Chili's, Outback Steakhouse and Olive Garden were once diners' favorite hot-spots, but missing out on those meals may be a thing of the past as well.

America's Most Wanted Recipes, Delicious Recipes From Your Family's Favorite Restaurants, by Ron Douglas hit book stores this month to a very welcoming audience. With more than 200 copycat recipes from 57 of the most-loved restaurants across the U.S. like KFC, Red Lobster, P.F. Chang's, Cracker Barrel and Bennigan's, the wait for your favorite dishes is over.


Cajun Jambalaya Pasta

We prepared, and devoured, Chili's Chocolate Chip Paradise Pie and Chicken Enchilada Soup, The Cheesecake Factory's Cajun Jambalaya Pasta and Applebee's Crispy Orange Skillet. Each one was a delicious and spot-on rendition of the classic and easy to prepare - which made eating at home almost as good as going out to dine at a local hot-spot, and far cheaper.

Just think, no waiting in line or hanging on to a beeper as you search in vain for a spot at the bar while your table is prepared; no wondering exactly what's in your meal - and complete control over aspects like sodium and fat; a much smaller bill - and no tipping!

Get your own copy of America's Most Wanted Recipes at Simon & Schuster and Amazon.com.


Thursday, July 09, 2009

In the Garden Today

It's no secret that I love gardening and think the world should take it up as its next great move toward sustainabilty. I recognize that not everyone has the means to do it, though, and I'm OK with that. This is why I share my garden so often on my blog.

I check my garden daily, usually twice, to water, weed and just look at it. I'm never less than amazed at how things grow and get a real thrill from growing things from seed. Plants are good, especially in colder climates where it may be harder to start from seed, but I like watching the first seed leaves pop out and enjoy witnessing the whole plant mature from the first pod to the last fruit on our plates. That goes for flowers, too - food for the bees. It makes our harvest a little later than others, but I think it's worth it.

Here's what I photographed this morning:


Cantaloupe flower.


Zucchini flower.


Monday, July 06, 2009

Kiwi-Lime Sorbet


Kiwi Lime Sorbet
Kiwi Lime Sorbet

There is quite possibly nothing easier or more refreshing than sorbet. Traditionally served to cleanse the palate between courses, I think this one is perfect on its own served as a light dessert.

I learned to make sorbet in school using a slightly complicated method of floating an egg (in shell) in the liquid mixture, adding sugar, and stirring until it dissolved, until a dime-sized portion of the egg was the only part exposed above the mix.

This method is far easier and almost foolproof.

Kiwi-Lime Sorbet
Serves 4 for dessert or 8 as a traditional sorbet
Printable Recipe

1 cup granulated sugar
1/2 cup water
6 medium-size kiwi - peeled
1 cup freshly-squeezed lime juice

Make a simple syrup from the water and sugar: Combine sugar and water in a heavy saucepan and cook, stirring continually, over medium-high heat until sugar is dissolved. Simmer for another minute and remove from heat.
Puree kiwi in a blender until very smooth - add lime juice - this should make 2 cups of kiwi and juice. Add simple syrup and stir well.
Pour the mixture into a shallow pie plate or 9x9 pan. Freeze for 40 minutes.
After 40 minutes, scoop the frozen outer ring of the mixture into the center of the plate. Freeze again. Check every 30 to 40 minutes, stirring and scraping each time, until frozen. Freeze for an additional hour before stirring one last time at service time.

Friday, July 03, 2009

Ile de France Cheese of the Month: Shrimp and Brie Quesadillas


The cheese of the month for July at Ile de France, is Brie. Traditionally, I am not a lover of brie. I've had some that just didn't taste right to me and left me feeling rather funny.

I was a bit apprehensive, then, to try the brie from Ile de France. I was very pleasantly surprised to find it quite agreeable and altogether delicious. I paired this delicate cheese with shrimp in a delectable quesadilla that was consumed with abandon by all who sampled it.

Shrimp and Brie Quesadillas
Serves 4
Printable Recipe

8 flour tortillas - 6-inch size
1/2 pound shrimp - shelled and cooked
1/2 pound Ile de France Brie - rind intact - sliced
4 Tablespoons sliced green onion
salt to taste

Heat a non-stick skillet over medium-high heat and add a tortilla, turning often until heated through. Add shrimp and top with 1/8 pound cheese slices and 1 Tablespoon green onion and salt as desired. Top with another tortilla and cook, turning once, until cheese is melted and quesadilla is lightly browned. Repeat with remaining tortillas and cut each into quarters to serve.