Monday, July 31, 2017
Antipasto Pasta Salad
My family just loves pasta salad, especially in the summer. This one is excellent for potluck picnics or dinner at home. This has all the best elements of a great antipasto plate tossed together in a delicious salad. Take out the meat for a veggie friendly version, and make sure you dress it within an hour of consuming or the pasta will soak up all the liquid and you'll be left with a dry salad.
Antipasto Pasta Salad
Hands-On Time: 10 minutes
Ready In: 20 minutes
Yield: 6-8 servings
Ingredients:
1 pound rotini pasta cooked according to package directions until al dente and cooled
8 ounces fresh mozzarella cut into 1/2-inch cubes or 8 ounces baby bocconcini
8 ounces hard salami cut into 1/2-inch cubes
1 cup grape tomatoes cut into quarters
1/2 cup jarred roasted red peppers diced
1 (6 ounce) jar marinated artichoke heart quarters - diced and marinade reserved
1 cup black olives, halved
2 Tablespoons each fresh basil and Italian flat leaf parsley, chopped
1/2 cup sliced pepperoncini - optional (not shown in photo)
Directions:
1. Combine all ingredients in a large bowl and toss well to combine.
2. Refrigerate for up to one hour after dressing has been added.
*NOTE- If taking to a picnic etc. take the dressing along with you and add just before serving, but not more than one hour prior.
Friday, July 28, 2017
Strawberries & Cream Icebox Cake
Just four ingredients make this cake a real treat, in more ways than one. Fresh strawberries combine with rich sweetened condensed milk and cake for a delicious dessert. The necessary make-ahead prep makes it perfect to take along for picnics and summer parties.
Strawberries & Cream Icebox Cake
Hands-On Time: 15 minutes
Ready In: 9 Hours
Serves: 12
Ingredients:
1 boxed white cake mix
12 ounces fresh strawberries
1 can (14 ounces) sweetened condensed milk
1 tub (16 ounces) frozen whipped topping - thawed
Directions:
1. Bake cake in a 9x13 pan according to directions. Cool.
2. Poke holes in cake with a wooden spoon handle or clean chopstick.
3. Pour contents of condensed milk can over cake.
4. Wash strawberries and hull. Slice over top of cake.
5. Cover cake and refrigerate for 8 hours or overnight.
6. Remove cake from refrigerator and top with whipped topping.
Wednesday, July 26, 2017
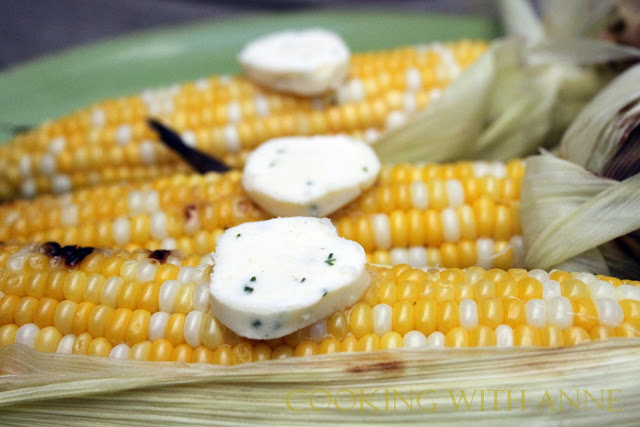
Veggie Wednesday: Grilled Corn with Garlic and Chive Butter
The farmers' market is my favorite place to be in the summer - stalls are full to bursting with ripe and delicious vegetables at their peak flavor. We are in the throes of fresh corn season and corn on the cob signals summer like no other vegetable. Grilled over a fire and topped with a flavored butter, it's pure summer perfection and one of our family favorites!
Grilled Corn with Garlic and Chive Butter
Hands-On Time: 20 minutes
Ready In: 40 minutes
Serves: 6
Ingredients:
6 ears of corn with husks and small length of stalk intact
1/2 pound (2 sticks) butter - at room temperature
2 Tablespoons snipped fresh chives
2 cloves garlic - minced
1/2 teaspoon Kosher salt
Directions:
1. In a small bowl combine butter, chives, garlic and salt and mash until completely
blended.
2. Lay out a sheet of parchment paper and spoon butter into the center to form a log
approximately 1-inch in diameter.
3. Roll parchment paper around the butter making sure the log is uniformly shaped. Pinch
ends tight and set in the refrigerator to firm up until ready to serve.
4. Pull husks down from the corn, leaving intact, and remove corn silk and any debris
that may remain. Pull husks back up over the corn to cover completely. Soak corn in cold
water for 5 minutes. Remove and drain well.
5. Heat grill over high heat. Cook corn directly on grill for 15 to 20 minutes, turning
every 5 minutes to keep from burning Keep grill covered between turning. Peel back husks
periodically to check the corn. Kernels that are still milky looking are not done. Pierce
a kernel or two to check for doneness.
6. Remove corn from grill, strip husks away and snap off stalk. Cut butter into even
slices and serve a slice with each corn cob.
Monday, July 24, 2017
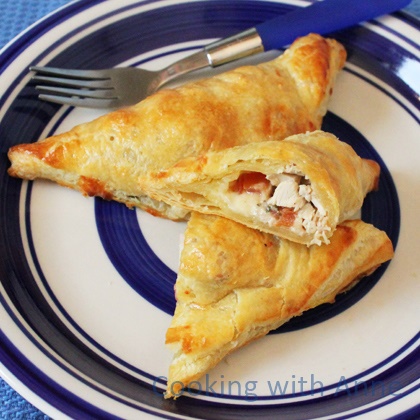
Cheesy Chicken and Tomato Bruschetta Turnovers
I can't begin to tell you how GOOD these things are. When I first developed them for Disney, we had them devoured in no time. I made them over and over again after that as well. Store-bought ingredients make this extra flavorful turnover a snap to make. Six ingredient easy, it's ready in just over half an hour and special enough to serve to company. Instructions for appetizer-sized turnovers are included.
If you have the time, you already know these will be even better with your own roasted chicken and homemade bruschetta.
Cheesy Chicken and Tomato Bruschetta Turnovers
Hands-On Time: 10 minutes
Ready In: 35 minutes
Serves: 8
Ingredients:
1 package (2 sheets) puff pastry - thawed
1 small (2 pounds) rotisserie chicken
1/2 cup store-bought tomato bruschetta (I adore Wegman's fresh bruschetta)
1/2 cup shredded Parmesan cheese
1/2 cup shredded mozzarella cheese
1 egg
1 Tablespoon water
Directions:
1. Preheat oven to 400 degrees F and line two baking sheets with parchment paper.
2. Remove meat from chicken and chop - you need 2 cups. Save leftover chicken and carcass for other recipes.
3. Unfold puff pastry and cut each sheet into 4 even squares.
4. Beat egg and water until frothy and brush the outer edge of each square with mixture.
5. Mound in the center of each pastry square: 1/4 cup chicken, 1 Tablespoon each -
bruschetta, Parmesan and mozzarella.
6. Fold over diagonally, making a triangle, and press the edges well to seal. Brush the
top of each pastry with egg wash and bake for 20 to 25 minutes or until golden brown and
bubbling at the edges.
For appetizer-sized turnovers:
Cut each pastry sheet into 8 squares and top each with a tablespoon of chicken and a
teaspoon each of bruschetta, Parmesan and mozzarella. Brush with egg wash and bake for 15
minutes or until golden brown and bubbling at the edges. Makes 16 appetizers.
8 plum tomatoes, chopped
1/4 cup finely diced onion
3/4 cup Basil
1 clove Garlic, finely minced
2 Tbsp Olive Oil
Friday, July 21, 2017
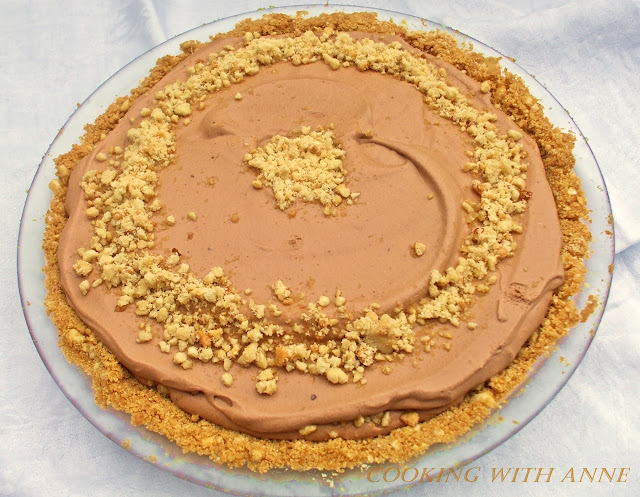
Chocolate Ice Cream and Nut Pie
Chocolate Ice Cream and Nut Pie |
Chocolate Ice Cream and Nut Pie
Hands-On Time: 15 minutes
Ready In: 5 hours and 15 minutes
Serves: 8
Ingredients:
1 1/2 cups finely chopped peanuts - divided
1 cup graham cracker crumbs
1/3 cup melted butter
1/2 cup sugar
1/2 cup water
1 cup semi-sweet chocolate chips
2 large eggs
2 cups heavy cream - whipped
Directions:
1. Combine 1/2 cup chopped peanuts, graham cracker crumbs and melted butter together.
Blend well and press evenly into a 9 inch pie plate. Set aside.
2. In a heavy saucepan combine water and sugar. Heat to boiling, stirring until sugar
melts. Boil for 3 minutes. Remove from heat.
3. Add chocolate chips to sugar water and stir until chips are melted and mixture is
smooth.
4. Beat eggs together and add 1/4 cup of hot chocolate mixture to eggs. Stir quickly so
eggs do not cook and add back to original chocolate mixture. Blend well.
5. Fold whipped cream into chocolate and spoon half into the prepared pie shell. Top with
1/2 cup chopped peanuts.
6. Add remaining chocolate mixture to top of pie. Garnish with remaining peanuts.
7. Chill for 5 hours or until fully set before cutting.
Wednesday, July 19, 2017
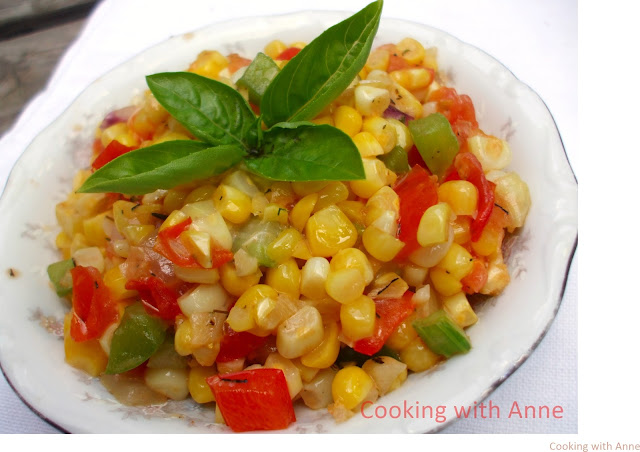
Veggie Wednesday: Maque Choux
This traditional Native American dish is very popular in Cajun country (and pronounced 'mock SHOE'). It's so simple that it's easy enough for every day meals. Fresh corn is the usual for the 'milk' leached from the kernels, but frozen will do in a pinch. The colors are beautiful and the sweetness of the corn plays very well with the flavors of the peppers and onions. This is a great side for summertime meals.
Maque Choux
Hands-On Time: 10 minutes
Ready In: 25 minutes
Serves: 4
Ingredients:
4 Tablespoons unsalted butter
3 ears fresh corn
1/4 cup diced celery
1/2 cup diced onion
1/2 cup diced peppers - red, yellow and green
3 cloves garlic - minced
1 cup seeded and diced tomato
2 Tablespoons light cream
1 teaspoon dried thyme leaves
1 teaspoon Kosher salt
Directions:
1. Remove corn from cobs and set aside
2. Heat butter in a medium skillet. Add onion, peppers, corn and celery. Cook for 10
minutes, or until onions and celery begin to soften.
3. Add tomatoes, thyme, cream and salt. Stir and cook for 5 minutes longer. Serve hot.
Monday, July 17, 2017
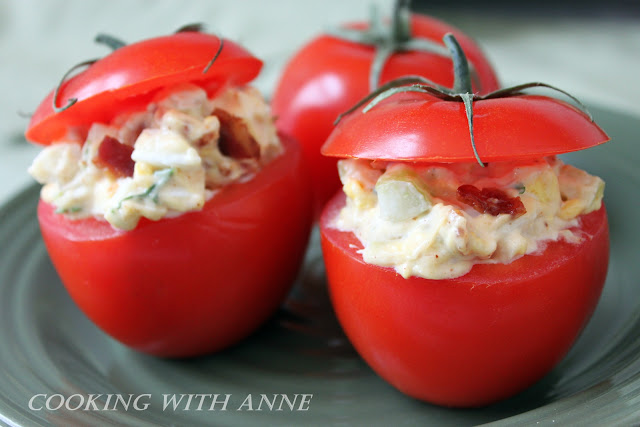
Bacon and Egg Stuffed Tomatoes
Bacon and Egg Stuffed Tomatoes |
Everyone who really knows me knows tomatoes are my absolute favorite food. I mean, when I'm asked the deserted island question about which foods I would want forever if I were stranded, it's tomatoes hands-down.
This is an excellent recipe for those hot and humid no-cook days. No cook? What about the eggs and bacon? Well, if you find yourself making deviled eggs for a picnic or other summertime gathering, set aside a few for other recipes, like this one. Or, with the wonder of modern groceries, you can simply purchase eggs already hard-boiled and be done with it. To that end, you can also buy bacon that is already fried - you just need a few seconds in the microwave to crisp it up and you're ready to go. See how simple that is?
Add other herbs like dill, if you like, and you can play with this in so many ways! There are several different types and flavors of mayo out there these days, and you can add other chopped veggies, as well.
Bacon and Egg Stuffed Tomatoes
Makes 6 tomatoes
Ingredients:
6 medium tomatoes
salt and pepper
Filling:
6 hard boiled eggs-chopped
3/4 c finely diced celery
1/3 c mayonnaise (reduced or fat free is fine)
6 slices turkey bacon (or regular bacon)-cooked and crumbled
2 T chopped fresh parsley
1/2 t Kosher salt
1/4 t large grind pepper
paprika for tops (smoked paprika adds a lovely dimension!)
Directions:
1. Wash tomatoes thoroughly and dry well.
2. Cut tops from tomatoes; scoop out pulp and seeds, leaving shells intact. Chop tomato pulp only, discarding seeds.
3. Drain tomato shells, and sprinkle inside with salt and pepper.
4. Combine tomato pulp, eggs, celery, mayonnaise, bacon, parsley, 1/4 t salt, and 1/4 t pepper; stir well.
5. Fill tomato shells with bacon and egg mixture. Sprinkle with paprika.
Friday, July 14, 2017
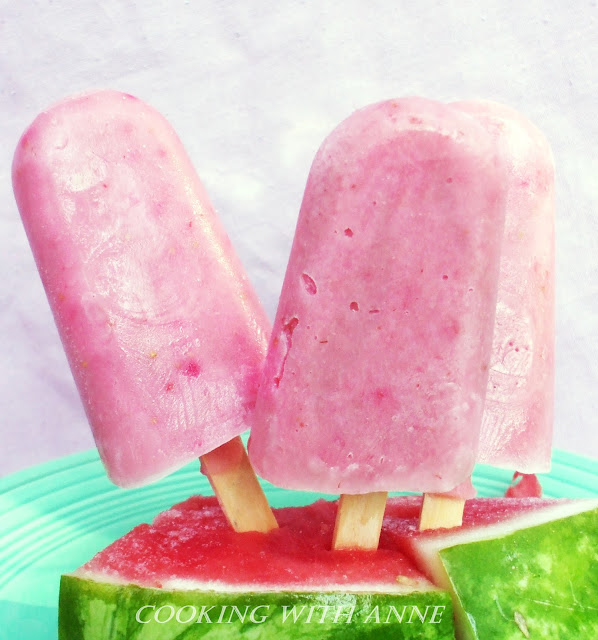
Strawberry Milkshake Popsicles
Strawberry Milkshake Popsicles |
As of the last few weeks it has become glaringly apparent that it's summer. The kids are showing it, too. The higher the mercury goes, the more often they ask for cool or frozen treats. Popsicles are the perfect answer to their pleas, but store-bought varieties can be full of sugar, artificial colors and flat-out expensive sometimes.
The solution to that problem is to create your own. Homemade Popsicles are one of the easiest things to make. If you have your own Popsicle molds it's even easier, and if not, all you need are paper cups, Popsicle sticks and plastic wrap. Any liquid that freezes well is fair game. You can test your ideas by filling a section or two of an ice cube tray and freezing until firm.
We've used everything and had lots of fun experimenting. We've had popsicles from fruit juice, pudding, flavored gelatin, pureed fruit, and yogurt. These Popsicles were made to taste like one of our very favorite summertime treats - strawberry milkshakes.
Strawberry Milkshake Popsicles
Hands-On Time: 5 minutes
Ready In: 6 hours
Servings: 6-8 Popsicle
Ingredients:
16 ounces (2 cups) vanilla or strawberry flavored yogurt (blended type, any fat percentage works well)
1/2 teaspoon vanilla (leave out if you are using vanilla yogurt)
5-6 large strawberries - hulled and cut in half
Directions:
1. Puree all ingredients together for 30 - 34 seconds in a blender.
2. Strain well to remove seeds. You can leave out this step, but the seeds will settle at the bottom of the mold and will be visible at the top of the Popsicle when un-molded.
3. Pour into Popsicle molds and attach lids with sticks or, if you are using cups cover each cup with plastic wrap and insert the stick through the plastic. Don't let the stick touch the bottom of the cup. Settle sticks evenly in the center of each mold before freezing.
4. Freeze for 6 hours or overnight before un-molding. Check after half an hour and re-settle Popsicle sticks if necessary.
5. Run the underside of the molds under warm water momentarily before un-molding.
Wednesday, July 12, 2017
Veggie Wednesday: Un-stuffed Vegetarian Peppers
Un-stuffed Vegetarian Peppers |
In this house we all love stuffed peppers, but sometimes I need a quicker and healthier alternative and this casserole fits the bill. This is full of colorful peppers, tomato and your choice of brown or white rice. Top with cheese and all you need is a salad to complete this veggie friendly menu.
Un-Stuffed Vegetarian Peppers
Serves: 4-6
Prep Time: 10 minutes
Cook Time: 15 minutes
Ingredients:
3 cups diced peppers, red, yellow and green - 1 cup each
1/2 cup diced onion
2 Tablespoons olilve oil
3 cloves garlic, minced
1 teaspoon salt
15 ounces tomato sauce
1/2 cup shredded cheddar cheese
2 cups cooked rice, brown or white
Yields 4-6 servings
Directions:
1. Preheat oven to 350 degrees F.
2. In a large skillet, heat olive oil over medium-high heat. Add peppers and onions and cook until veggies start to soften, 5 minutes or so.
3. Add garlic and stir well.
4. Add rice, tomato sauce and salt and stir to combine. Remove from heat.
5. Pour rice into a greased casserole dish, about 10 x 6 in size and top with cheese.
6. Bake fore 15 minutes or until cheese is melted.
Monday, July 10, 2017
Lime Angel Food Cake with Raspberry Sauce
Lime Angel Food Cake with Raspberry Sauce |
Fluffy Angel Food Cake takes on a new twist with the addition of lime juice and zest. Paired with a simple raspberry sauce, this cake is at once delicate and decadent and altogether perfect for a lighter summertime dessert. The calorie count makes this even more desirable with most slices (one twelfth of a cake) coming it at around 170 calories.
Lime Angel Food Cake with Raspberry Sauce
Hands-On Time: 15 minutes
Ready In: 60 minutes (including cooling time)
Serves: 12
Ingredients:
10 -12 large egg whites (about 1 1/2 cups)
2 teaspoons lime juice
1 cup granulated sugar
1 Tablespoon lime zest
1 cup all-purpose flour
1 1/2 cups powdered sugar
Directions:
1. Preheat oven to 350 degrees F.
2. Sift together flour and powdered sugar. Set aside.
3. Combine egg whites and lime juice in a large bowl. Beat until soft peaks form.
4. Stir together granulated sugar and lime zest. Add by the tablespoon to egg whites and
continue to beat, adding until all sugar is gone, until stiff peaks form.
5. Fold flour and powdered sugar into stiff-beaten egg whites in four small additions.
6. Turn out into an ungreased 10-inch tube pan.
7. Bake for 40 - 45 minutes or until top springs back when touched lightly.
8. Turn pan over and cool with cake still inside pan. Cool completely.
9. Remove from pan gently and serve with Raspberry Sauce.
Raspberry Sauce
Hands-On Time: 1 minute
Ready In: 1 minute
Serves: Makes 1 1/2 cups
Ingredients:
1 1/2 cups seedless red raspberry preserves
2 Tablespoons lime juice
Directions:
1. Microwave preserves for 30 seconds until warm. This may take more or less time
depending on your
microwave.
2. Stir well until smooth.
3. Add lime juice and stir until well combined.
Subscribe to:
Posts (Atom)