Wednesday, August 30, 2017

Veggie Wednesday: Fiddlehead Ferns


Raw Fiddlehead Ferns

Fiddlehead ferns, so named for the shape they grow into, are a delicious addition to your spring vegetable repertoire. Similar in flavor to asparagus, with a slightly bitter finish akin to broccoli rabe, they have a wonderful texture and bite to them and have become something I look forward to each year.

Before you dive head-first into a patch of sprouting ferns, there are a few bits of information that will be beneficial to you.

Some fiddlehead ferns are classified as 'toxic' and supposedly the ostrich fern is the least so. The general consensus is that they can cause gastrointestinal upset if too many are eaten. I haven't had problems with them, though, so I feel that the ostrich ferns are just fine. Go easy if you're trying them for the first time just to be on the safe side.

One thing you don't want to do is forage for them yourself unless you are very skilled at foraging. Look at Whole Foods or local farmers' markets during the month of May and you will likely find decent specimens. They can sometimes come with a sort of covering on them that resembles very fine garlic skin, but brownish in color. Simply give them a good rinse in clear water and you should be good to go.

Cooked Fiddlehead Ferns

Although they can be eaten raw in salads, I've not done so, preferring the change of texture once cooked. If you boil them, do so for 5 to 8 minutes only, any longer renders them mushy and flavorless. I like them sauteed in butter and garlic with a bit of sea salt and a squeeze of lemon juice, but I've also had them in a quiche with ham and cheese. Gently coddled by the cooking egg and cream, they are kept from overcooking and still have a nice crunch not unlike that of a lightly cooked fresh green bean.

Quiche with Fiddlehead Ferns

Fiddlehead Quiche

1 c  milk
1/2 c  light cream
3   large eggs
1/2 t salt
1/4 t pepper
1 clove garlic-minced
2 T green onions-sliced
1 c  grated cheese-Swiss or Gruyere
18   fiddlehead crosiers, cooked
2 slices ham-chopped
grated nutmeg, to taste
1    8" pastry shell, unbaked

Beat milk, cream and eggs well. Add salt, pepper, garlic and onions.
Sprinkle half of the cheese in the bottom of the pastry shell.
Arrange fiddleheads and ham over the cheese.
Pour in the egg mixture, add the remaining cheese, and grate fresh nutmeg over the top.
Bake at 375 degrees F for 30 minutes, or until a knife inserted in the center comes out clean.


Whatever you do with them, don't limit yourself - they are really something everyone should try once and I promise you it's worth it.


Monday, August 28, 2017

Orange Pork Cutlets and Baby Bok Choy

Orange Pork Cutlets and Baby Bok Choy

Baby bok choy is the smaller and more tender version of regular bok choy. It cooks quickly and does not need to be separated or chopped to cook.

Orange, soy and garlic combine in a delicious sauce that coats pork chops and baby bok choy perfectly. If baby bok choy is not available, use the more mature version and cut into large chunks. Serve alone or with rice or rice noodles.

Orange Pork Cutlets and Baby Bok Choy

Hands-On Time: 15 minutes
Ready In: 20 minutes
Yield: Serves 4

Ingedients:

1 1/2 pounds thin cut boneless pork chops - about 8
1/2 cup all-purpose flour
1/4 cup cornstarch
1/2 teaspoon Kosher salt
2 Tablespoons vegetable oil
juice and zest from 1 large orange - about 1/3 cup juice
1 large clove garlic - minced
2 tablespoon soy sauce
4 to 8 heads baby bok choy (we eat 2 each because we love it)

Directions:

1. Combine flour, cornstarch and salt in a shallow bowl.
2. Heat oil in a skillet over medium-high heat and add chops. Brown chops for 6 minutes per side and set aside.
3. In the same pan add garlic, soy, juice and zest. Simmer for 2 minutes and add bok choy to pan.
4. Cook for another 4 minutes and push to the side. Add chops back into pan to coat with sauce.
5. *Optional* Serve with rice or rice noodles.

**Note: Any citrus will yield more juice if you first roll it back and forth, using medium pressure, on a firm surface.

Friday, August 25, 2017

After School Snacks

By the time my kids walk through the door after school, they are nearly zombies owing to the fact that they're famished. I think they would eat just about anything at that point, and they tend to make poor choices because they are so hungry. They also eat too much and then aren't so hungry when it comes to dinner time. To keep them from consuming an entire package of licorice (yes, one child did this), I try to have healthier alternatives on hand. Each of these is a favorite and, yes, there is a pizza theme running through - what kid doesn't love pizza?


Graham crackers are a terrific source of 'hidden' whole grains. Kids don't have any idea they're better for them and topped with fruit spread and low fat cream cheese they have just the right combination of whole grain and protein to make the perfect after-school snack. They also taste just like fruit cheesecake!

Use whichever fruit spread you like and complement it with fresh fruit of the same type, or switch it up by adding a different fresh fruit to the top.

Cheesecake Snacks
Hands-On Time: 5 minutes
Ready In: 5 minutes
Serves: 4

Ingredients:

6 whole graham crackers - split in half (Try Annie's Homegrown, or Back to Nature brands)
4 ounces low fat cream cheese
1/4 cup strawberry or other all-fruit spread (this is the stuff without sugar added)
sliced fresh fruit - optional

Directions:

1. Combine cream cheese and fruit spread and stir until smooth.
2. Spread on graham cracker halves and top with fresh sliced fruit if desired.
3. Refrigerate for up to 1 hour, lightly covered.


An old snack standby in our house is packets of cheese and crackers. The kids love them but they can get expensive and there are usually too many preservatives for my liking. Making my own is not only economical, but healthier as I can control the fat content and the amount of preservative the kids are getting. Whip up the cheese ahead of  time and spread it for the kids or let them do it themselves with a safe knife.

Cheese and Cracker Snacks
Hands-On Time: 20 minutes
Ready In: 20 minutes
Serves: 8

Ingredients:

4 ounces low fat or fat free cream cheese
1 cup low fat cheddar cheese - shredded (Shred your own! The pre-shredded stuff has fillers.)
1 Tablespoon milk
1/4 teaspoon salt
1/4 teaspoon paprika
96 snack crackers 1 1/2 to 2 inches in size

Directions:

1. Combine cream cheese and cheddar in a blender with milk and pulse until very smooth.
2. Stir in salt and paprika to taste.
3. Spread evenly on 48 of the crackers. Top with remaining crackers and push down
lightly.
4. Serve immediately or store cheese covered in the refrigerator for up to 3 days.


Little nuggets of energy never tasted so good! Change the add-ins to anything you'd like in the same amounts listed and customize to your liking. You can also roll these in coconut for extra texture.

PB Energy Balls
Hands-On Time: 10 minutes
Ready In: 1 hour 10 minutes
Yield: 24

Ingredients:

1/2 cup peanut butter
1/3 cup honey
1/2 teaspoon vanilla extract
1/4 teaspoon ground cinnamon
1 cup old-fashioned rolled oats
1 cup crisp rice cereal
1/4 cup sunflower seeds or chopped nuts
1/4 cup chopped dried cranberries or mini chocolate chips

Directions:

1. Blend together peanut butter, honey, vanilla extract and ground cinnamon until smooth.
2. Pour in oats, rice cereal, seeds and cranberries and mix until coated well.
3. Refrigerate for 1 hour and roll into one-inch balls.
4. Put into an airtight container and refrigerate for up to 2 weeks.


Kids love pizza, and these crackers are a great mini-version for after school snacks. Add whatever toppings you like, broil for a few minutes and you're good to go!


Pizza Crackers
Hands-On Time: 5 minutes
Ready In: 9 minutes
Yield: 24 crackers

Ingredients:

24 crackers, about 1 1/2 inches in size
1 cup marinara sauce
1 cup shredded mozzarella cheese
1 cup toppings such as, olives, broccoli, peppers, ham, pepperoni, sausage etc.

Directions:

1. Preheat broiler and lay crackers on a baking sheet.
2. Top each cracker with sauce, cheese and desired toppings.
3. Broil 3-4 minutes or until cheese melts.


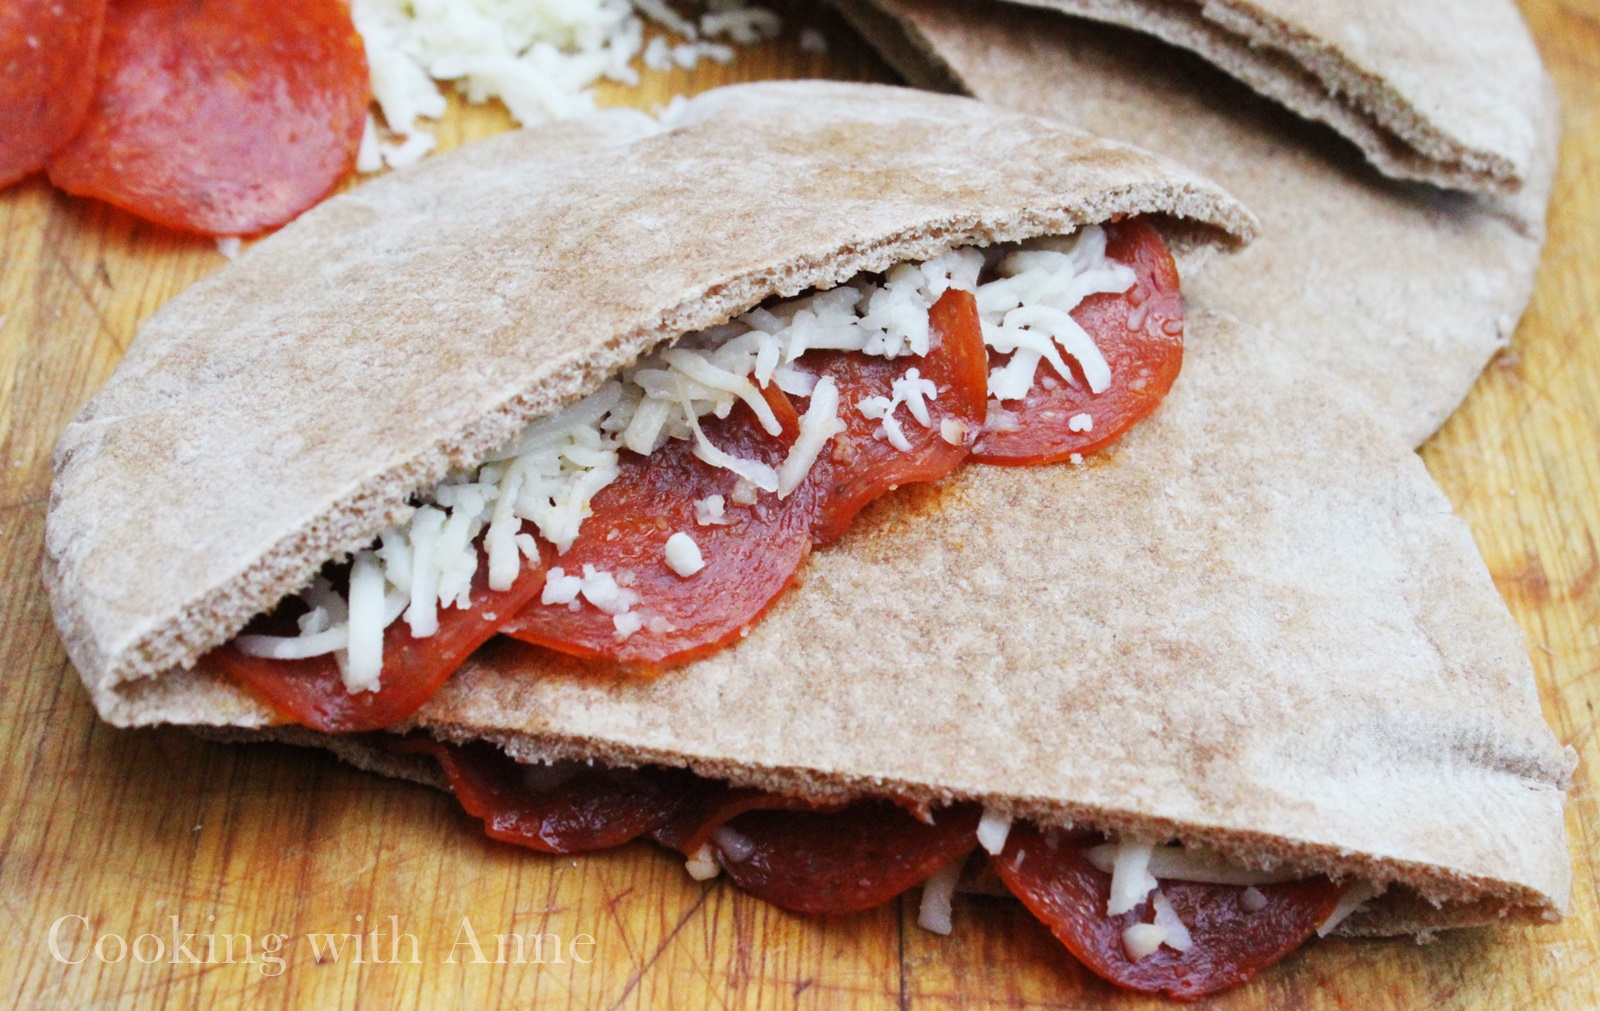
Pita Pizza Pockets
Hands-On Time: 5 minutes
Ready In: 6 minutes
Serves: 4-8

Ingredients:

4 whole wheat pitas
2 cups shredded mozzarella cheese
1 cup pizza sauce
2 ounces sliced pepperoni

Directions:

1. Cut pitas in half crosswise, making 2 pockets each.
2. Fill each pita half with 2 Tablespoons pizza sauce, 1/4 cup mozzarella and several
slices pepperoni.
3. Microwave for 30 to 60 seconds for 2 halves, checking after the first 30 seconds.
4. Cool briefly if necessary and serve.

Wednesday, August 23, 2017

Veggie Wednesday: Quinoa Stuffed Chayote Squash

Quinoa Stuffed Chayote Squash

Chayote squash (also known as mirlitons) are similar to other summer squashes, with a tender inside and edible skin. They can be found in most  any supermarket these days as can quinoa, a grain from South America and the highest protein grain one can find. The bright flavors of Italian  Parsley and orange play well with the mellowness of the squash.
 Serve 2 squash for a vegetarian main dish or one as a side to grilled chicken or fish.

Quinoa Stuffed Chayote Squash
Serves 3 as a main course or 6 as a side
Prep Time 15 minutes
Cook Time 30 minutes
3 chayote squash
1 Tablespoon Country Crock Spread
2 Tablespoons each red pepper, yellow pepper and orange pepper - finely diced
1 small shallot - minced (about 1 Tablespoon)
1/2 cup quinoa
1 cup chicken or vegetable stock
2 Tablespoons freshly squeezed orange juice
Zest of one orange - about 2 teaspoons
2 Tablespoons fresh Italian, or flat leaf, parsley - chopped fine

1. Cut squash in half and cook in boiling salted water until tender - about 20 minutes.2. While squash are cooking heat Country Crock in a small pan and saute shallots and peppers until softened but not browned.
3. Add quinoa and stir well. Pour in stock and orange juice. Stir and cover tightly. Turn heat to a simmer and cook for 15 minutes or until all  liquid is absorbed.
4. While quinoa is cooking and when chayote are tender, remove from water and drain well on paper towels. Remove seeds and most of flesh with a  spoon, leaving a 1/4 inch edge all around the inside of the squash. Keep warm.
5. Fluff quinoa with a fork and add parsley and orange zest. Salt and pepper to
6. Stuff squash with quinoa mixture and serve immediately.

Monday, August 21, 2017

Cucumber Melon Agua Fresca


Agua fresca is served at food stands throughout Mexico and is the perfect foil to spicy dishes. It's also one of the most refreshing drinks and excellent for cooling off on a hot summer day.

Cucumber Melon Agua Fresca
Hands-On Time: 10 minutes
Ready In: 10 minutes
Serves: Makes about 8 cups

Ingredients:

4 pounds of watermelon
1 large cucumber
2 Tablespoons lime juice
2 cups water
Sweetener as needed (sugar, Stevia, etc.)

Directions:

1. Remove rind and seeds from watermelon. Cut into cubes.
2. Peel cucumber and cut into chunks.
3. Puree fruit in a a blender until smooth - this can be done in batches if necessary.
4. Add water to fruit and stir well. Strain through a fine mesh sieve.
5. Add lime juice to taste. Many times the fruit is sweet enough that very
little sugar is needed, use as you desire.
6. Serve over ice.