Pages

Pages

Wednesday, May 29, 2013

Raspberry Chocolate Cannoli

Raspberry Chocolate Cannoli
Last night we had a fabulous dinner. Really. I didn't realize just how fabulous until my social media outlets were all abuzz about it. I made braciole and homemade ravioli with my near-famous marinara. The kids loved it and so did the man. I only took phone photos (and it was rainy and yucky here so none were very good) and put them together so you can glimpse what was going on in my kitchen yesterday.

braciole and candy wrapper ravioli
Braciole with filling, rolled and tied, browned, covered in sauce, eggs and flour, pasta dough and machine, "candy wrapper ravioli (filled with Asiago and ricotta) and the finished dinner: Braciole sliced and ravioli cooked al dente before frying in butter.

The only thing that would have made this meal better would be these (or any!) cannoli. Italian cannoli can seem fancy and difficult to make, but with pre-made shells they're a breeze to do. Once finished they can be served with a special dinner or a simple dessert that kids love. Usually made with cinnamon, it's been swapped out here for raspberry extract.

Raspberry Chocolate Cannoli
Printable Recipe
Hands-On Time: 15 minutes
Ready In: 15 minutes
Serves: 6

Ingredients:

6 ready-made cannoli shells
15 ounces ricotta cheese
1/2 cup confectioner's sugar
1/4 teaspoon raspberry extract
1 -2 Tablespoons heavy cream - as needed
1 cup mini chocolate chips
Fresh raspberries - optional

Directions:

1. Whisk together ricotta cheese, confectioner's sugar and raspberry extract until smooth. Add heavy cream if needed. The mixture should be thick enough to pipe and hold its shape.
2. Fold in mini chocolate chips.
3. Transfer filling into a large pastry bag fitted with no tip and a large opening or a large round tip.
4. Pipe filling into each prepared shell, filling each in the center and out to the open ends.
5. Serve immediately with fresh raspberries if desired.

Thursday, May 23, 2013

Cooking with My Kids

Kids Making Pizza
Five of the Kids Making Pizza
I've been raising children for 23 years now and by the time I've "raised" them all (you know, to the magical age of I'm-never-moving-out-18) I'll have been raising kids for 35 years. That's a lot of kid time and a whole lot of meals, especially as there are so many of them.

One in a while I let go of my OCD self and let them help cook. The results aren't always perfect and I find myself looking over shoulders and correcting, but usually they have a good time. Kids are always more likely to eat something they've helped prepare, so it helps me avoid uneaten meals and rounds of, "Ew! I can't eat that!"

Kids Making Pizza
Another Pizza Night

Not all of the kids are adept at cooking and several just flat out would rather eat, but my 8 year-old, Ian, is something of a whiz in the kitchen. Ian is on the Autism spectrum with high functioning Asperger's. He is bright and cute and loves to be in the kitchen with me. He is also frustrating as hell and some days just the sound of his voice makes me a nervous wreck - you never know what he'll be ready to dish out on any given day. Once I have him in the kitchen, though, he is calm, focused, ready to learn and non-argumentative. A perfect helper and very good at what he does.

Kids Cooking
Ian Cooking Spinach

All of the kids have helped when we make pizza together and they all love that; they can choose whatever toppings they like, stretch their pizza into whatever shape they like and take as much time getting it together as they like. Beyond pizza, though, the other kids don't really like to be in the kitchen helping ... they'd rather hover like buzzards waiting to go in for the kill.

Kids Cooking
The Littlest Munchkin, Lara, Making Pizza

Not too long ago Ian asked (as always) if he could help prepare dinner. I was making fried chicken that night and was convinced there was nothing he could help with. He watched me use a standard breading procedure for chicken cutlets and then announced that he could do it.

I reluctantly told him he could and then explained "wet hand - dry hand" to him. Off he went. He did so well with it that I almost couldn't get the chicken fried fast enough. He truly excelled at breading chicken. I was so amazed and proud I had to take a picture of him - which he loved.

Kids Cooking
Ian Breading Chicken
As soon as his part was done and I assured him there was nothing else I needed help with, he ran off and got into trouble with his siblings. But, while he's in that kitchen with me, with his hands flying and his brain chill and concentrating on the task at hand, he's fine. We talk, he asks questions about what we're doing,  and he even tells me, "I'm learning so much from you, mom!". This from the same child who will tell me he hates me when I won't let him have his way.

I'm thinking a culinary path is in his future, and that would be just fine with me ... because some day HE will be the one making dinner for me.


Monday, May 20, 2013

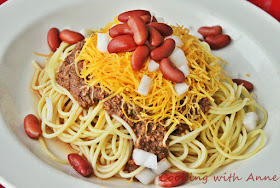
Cincinnati Chili

Cincinnati Chili
Cincinnati Chili


Cincinnati Chili is not only well-loved but well-debated. Ask anyone who lives in, or once lived in, Cincinnati and they will tell you exactly what their chili should or shouldn't contain. They'll also tell you which chili parlor (there are more than 140 in Cincinnati) is the best and which 'way' they prefer their bowl.

Its origins being Greek in nature, the spice blend is different than Texas chili, and the beans are an option, not a must. Cinnamon, allspice and cumin are heavy-hitters in this chili and the flavor is like no other.

There's no denying the intrigue and fun of this dish, though and this version is as close to the 'real-deal' as you may find. I'm sure I'll hear an argument to the contrary, and from passionate Cincinnati Chili lovers, I'd expect no less.

Cincinnati Chili
Printable Recipe
Ready In: 3 hours
Serves: 6

Ingredients:

1 pound ground round
3 cups water
3 Tablespoons tomato paste
1 teaspoon ground cinnamon
1 clove garlic, minced
1 bay leaf
1 Tablespoon chili powder
1/2 teaspoon allspice
1 teaspoon paprika
1 Tablespoon ground cumin
Salt and ground pepper to taste
1 pound spaghetti - cooked and kept warm
2 cups kidney beans - cooked and kept warm
8 ounces finely shredded sharp cheddar cheese
1 medium white onion - chopped

Directions:

1. Break up ground round as finely as possible and add to a large pot. Add water, tomato paste, garlic, bay leaf and spices. Cook at a simmer (medium-low heat), breaking up beef as it cooks so it will be very fine. This is important to the end product.
2. Cook beef for a total of 3 hours, leaving the grease that forms on top - that's a vital part of the flavor. Remove the bay leaf and stir well. Season with salt and pepper as desired.
3. For the different 'ways' to eat Cincinnati Chili, follow the instructions below:

2-way: Cooked spaghetti topped with chili.
3-Way: 2-way with shredded cheddar added on top.
4-Way: 3-Way with diced onions on top.
5-Way: 4-Way with cooked kidney beans added on top.


Wednesday, May 15, 2013

Honey Granola

Honey Granola
Honey Granola


More honey! I really do love that golden stuff. In fact, check out my last post for a great dinner idea using honey. In the meantime, this one is awesome. Honey Granola combines many flavors and textures and is a great as a snack or even a cereal on its own or a topping for yogurt. Use any nut or dried fruit you like to change up the flavors.

Have your kids help in the kitchen with mixing and they'll be even more likely to want to eat this healthier-than-most snack. Serve it up in something cute (see photo) and it will be a big hit!


Honey Granola
Printable Recipe
Hands-On Time: 10 minutes
Ready In: 45 minutes plus 30 minutes cooling time
Serves: Makes 7 cups

Ingredients:

4 cups rolled oats (not instant or quick cooking)
1/2 cup shelled sunflower seeds
1/2 cup raw shelled pumpkin seeds
1 cup whole raw almonds
1 teaspoon ground cinnamon
1 cup dried apricots - chopped
2 Tablespoons flax seed oil
3 Tablespoons vegetable oil
1 cup honey

Directions:

1. Preheat oven to 325 degrees F. Line a baking sheet with parchment paper.
2. Stir together oats, seeds, nuts, cinnamon and fruit in a large bowl.
3. Blend honey and oil and pour over oat mixture.
4. Stir together until everything is well coated and spread evenly on baking sheet.
5. Bake for 20 minutes and stir well. Bake for another 15 minutes or until golden and beginning to dry.
6. Cool for half an hour before storing in an airtight container for up to 2 weeks.


Monday, May 13, 2013

Apricot and Honey Chicken

Apricot and Honey Chicken


One of my very favorite food producers is the honey bee. In fact, my grandfather kept bees and collected honey, something I've been wanting to do for some time. Honey bees have been in real danger over the past few years and at our house we try to do our part by growing bee-friendly plants in our garden. Honey is one of the best sweeteners for many reasons, but bees also help with our delicate eco-system by pollinating many plants, not just flowers. Check out SaveHoneyBees.org for information on how you can help.

Apricot and Honey Chicken is simple and quick and a great meal for a warm evening. Pair with a very green salad for a lighter meal that still satisfies.

Apricot and Honey Chicken
Printable Recipe
Hands-On Time: 15 minutes
Ready In: 1 hour
Serves: 4

Ingredients:

5 Tablespoons honey
6 dried apricots - diced
1/3 cup apple juice
2 boneless, skinless chicken breasts - about 1 pound
1/2 teaspoon salt

Directions:

1. Preheat oven to 350 degrees F. Spray a 9x13 baking dish with cooking spray and set aside.
2. Cut chicken breasts is half horizontally to form 4 thin cutlets. Sprinkle with salt and set in prepared pan.
3. Combine apple juice, honey and apricot halves together in a pan. Simmer gently for 10 minutes. Remove from heat and cool for 15 minutes. Process or blend until smooth.
4. Brush apricot mixture over chicken and bake until chicken is done, about 25 minutes.


Friday, May 10, 2013

Red Velvet Truffles


Red Velvet Truffles
Red Velvet Truffles

Red velvet cake isn't anything new and neither are red velvet truffles, but I had to make these anyway. I started out a couple weeks ago attempting to make a version that was a riff on the Cookie Dough Bites I made for Disney (see Family.com or Spoonful.com for the recipe), adding cocoa powder and red food coloring, but the result was less than desirable and too heavy.

I went back to the drawing board, read other recipes and then, as usual, did my own thing. These truffles are truly delicious. They aren't heavy and aren't too sweet. The white chocolate surrounding them is the perfect complement to the rich centers.

I first thought of doing the usual crumbled cake and icing, but I felt it would be too sweet. I went with straight up cream cheese and then tried the "dough" once it was together. I was skeptical and wrestled with myself about adding powdered sugar. I'm really glad I didn't.

I also didn't use the usual white coating or white chocolate chips that can sometimes be cloyingly sweet. I instead went with Ghirardelli white chocolate baking bars and the end result was exactly what I was looking for; a rich center that wasn't too sweet or heavy surrounded by a creamy smooth exterior. I'm not specifying a box size for the cake or a recipe for red velvet because most people have their own favorite brands and/or recipe.

I didn't add extra red food coloring, I think the usual color of red velvet is pretty enough and with the off-white of the baking bar the truffles are very classy.

Completely crumbed cake.

Cream cheese added to crumbs.

Baking chocolate bar.

Adding truffle to chocolate.


Perfectly dipped truffle.


Red Velvet Truffles
Printable Recipe
Hands-On Time: 25 minutes
Ready In: 1 hour 25 minutes
Makes: 36 truffles

Ingredients:

One 9x13 size red velvet cake - completely cooled
8 ounces cream cheese - softened to room temperature
4 bars white baking chocolate (16 ounces total)

Directions:

1. Crumble cake completely into a large bowl.
2. Add cream cheese and mix with hands until completely combined with no streaks of cheese showing.
3. Roll between palms into 1" balls and set on a cookie sheet until all are rolled.
4. Melt chocolate in a double boiler or in the microwave until smooth.
5. Dip truffles in melted chocolate and set back on cookie trays.
6. Let stand until hardened or put into freezer until set. Serve at room temperature.

Thursday, May 09, 2013

Ponzu Chicken with Sesame Green Beans and Potatoes

Ponzu Chicken
Ponzu Chicken

Ponzu is a popular Oriental marinade made of soy and citrus. The salty sweet flavor pairs well with chicken and any citrus choice you like can be used for this, try changing it each time for a new flavor. The flour helps to thicken the sauce just right and no salt is needed with the soy sauce being used. Don't marinate longer than 2 hours total or the chicken will begin to 'cook' and turn mushy.
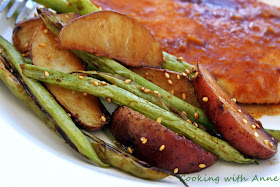
Sesame Green Beans and Potatoes

I like to serve the chicken with fresh green beans and red potatoes that make perfect partners when brought together with soy and sesame. Toasted sesame seeds can be bought or made. Tossing gently in a hot pan for a few seconds is all that's needed to bring out the nuttiness of the seeds and increase the flavor exponentially.

The sodium content between these two can be quite high, so a lower sodium soy is advised. I always use a good brewed soy sauce. The imitation soy is NOT the same in flavor and can actually make a good dish bad. Kikkoman is an excellent brand of soy and ponzu sauces.


Ponzu Chicken
Printable Recipe
Hands-On Time: 15 minutes
Ready In: 35-45 minutes
Serves: 4

Ingredients:

2 Tablespoons vegetable oil
2 (about 1 pound total) large boneless, skinless chicken breasts
1/4 cup flour
1 clove garlic - minced
1/2 cup soy sauce
3 tablespoons fresh citrus juice such as lime, lemon or orange
1 Tablespoon Mirin (sweetened rice wine) or 1 teaspoon granulated sugar

Directions:

1. Cut chicken breasts in half horizontally so you have 4 thin slices. Set aside.
2. Combine soy sauce, juice, garlic and Mirin or sugar in a large bowl. Stir until well combined and add chicken breasts. Marinate for 20 - 30 minutes.
3. Heat oil in a 10-inch skillet over medium heat. Dredge chicken in flour until each piece is evenly coated. Fry in oil for 3 minutes per side until golden.
4. Pour remaining marinade over chicken and cover with a lid. Cook for another 3 minutes. Serve with sauce over each piece.


Sesame Green Beans and Potatoes
Printable Recipe
Hands-On Time: 5 minutes
Ready In: 15 minutes
Serves: 4


Ingredients:

1/2 pound fresh green beans
4 medium red-skinned potatoes
2 Tablespoons vegetable oil
1 Tablespoon sesame oil
1 clove garlic, minced
2 Tablespoons soy sauce
2 tablespoons toasted sesame seeds

Directions:

1. Snap ends off green beans and set aside. Wash potatoes well and cut each into eight thin wedges.
2. Heat oils in a large skillet over medium heat. Add potatoes on the bottom, topped with green beans and followed by garlic. Do not put garlic directly into oil or it may burn.
3. Lid tighly and cook for 10 minutes, checking every 2 minutes to stir so vegetables cook evenly. Check to make sure potatoes are soft and green beans are crisp-tender. Cook for another 3 minutes if vegetables are not done.
4. Sprinkle vegetables with soy sauce and sesame seeds at the end of 10 minutes and toss well to coat.


Wednesday, May 08, 2013

Lemon Ricotta Pancakes

Lemon Ricotta Pancakes
Lemon Ricotta Pancakes with Raspberry Preserves
Mother's Day is almost here! What is the mom in your life eating this Sunday? Breakfast at a restaurant? Brunch at home? How about breakfast in bed with these delicious little pancakes?

These quick pancakes are full of flavor. A burst of bright lemon is infused in each bite and the deep red raspberry preserves on top add extra flavor. Simple enough for a weekday breakfast but special enough to serve to guests, these fluffy pancakes are a favorite in our house.

I've even made these at work for my clients and they are always met with rave reviews and the plates are empty and tummies full. Give them a try and, as always, let me know how you liked them!


Lemon Ricotta Pancakes with Raspberry Preserves
Printable Recipe
Hands-On Time: 20 minutes
Ready In: 20 minutes
Serves: 4

Ingredients:


Zest of 1 lemon - about 1 Tablespoon
2 Tablespoons granulated sugar
2 cups flour
1 Tablespoon baking powder
1/2 teaspoon salt
1 cup whole milk ricotta cheese
2 eggs
1/2 to 1 cup milk or buttermilk
1 teaspoon vanilla extract
1 cup red raspberry preserves, with or without seeds, whichever you prefer


Directions:

1. Combine lemon zest with sugar and rub together with your fingers until fragrant and moist. Set aside.
2. Stir together flour, salt and baking powder, set aside.
3. Blend eggs, milk, ricotta and vanilla. Fold lemon and sugar to wet ingredients. Add to dry ingredients and mix until just combined. Batter will be slightly lumpy.
4. Drop by 1/4 cupful onto a hot griddle and cook until bubbles appear on the surface of the pancake. Turn and cook for 1 minute longer. Set aside and keep warm until all pancakes are cooked - there will be 12 - 14.
5. Heat preserves until smooth and liquid. Plate pancakes, 3 to a plate, and top with 1/4 cup of preserves.

*Note: For a faster version you can use 2 cups of instant pancake mix and 1 1/4 cups of water in lieu of the pancake batter.


Sunday, May 05, 2013

Arroz Con Pollo with Three Olives

Arroz con Pollo
Arroz con Pollo

Chicken and rice is a great staple for dinner, but when it's Arroz con Pollo, it's even better! This version has 3 different olives in it, added before most of the cooking so they soak up all the lovely flavors mingling in this dish. Cooking it with bite-sized chunks of chicken rather than whole pieces speeds the process so this delicious dinner is ready in no time.

Arroz Con Pollo with Three Olives
Printable Recipe
Hands-On Time: 20 minutes
Ready In: 60 minutes
Serves: 8
Cost Per Serving: $1.25

Ingredients:

2 Tablespoons olive oil
2 garlic cloves - minced
1/2 cup sliced green onion
1 large green pepper - diced
1 pounds boneless skinless chicken breasts - cut into 1-inch cubes
5 cups chicken broth
2 1/2 cups long-grain rice - uncooked
1 cup frozen peas
2 cans (28 ounces) whole tomatoes - diced and drained well
1/3 cup Spanish olives
1/3 cup ripe black olives - pitted
1/3 cup ripe green olives - pitted
2 teaspoons paprika
1 bay leaf
pinch saffron - optional

Directions:

1. Heat a large deep skillet over medium-high heat and add oil. Saute green peppers until they start to sweat or leach juices. Add garlic and onion and stir.
2. Scoot veggies to the side of the pan making a clear center. Add chicken and cook just until no longer pink.
3. Remove veggies and chicken and stir in stock, rice, peas, tomatoes, olives, paprika and saffron and bay leaf. Add chicken and veggies back in.
4. Lid tightly and reduce heat to low. Cook for 20-30 minutes or until rice is tender.
5. Remove bay leaf, fluff rice and serve.


Friday, May 03, 2013

Slow Cooker Goulash


It's finally warming up here in eastern Pennsylvania which is a blessing and a curse at once. I'm thrilled that winter has finally ended, but warmer weather in Pa more often than not brings high humidity. Some days even the A/C can't cut through it and cooking is the furthest thing from my mind.

There were years we didn't have A/C and learning to feed everyone regardless of the climate was always a challenge. I put my slow cooker to good use for those days and it helped immensely to keep the heat in the kitchen to a minimum.

This is one recipe that I love for its simplicity. it packs a lot of flavor and is very easy to put together.
Goulash is a Hungarian staple though this version is not truly Hungarian in nature and more Americanized with the use of noodles rather than potato dumplings. Slow cooking the beef makes it fork-tender and the resulting sauce is heavenly. Chuck roast is best, but other cuts of beef will work well with the low-and-slow cooking method.

Slow Cooker Goulash
Printable Recipe
Hands-On Time: 10 minutes
Ready In: 6 hours
Serves: 6 to 8

Ingredients:

2 pounds chuck roast cut into 1-inch cubes
1 large yellow onion - diced
3 cloves garlic - minced
2 Tablespoons tomato paste
2 Tablespoons Worcestershire sauce
3 Tablespoons Hungarian paprika
1 teaspoon ground caraway seed
1 teaspoon Kosher salt
1 teaspoon sugar
2 Tablespoons flour
1 cup water
10 ounces wide noodles - cooked
sour cream for garnish

Directions:

1. Place beef in the bottom of a slow cooker liner. Top with onion.
2. Combine water, tomato paste, salt, paprika, sugar, Worcestershire, caraway and flour together until well blended.
3. Pour over beef and onions and set slow cooker to low heat. Cook for 4-6 hours on high setting or until beef is very tender. Taste for seasoning and add salt as needed.
4. Serve beef over hot cooked noodles and top with sour cream as desired.


Wednesday, May 01, 2013

Asparagus and Leek Quiche

Asparagus and Leek Quiche


Quiche is delicious any way you slice it, but spring veggies like leeks and asparagus make it even better. Lightly sauté the asparagus to bring out even more flavor. Change the cheese to anything you like if Swiss is too heavy for your palate, and use green onions in place of the leeks if desired.

Asparagus and Leek Quiche
Printable Recipe
Hands-On Time: 10 minutes
Ready In: 60 minutes
Serves: 8

Ingredients:

1 pie crust
3 large eggs
1 1/2 cups light cream
1 teaspoon salt
1/4 teaspoon white pepper
4 ounces Swiss cheese - shredded
2 Tablespoons olive oil
1 leek - split lengthwise and rinsed well to remove sand and grit
8 spears asparagus cut in 4-inch lengths

Directions:

1. Preheat oven to 400 degrees F.
2. Fit pie crust into an 8-inch pie pan and crimp edges. Weight with beans or other pie weights and bake for 10 minutes. Remove weights and set aside.
3. Beat eggs until light and lemon yellow in color. Stir in cream, salt, pepper and cheese.
4. Slice leeks thinly and cook in olive oil over medium heat until limp. Add asparagus and cook for another 5 minutes until spears are crisp-tender.
5. Pour half of the egg mixture into the par-baked crust and bake for 10 minutes.
6. Top baked egg mixture with asparagus spears, fanning them out from the center like the spokes of a wheel. Sprinkle with cooked leeks and top with remaining egg mixture and put back into the oven.
7. Bake for an additional 30 minutes or until top is puffy and set. Cool for 10 minutes before cutting.